My beloved Hewlett Packard 48GX quit on me the other day right in the middle of a calculation. I immediately checked the batteries and discovered that at least two of the three batteries had begun to leak and had white crystals growing on them:
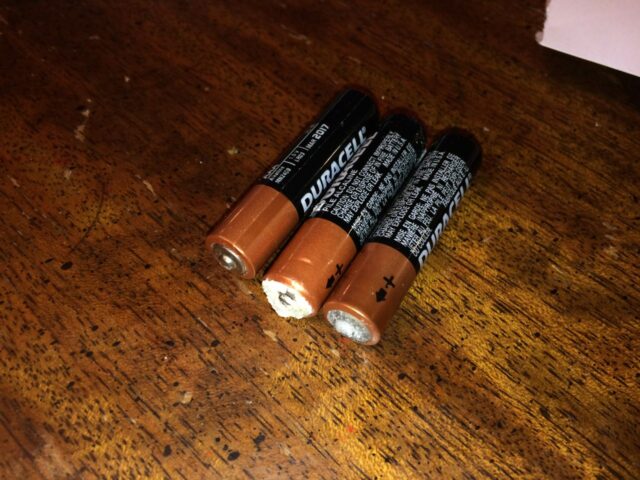 |
| Corroded Duracell batteries from my HP 48GX |
I was quite surprised to see this because I didn’t really realize batteries did this anymore. I took out the old batteries, scraped off the corrosion from the battery terminals with my pocket knife until they were shiny and reinstalled 3 fresh AAA batteries. To my great shock the calculator would not come back on–nothing. I tried another set of batteries and they wouldn’t work either. I even checked the voltage of the three batteries in series (on the calculator connector side) and the voltage looked good, as you can see below. The batteries are in series so the total voltage should be around 1.5 + 1.5 + 1.5 = 4.5 Volts.
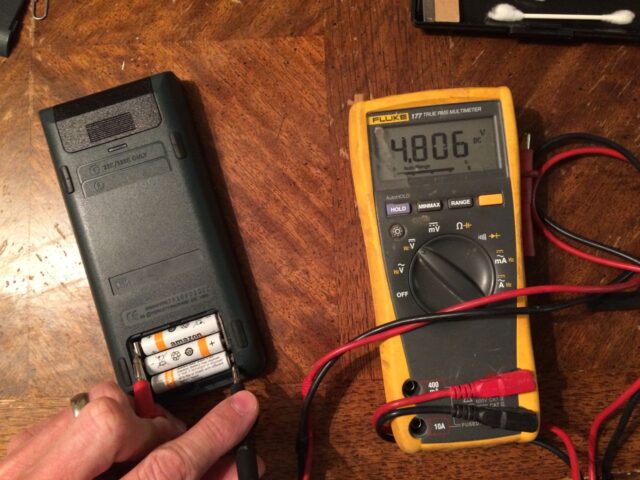 |
| Checking the battery voltage of an HP 48GX |
I then decided to call Duracell, because I was convinced that their batteries had ruined my 20-year-old calculator. You can call them via the US and Canada at 800-551-2355. They were nice and filled out a case for me and said they would mail me a shipping label to mail in my calculator. They said it would take 3-4 weeks to get the mailing label and then another 6-8 weeks to hear back from them (they said they would call me to tell me what they were going to do).
How to Fix a HP 48GX That Will Not Turn on After Changing Batteries
I also began to research what it would cost to purchase a replacement. HP doesn’t make the 48GX anymore but used HP 48GX’s average about $200 on ebay.com for the ones in good condition. I really didn’t want to fork over $200 at the moment and was going to see what I could do on my own without damaging the calculator. The calculator is “rugged” and therefore very well put-together and I have read that the case is riveted and snapped together. There are some tutorials on how to open it but it isn’t for the faint of heart. You can read a one good one I found here. Don’t break to that link too fast though if you have had the same issue as me because you don’t need to break open your HP quite yet. In the meantime (waiting for Duracell’s 3-4 weeks to tick by–I only made it to day 2!) I began to scour the internet to find a solution. I found websites dedicated to these old HP calculators and people who repair these for a living (like this guy here, who actually isn’t taking any more calculators at the moment because he has such a backlog of repairs to do). Finally I found a site that helped me figure out how to do this (site does not exist anymore). Here’s the steps with lots of pictures:
Step 1: Put fresh batteries in the 48GX.
Note that the top battery has its positive pointing to the left, the middle one has its positive to the right, and the bottom one has it’s positive to the left. I don’t know why I’m explaining that–if you know how to use RPN you know how to install batteries (but I like to be very thorough in my tutorials).
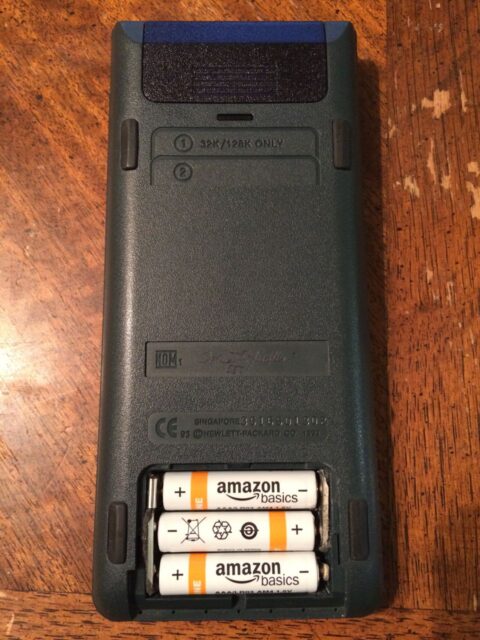 |
| Battery orientation in HP 48GX |
Step 2: Lay the HP 48GX face down.
This is with the expansion slot at the top and battery cover at the bottom.
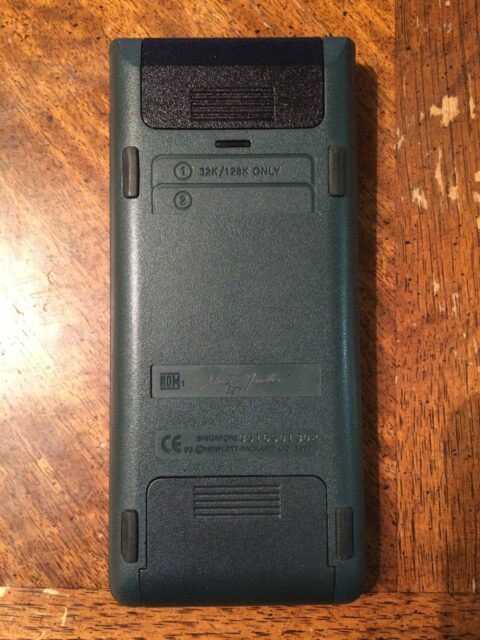 |
| HP 48GX Face Down |
Step 3: Pry out the top right rubber foot.
Some people say it is marked with an “R” but there’s no R on my calculator. I thought it may have been held in place with adhesive but the rubber feet are actually plugs that fit in a hole and are simply held in place by friction. You can pull it out with your fingernail:
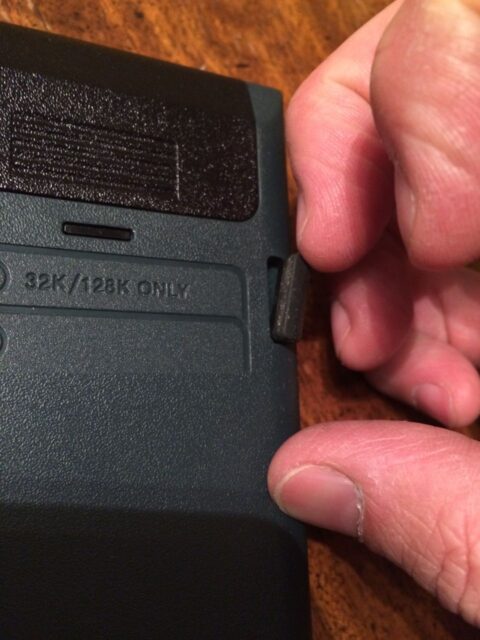 |
| Prying out the top right rubber foot of the HP 48GX |
The rubber foot pulled out:
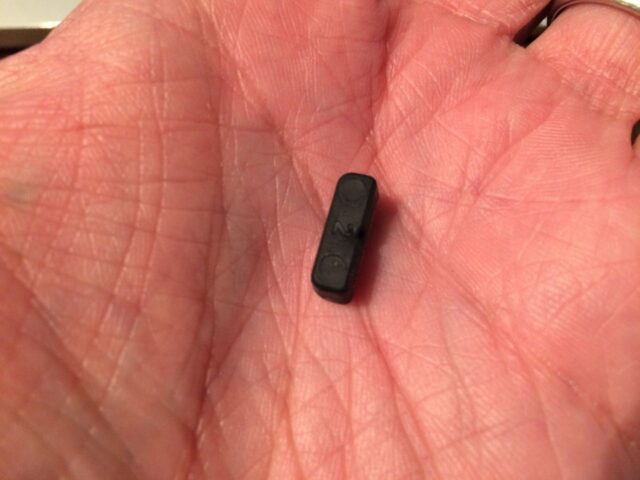 |
| HP 48GX Rubber Foot pulled out |
Step 4: Insert a paperclip straight into the reset hole and gently press.
I couldn’t really feel any tactile feedback when I pressed the reset button like you do some similar “paperclip in hole” reset buttons (like in routers, etc) so don’t kill it and push real hard–it didn’t take much pressure at all for me to reset mine.
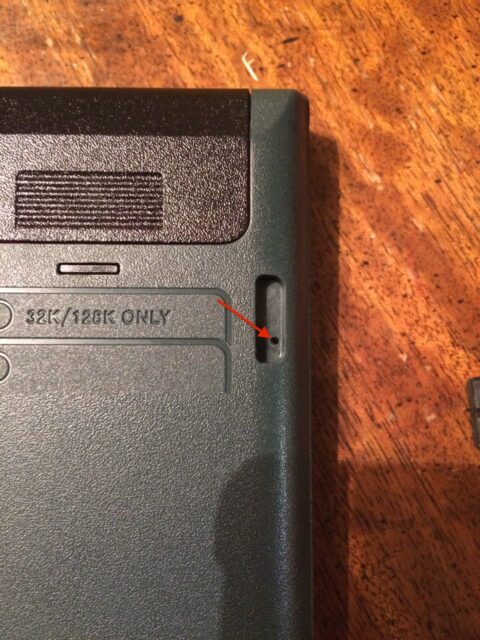 |
| HP 48GX Reset Hole |
All I had handy was a large paperclip (versus the standard smaller type) and it fit into the hole fine. Press and release the reset button.
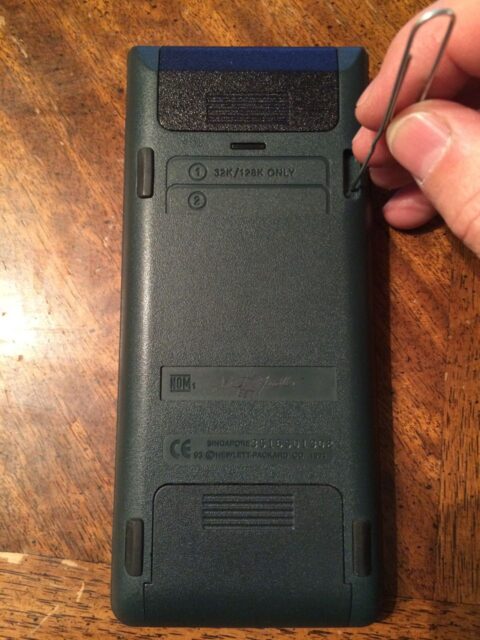 |
| Using a paperclip to press the reset button on a HP 48GX |
Step 5: Turn on your HP 48GX.
Now I have my 20-year-old reverse Polish notation friend back! I’m so happy 🙂
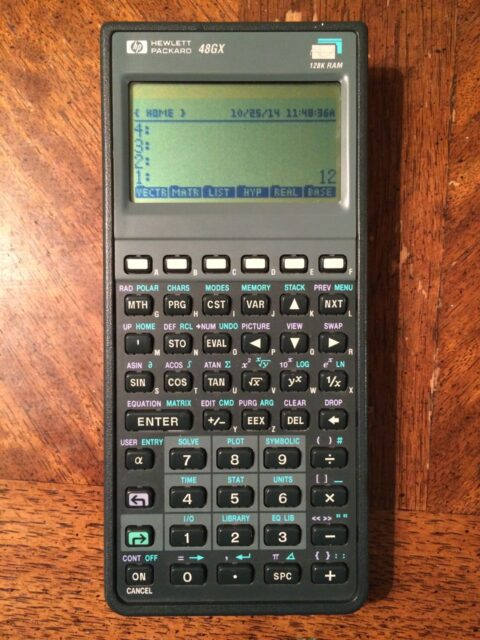 |
| HP 48GX Back On Again!! |
One thing to note. In all the things I attempted to do at first, I tried pressing the ON button in combination with a lot of other buttons, so when I first got the calculator to turn back on it looked like this:
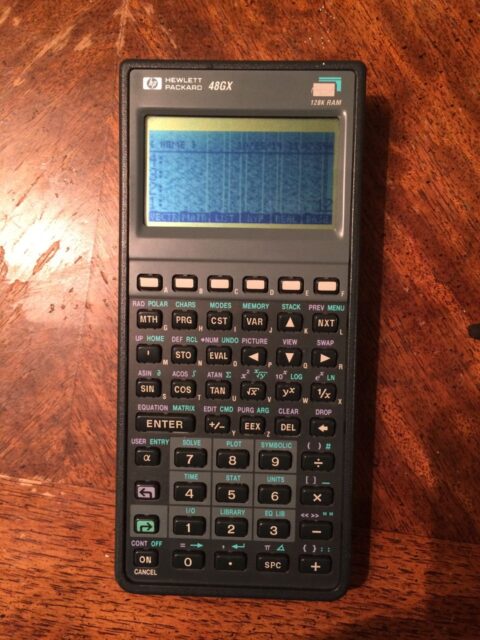 |
| HP 48GX with Contrast Too Dark |
How to adjust the contrast on a HP 48GX
With the power on, press and hold the ON button while pressing the – button to lighten the contrast and the + button (while holding the ON down) to darken the contrast.
Amazon Associate Disclosure: As an Amazon Associate I earn from qualifying purchases. This means if you click on an affiliate link and purchase the item, I will receive an affiliate commission. The price of the item is the same whether it is an affiliate link or not. Regardless, I only recommend products or services I believe will add value to Share Your Repair readers. By using the affiliate links, you are helping support Share Your Repair, and I genuinely appreciate your support.

You saved the day. Thank you so much.
THANK YOU!! It worked – I’ve had this calc since 1995 and LOVE it – this saved my calc
Good to hear, Jerremy. I love my 48GX and still use it as my primary calculator at work.
The corroded batteries on my HP 48GX made the end contacts come loose. Putting them back in place with new batteries and then trying the paperclip remedy failed to reboot the calculator. Must I do something else to get the batteries engaged first? Thanks for any help you can give me: hate to lose my HP 48GX
Calvin, I’m guessing that the contacts you are referring to, which came loose, are the long ones that span the ends of two batteries, and had been held in place with some black foam. There are two of these, one that spans the left side of the 2 lower batteries, and one that spans the right side of the 2 upper batteries. They are both mounted on foam. All these need to do is make good contact with the ends of the batteries as they are connecting the batteries in series. They connect the batteries like a backward S, starting at the top left, going right, then down, back to the left, then down, then across to the right. Clean the metal plates with sandpaper (an Emory board will work too) till they are shiny, and just hold them in place until the batteries are seated, and then they should stay in place. If the foam is gone, you’ll need to replace it with something else that makes the battery fit tight. You could use some double-sided adhesive foam or even just fold up some paper if you’re in a pinch. Additionally, the top left and lower right permanent battery contacts must be clean, as they are the only 2 contacts that connect the batteries to the calculator.
Just before you responded, I thought I’d try once more to clean the contacts better (some sandpaper). Then, using newly purchased batteries (maybe the “new ones” I had put in from desk drawer were too old?), I went through the process again: install batteries, poke the hole with a paperclip, turn it on. Now it worked! I have my old 48GX back again. Many thanks for your posting and help.
Great to know, I was in your shoes once and searching for how to buy another GX. I’m glad you too were able to get yours running again! Thanks also for the donation to Share Your Repair, I really appreciate it.
I too am a happy camper. However I had some difficulty. After cleaning the one corroded battery terminal, pulling the rubber foot pad and sticking a paperclip in nothing happened. In my calculator I could feel a definite switch moving as I depressed the paperclip. I tried several times, finally I got a message “Do you want to Recover Memory?” I did not know what to do so I hit blue shift-off. It would not come on. I let it set overnight with no batteries in it. In the morning, I removed my Structural and COGO cards, put the batteries in, did the paperclip reset and it came on asking “Do you want to Recover Memory?” . This time there was a YES above the white “A” key and a “NO” above the white “F” key. I hit “NO”. I checked that it would come on and off, put my cards back in and rebuilt all my Global variables. Good as new. I am 72 years old.
Stanley, good job at fixing your GX. Tell us what you do with your HP and all those cards!
Sweet! My HP48G is back in business. Thank you John.
Bless you brother, my 48G is back up and back to life.
It’s a good feeling isn’t it? I thought mine was gone forever and I love my 48GX so I was so happy when this trick brought it back. Thanks for sharing.
SHE’S ALIVE! THANK YOU
That’s a good feeling I can relate to!
Thank you exactly the fix i needed. Love my 48GX its only 28 years old and still going strong.
Fantastic handy hint. Thanks so much.
Thank you, fixed my otherwise reliable 48GX after a battery change 🙂
Ugh, I tried this and I couldn’t feel any tactile click of the rest button. I am simple holding ON and pressing C and it wakes up but the ON button doesn’t seem to work otherwise. How far down does the paper clip go. I tried giving it a little push but didn’t want to damage anything.
I just tested it out on mine and there is no tactile feedback. Pressing the reset on mine doesn’t cause it to turn on, I have to press the on button afterwards to get it to come on and then there’s a delay before it turns on, the first time I turn it on.
Thanks so much for this info. I bought my 48GX in 1995 and used it for all sorts of calculations and I even wrote a program to snoop on an RS232 data line so I could use it for debugging a problem with our flow meters. Today, 12/25/2019 was the first time I experienced this problem and after cleaning the connections using q-tips and vinegar I then applied cramolin contact cleaner for contact cleaning and protection. Using your procedure brought my calculator back to life.
Well Merry Christmas Phil, glad you were able to resurrect your GX.
I’ve had my HP 48GX since late 1994. This calculator has been with me almost everyday. I am so used to the RPN system, that it is hard to use any other calculator. About two weeks ago it quit working. I was devastated !! Luckily I din’t dispose of it. Today I found your write-up and tried it on mine. She is alive !!!!
Thank You so much John for your expose. I owe you one.
Felipe
Glad you were able to get your beloved GX running Felipe!
It’s been resurrected! Hallelujah! Merci Beaucoup
Glad to hear you got your 48GX going. When mine did this to me I was shopping for a replacement because I wouldn’t want to use any other calculator.
Very useful, thank you. my 21 year old HP48GX is now back to life!
Oh good, I love my HP 48! I think mine is about 25 years old.
Thanks my 1993 48G just did this and the reset worked.
Oh good, I still use my 48GX as my primary calculator at work and wouldn’t want to use any other calculator. I have an emulator for it too, on my iPhone, which I use when I’m away from my desk. It doesn’t have the tactile feel that the real thing has but I still use it as my go-to calculator when I’m out and about. Thanks for leaving a note.
Thank you for this info! I thought my 23yr old calculator died. It is back up and running again
Great to hear Shawn, I was just using my 48GX this morning at work and I wouldn’t want to do calculations on any other calculator! Go RPN!
THANK YOU THANK YOU THANK YOU You saved my life. It was not going to be worthwhile without my HP48.
Just another day on the web! Thanks for sharing. I actually had this happen to me twice over the span of about 10 years and both times it threw me for a loop, the second time I didn’t remember that it had happened the first time and had to figure it all out again. Yes, I love my 48GX and don’t even want to even balance my checkbook with anything else.