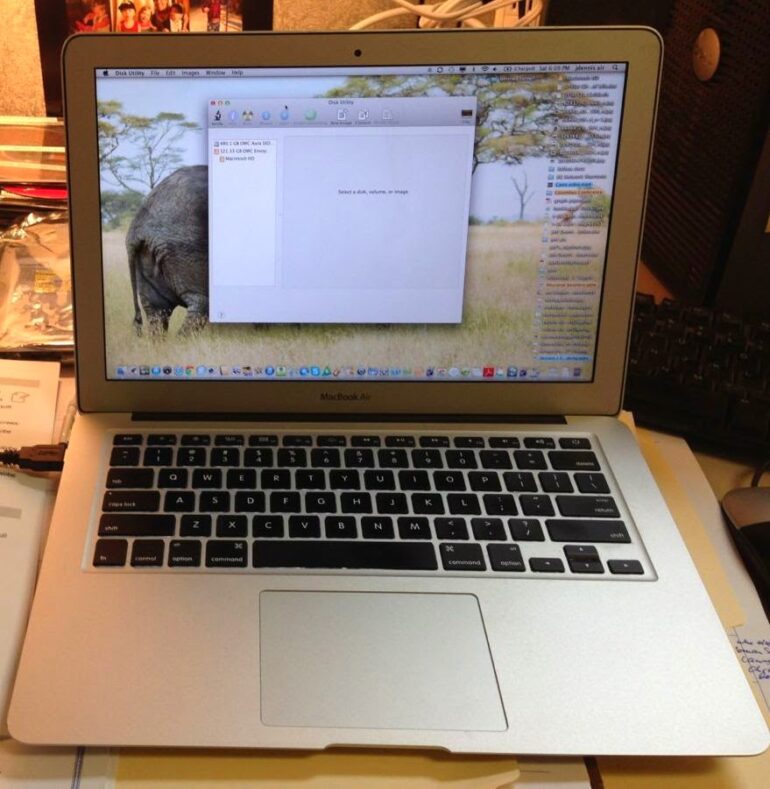
My boss was running out of space on his Mid-2011 13-Inch MacBook Air so we decided to install OWC’s after-market 480GB SSD upgrade along with their enclosure for the old drive so you can continue to use it as an external drive. Here’s how to upgrade yours as well.
How to Upgrade Hard Drive on MacBook Air Mid-2011
Hardware
- MacBookAir 4,2 Model A1369
- 480GB OWC Aura 6G SSD + Envoy Kit for MacBook Air 2010+2011: Complete Solution with Enclosure
Tools Needed:
- Pentalobe Screwdriver
(for the proprietary screws in the bottom of the MacBook Air)
- T5 Torx Bit
(for removing the screw from the SSD)
- Spudger Pry Tool
(for disconnecting battery connection on MacBook)
Step 1: Order a MacBook Air SSD upgrade kit.
I recommend OWC and have purchased a lot of after-market Apple hardware from them. Here is a link for the part we purchased. It comes with the tools you’ll need (a proprietary pentalobular screwdriver and Torx head screwdriver) as well as the external case for mounting the old drive.
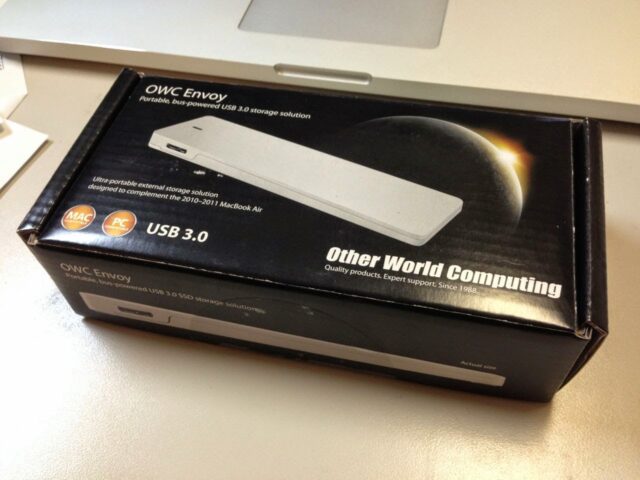 |
| Other World Computing Envoy Portable, Bus-powered USB 3.0 storage for the old MacBook Air SSD |
Step 2: Back up your data.
Even though you are not going to be deleting your old data I would still recommend having a backup before you complete such an upgrade. If you are not backing up make sure to buy an external drive and either use the free Apple Time Machine built into OS X or buy something like Carbon Copy Cloner. I use both.
Step 3: Power off your MacBook Air and unplug the power cord.
You definitely wouldn’t want the computer running when you did this upgrade.
Step 5: Download the iFixit manual from ifixit.com.
You cannot hardly beat their tutorials and I always print out a copy of them for using to keep all the different sized screws straight–this is the most helpful tip I can offer on this repair. Here is a link for the tutorial I used for this repair.
Step 5: Remove the lower cover.
Place the MacBook Air upside down on a non-abrasive surface and remove the 10 screws from the bottom of the case. These screws have pentalobular heads on them so do not try to unscrew them with a phillips or torx. The middle two top screws (that bridge the vent) are longer than the others so make sure to keep them straight.
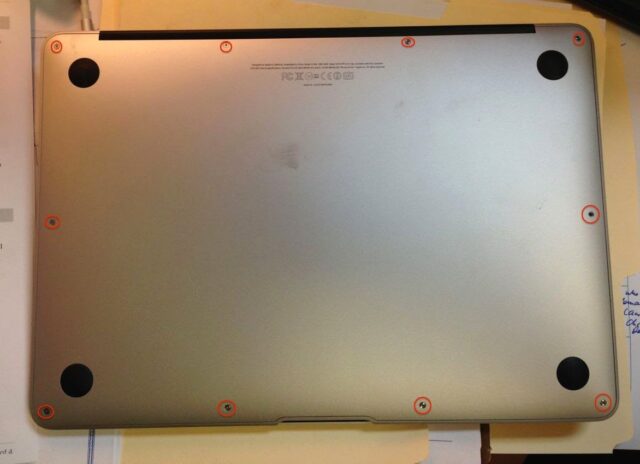 |
| Mid-2011 MacBook Air case screw locations |
I tape the screws on the printout exactly where they came from so there’s no question what to do when I reassemble:
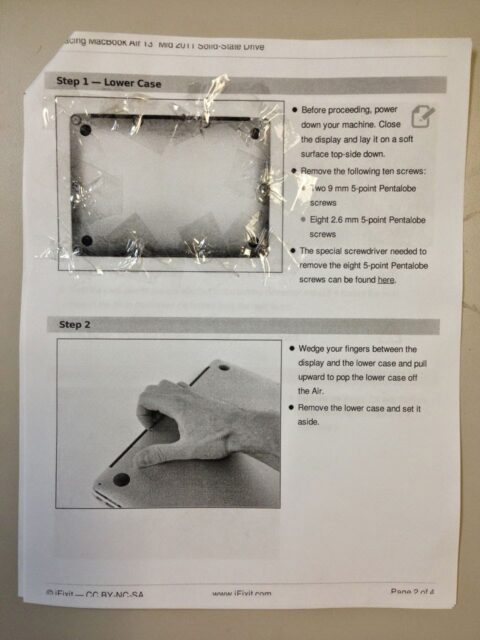 |
| My iFixit pdf printed out to tape the screws on their location of the picture |
Step 6: Carefully remove the lower case cover and set it aside.
Refer to the ifixit.com picture above to see where to put your fingernails. Below you can see the SSD outlined in red (excuse my blurry picture, it does the trick though):
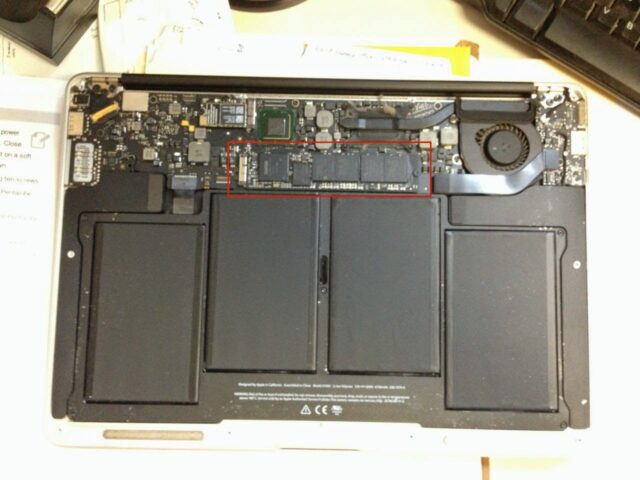 |
| Look how much space the 4 batteries take up! |
Step 7: Take static discharge precautions.
I never wear an anti-static wristband but you do want to be careful not to discharge the static on your body onto the electronics of your computer. Once you’ve opened the cover make sure to touch the metal body of the computer to ensure there is not a static charge built up on your body.
Step 8: Disconnect the Battery Connector.
To below and left of the SSD there is a battery connector with a clear tab below it. Pull the clear plastic tab straight down. Do not lift up or you could pull the connector off the motherboard. The battery wires will bend to allow you to pull the connector out. You can lay the male end of the battery connector on top of the female slot on the motherboard.
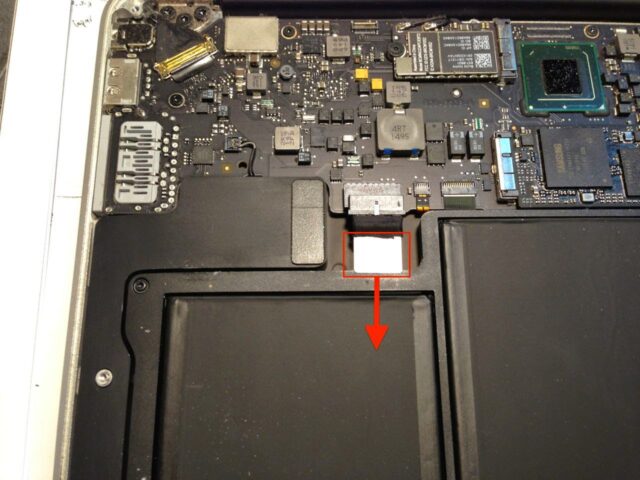 |
| Pull the clear plastic battery connector tab straight down (parallel with the surface of the motherboard) to disconnect |
Step 9: Remove the 2.9 mm T5 Torx screw from the right side of the SSD.
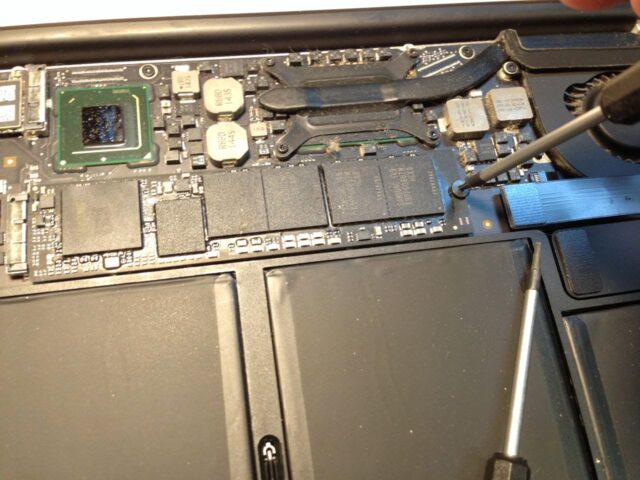 |
| Location of the single T5 torx screw securing the MacBook Air SSD |
Step 10: Pull the SSD straight out.
You may need to very slightly lift the right end of the SSD up to be able to grab it but do this as little as possible. Pull the SSD to the right straight out of its socket. You can rock it up and down slightly from the right end to get it to come out.
Step 11: Install the old SSD in the external housing (if you ordered one).
This is what you get in the box (minus the mess on my desk!):
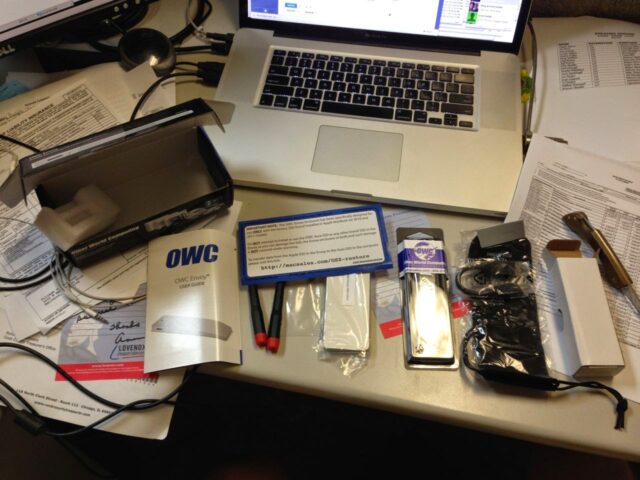 |
| Pardon my mess–here’s what came in the box. |
One thing to note is that there are two different length screws supplied with this OWC case and the longer one goes on the thick end. The case is wedge shaped to be similar with the wedge shape of the MacBook Air 🙂
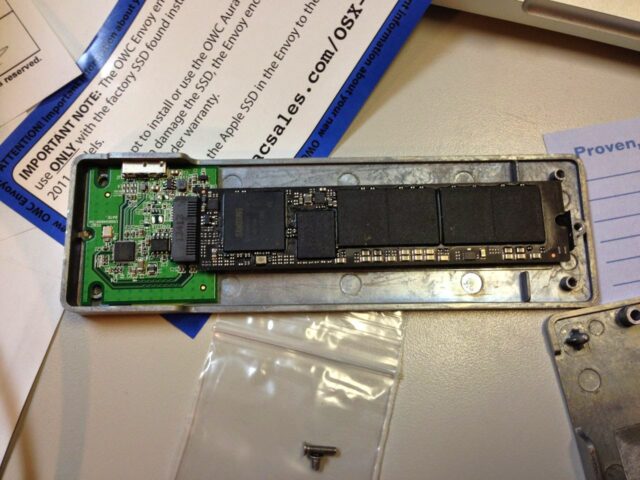 |
| Mounting the original MacBook Air SSD in the OWC Envoy Enclosure |
Step 12: Install the new SSD.
Insert the new SSD into the slot and carefully slide it in. Note that the replacement SSD has a pink heat sink sponge on the top side of it. Line up the screw hole and reinstall the original torx screw.
Step 13: Reconnect the battery.
I forgot this when I was putting this MacBook back together and had to take the case back apart. Don’t make that mistake–you don’t want to tighten those case screws more than necessary. Luckily the battery connector not being plugged in didn’t cause any problems spatially when I put the cover back on.
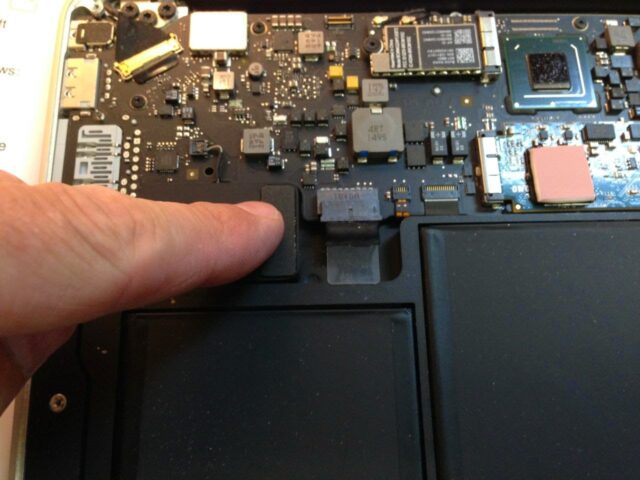 |
| Don’t forget to reconnect the battery |
Step 14: Install the cover and reinstall the 10 case screws with pentalobe heads.
Don’t forget that the center two screws on the top are the long ones.
Step 15: Connect your old SSD to the MacBook Air and boot to the recovery partition of the old drive.
Press the power button and then immediately press and hold the command button.
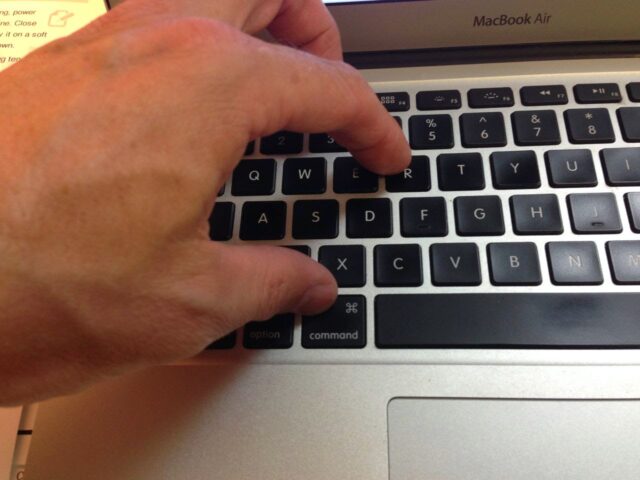 |
| Booting to the recovery partition by holding Command-R |
Step 16: Run disk utility to do a block-by-block clone of your old SSD to the new SSD.
I referred to OWC’s method 2 on this page because this Air is running OS 10.7. Click on the Restore tab at the top and then drag and drop the old drive as the source and the new drive as the destination. Note: I was only able to select the drives by dragging and dropping. I learned something in this step because until now I was unaware you could do a carbon copy clone of a drive using Disk Utility. That’s cool.
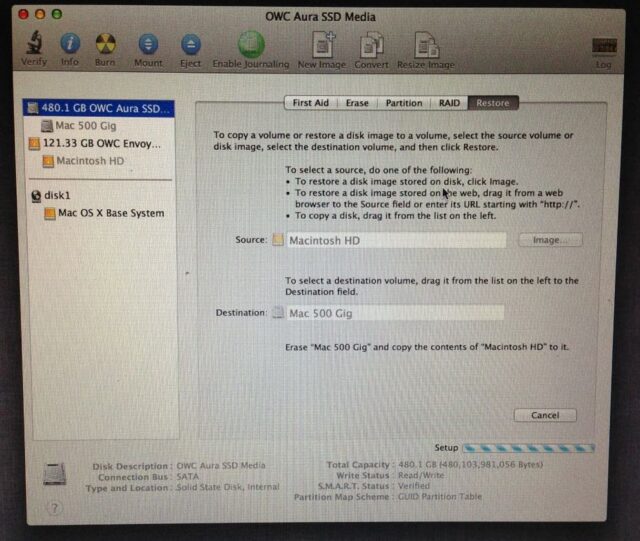 |
| Cloning your old SSD to the new SSD using disk utility |
Time to copy SSD over: approximately 1 Hour
Step 17: Disconnect the external drive and boot up.
Lots of extra space available now:
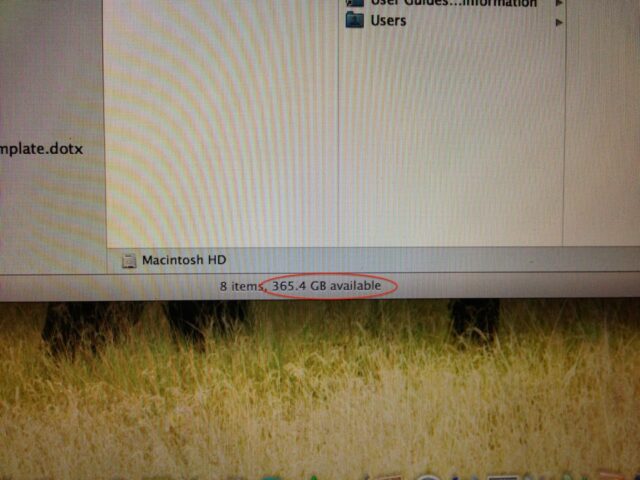 |
| 365.4 GB of free space after upgrading–that was more than we had in total to begin with |
Mission accomplished!
Other thoughts/lessons/failures:
I tried to connect the encased old SSD via USB to my other MacBook and the MacBook Air in target mode via lighting cable and was going to try to copy the old drive to the new with Carbon Copy Cloner but my computer would not even recognize the Air when I hooked it up. It may have been because the internal (new) SSD had not been formatted yet. If I had gotten real desperate I would have taken the new SSD back out of the Air and then placed it in the enclosure and then tried to format it first and then tried the above described setup again. Using disk utility from the recovery partition worked great though so I didn’t need to.
Amazon Associate Disclosure: As an Amazon Associate I earn from qualifying purchases. This means if you click on an affiliate link and purchase the item, I will receive an affiliate commission. The price of the item is the same whether it is an affiliate link or not. Regardless, I only recommend products or services I believe will add value to Share Your Repair readers. By using the affiliate links, you are helping support Share Your Repair, and I genuinely appreciate your support.

