I’ve upgraded 35-mm slide scanners and am writing about the experience. Two years ago I scanned all my father’s slides using a Braun Multimag SlideScan 4000 and wrote about the experience in another post:
How to Scan Slides on Pacific Image PowerSlide 5000 With VueScan on a Mac
Hardware:
- Pacific Image PowerSlide 5000
- Apple MacBook Pro running OS 10.9.4
- Braun Compact Slide Tray
Step 1: Purchase VueScan
Hamrick Software produces it. I purchased their professional edition in 2004 for $79.95 and have been receiving free updates all the way along and it has worked for every scanner I’ve owned and for those of you purchasing it now, it’s still the same price a decade later. It has been a great investment.Step 2: Install CyberView X5. It came with the scanner on a CD and I was able to install it on my Mac running 10.9.4. The Pacific Image driver website link is here so you can download the latest version and I recommend that (downloading the updated version).
 |
| CyberView X5 Installation Successful |
Step 3: Set up the VueScan settings.
This is the left pane of the VueScan window. It has 6 tabs at the top: Input, Crop, Filter, Color, Output, and Prefs. The online (html version) manual can be located here. I have created direct links to each section below (the titles).
Input Tab
The settings that are important on this section are (and click on the hyperlinked name to view the official manual section for that setting on VueScan’s website):
- Task: Scan to file
- Source: the scanner you want to scan with
- Media: Image (don’t use any of the other settings)
- Bits per pixel:
- Batch scan: I would always use the “List” setting because many times I wouldn’t have the cartridge completely full. This allows you to have a lot of control over the scanner and which slides in the cartridge it scans.
- Batch list:
- Frame number: this should be 1 if you are starting out on slide one–I captured this image while it was on slide 3. When you click the blue “Scan” button this number should be on the slide that is in the scanner.
- Scan resolution: This determines how good of an image you get as far as details are concerned and will determine the file size as well. I wanted the highest resolution possible so if I threw the slides away I’d be getting all I could from them digitally.
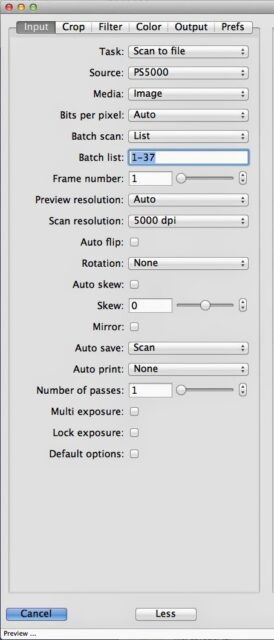 |
| VueScan Input Settings |
Crop Tab
The first time I used this software I had some problems with the cropping being off so instead of trying to play around with the settings I set it to maximum and used Photoshop’s Crop and Straighten Photos command to manually do it. I preferred this because it gave me the raw scans of each slide.
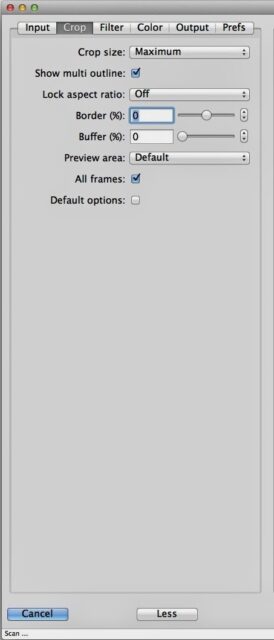 |
| VueScan Crop Settings |
Filter Tab
This is an important setting to save you a lot of time and to give you the best results. I chose the medium Infrared clean setting and below you can see the difference.
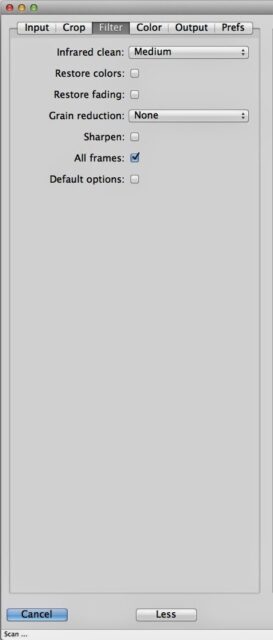 |
| VueScan Filter Settings |
Before and After “Medium” Infrared cleaning (click on the image below to see a larger version).
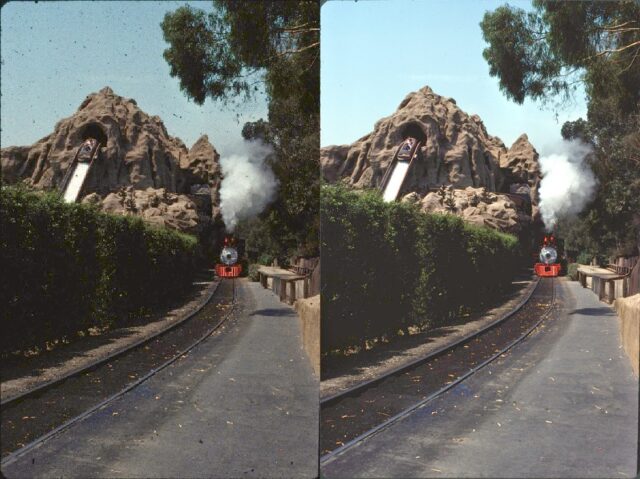 |
| Before (left) and After (right) infrared cleaning–note all the specks in the sky on the left image |
It is most visible in the sky, but you can also see it on the road as well. Here’s another great example of the amazing difference the infrared filtering does (click on the image to see a larger version):
 |
| Before and after infrared cleaning–check out the difference in the sky |
Here’s an example of where the infrared filtering didn’t quite do the job (left) and where I used Photoshop’s Spot Healing Brush Tool to fix it (right):
 |
| Fixing what the infrared filter doesn’t quite fix |
Specks like the one above are most often noticeable in large areas where there is no color differentiation. They are easy to fix though.
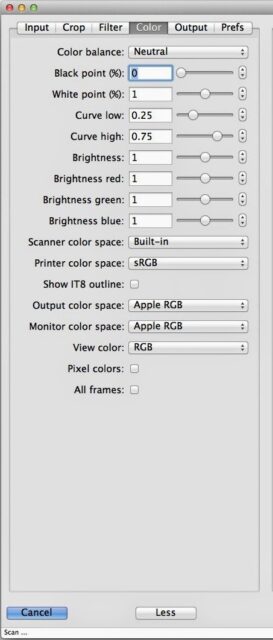 |
| VueScan Color Settings |
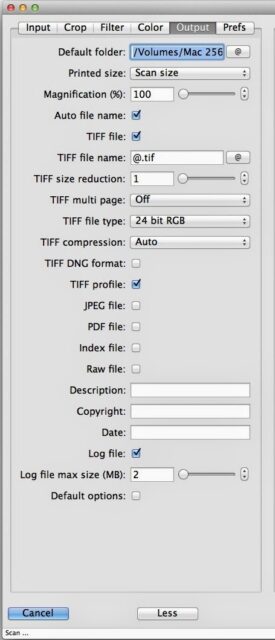 |
| VueScan Output Settings |
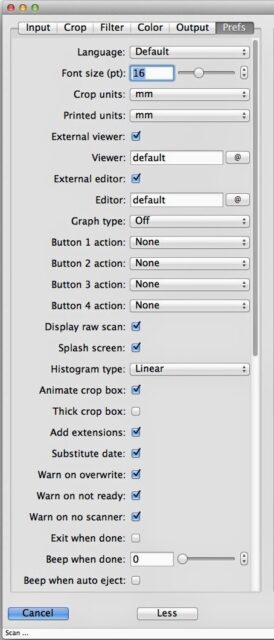 |
| VueScan Prefs Settings (part 1 of 2) |
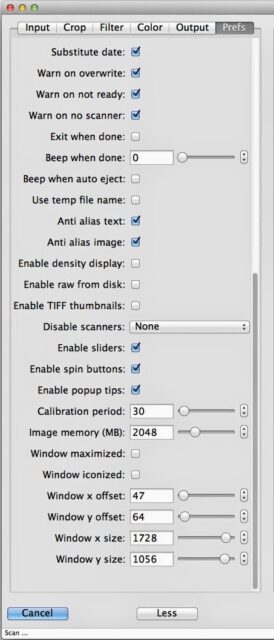 |
| VueScan Prefs Settings (part 2 of 2) |
Step 4: Load the slides in the magazine.
When the white bar of the magazine is away from you, the slide slots number from left to right, and on the top the slide should be inserted upside down and with the generic side (this side towards screen) to the left and the date on the right. Sometimes the generic side will be upside down and sometimes not and sometimes they put the writing on the top and bottom so it is right side up regardless. The most important part is not whether the slide is right side up or upside down but that the generic side is on the left. You can easily rotate the image and it is obvious that it needs rotation but if it is mirrored it is harder to tell. Mirroring scanned images is easy but if you are not familiar with the photographs or there are no words to see that they are backwards, you may not notice that the images are mirrored.
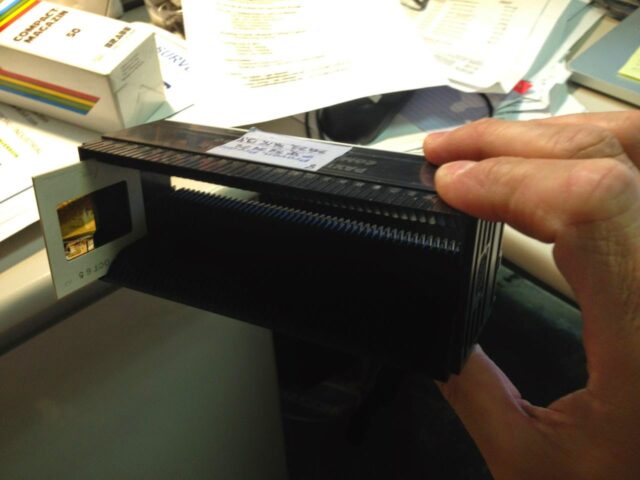 |
| Here the slide is being inserted in slot 1 upside down and with the “this side toward screen” on the left side |
Step 5: Insert the Cartridge into the Scanner.
With the arm all the way in I insert the cartridge from the left until it rests up against the arm as seen here:
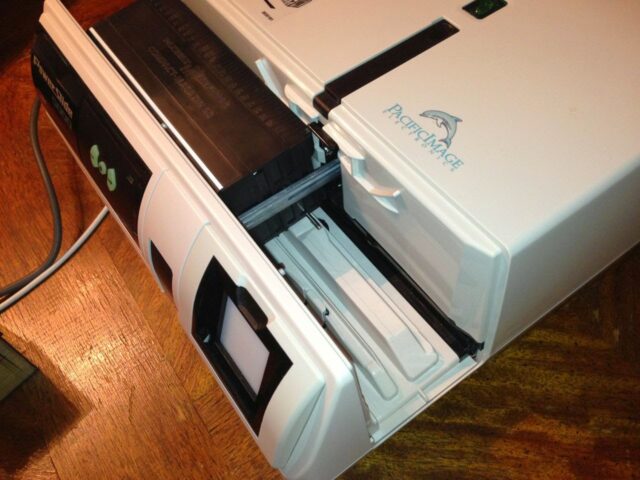 |
| Slide the cartridge in from the left and all the way till it rests agains the inserted arm |
Then pull out the arm manually (by the black handle on the front):
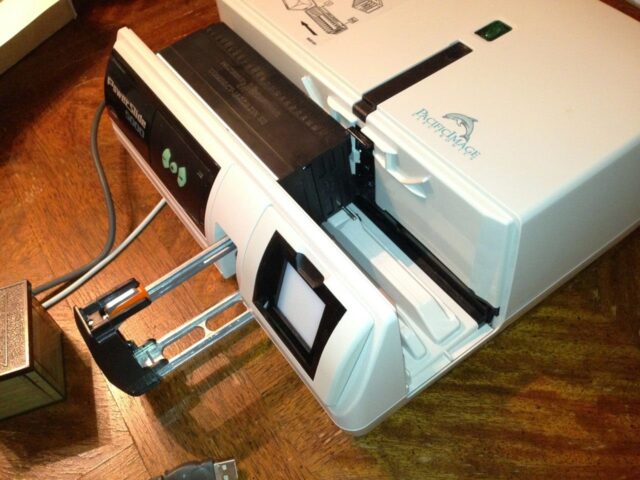 |
| Pull out the slide arm with your fingers |
Then reinsert the arm, which automatically moves the cartridge to the right and loads slide one into the scanner.
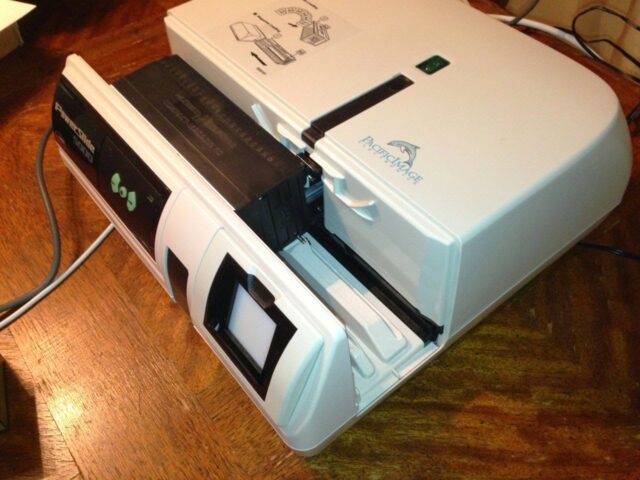 |
| Push the arm back in and it will load the first slide |
Step 6: Click “Scan” (in VueScan).
Make sure all your setting are correct before starting the scan because you cannot change them after you click “Scan.” If you were fast enough from when you turned the scanner on and when it warmed up it will begin scanning immediately. If you let it sit too long it will advance 1 slide and load slide #2 and then go back to slide 1 and then go through a warm up session again before it begins scanning. That would alarm me when I first began scanning but you’ll get used to it after a while.
VueScan automatically names the files sequentially with the date as the prefix of the file name.
Tips and Troubleshooting:
Don’t forget that the scanner arm needs space to come out!!
In all the scanning I’ve done I’ve accidentally set something in the way of the slide arm. When I set up the system in my office I took some post-it notes and made a little barrier to remind me not to get in the way:
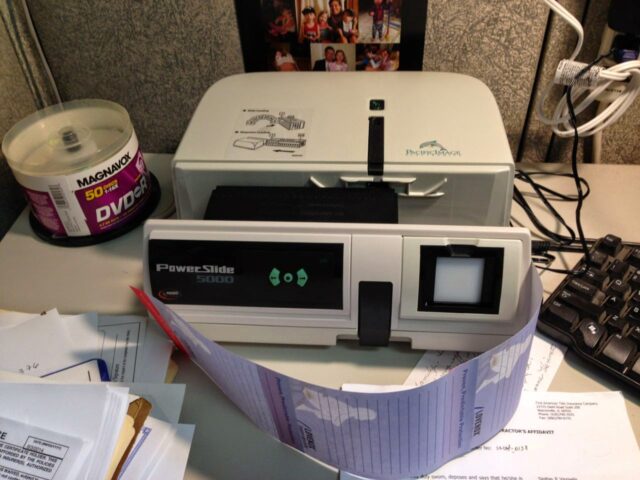 |
| PowerSlide 5000 with post-it note barrier to protect the scanner arm |
Performing Batch Rotation and Mirroring
If you are using a Mac running a recent version of OS X I recommend using Automator to create applications to automate rotating or mirroring (if you had the slide in backwards) images. This beats opening them one at a time in a photo editor and needing to re-save them. With automator, you can create a program which allows you to simply select the images you want to perform the particular manipulation (or series of manipulations) and then click on the application in the dock. I have written some tutorials on how to use automator:
How to Create a Folder Action to Resize Your Photos Using Mac OS X Automator
 |
| Custom-Made Automator Image Manipulation Applications |
Scanner Arm “Misses”
I’ve had instances of when the scanner arm will slip along the side of the slide and not push it into the scanner. This is usually because a slide is bowed in the middle or you were scanning thins slides using the big white 50-slide cartridge. The scanner does not detect this and gives you a scan that looks like the following:
 |
| Scanner Arm “miss” result |
Because the scanning software numbers the slide scan files numerically, you can track down which slide it missed and go back and scan it individually. Scanning an individual slide can be accomplished using the batch can and just list the slides you want scanned like this: 1,4,10-11.
Pink Faded Slides
I ran into batches of slides that were pink tinted. I had a hard time figuring out what might cause them to be like that but it seems that certain brands of slides (for example Ektachrome) do not hold their color while Kodachrome does hold its color. The pink slides are examples of a poorer brand of slide that has just not held up over the years. I found a website that goes in-depth on how to correct this issue while scanning.
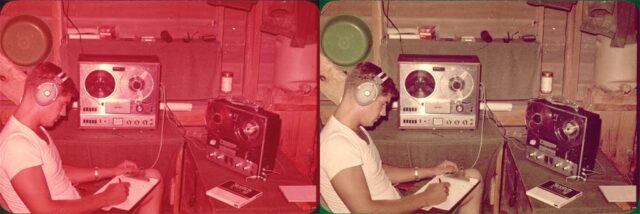 |
| A pink (color faded) slide scan on the left and the color-corrected version on the right |
To correct this issue in Photoshop CS4 select the following menu item:
Image > Adjustments > Color Balance
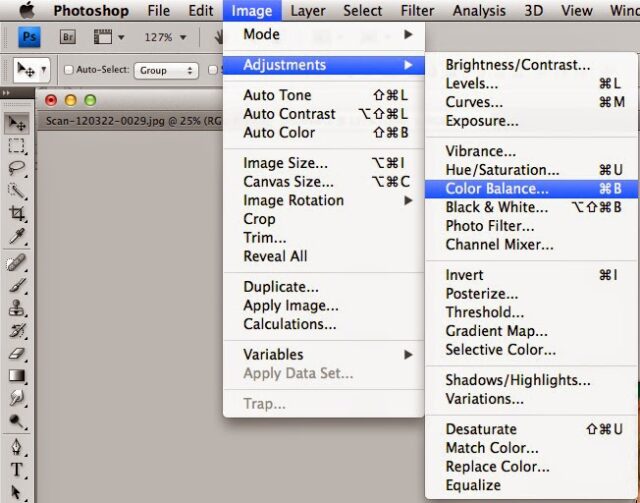 |
| Color Balance in Photoshop CS4 Menus |
Then adjust the Cyan/Red level all the way over to the Cyan side and play around with adjusting the Magenta/Green level over towards the Green side:
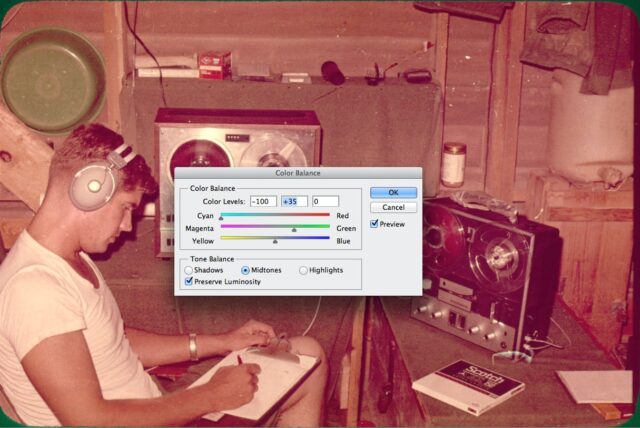 |
| Adjusting the color balance of a pink-tinted color-faded slide scan |
Alternatively you can bring up the Color Balance window by using the keyboard shortcut: Command-B.
All my film/negative scanning posts:
- How to Archive and Store 35-mm Slides
- How to Fix Braun Paximat Multimag Compact Magazine Jamming on Slide Number 25
- How to Scan Slides on a Pacific Image PowerSlide 5000 With VueScan on a Mac (this post)
- How to Scan Odd-Sized Negatives on an Epson Perfection V700 Scanner Model J221A
- How to Scan Odd-Size Negatives on a HP Scanjet 4850
- Scanning Slides With a Braun Multimag SlideScan 4000 Diascanner, same as Pacific Image ProSlide 3650
Helpful Links:
Amazon Associate Disclosure: As an Amazon Associate I earn from qualifying purchases. This means if you click on an affiliate link and purchase the item, I will receive an affiliate commission. The price of the item is the same whether it is an affiliate link or not. Regardless, I only recommend products or services I believe will add value to Share Your Repair readers. By using the affiliate links, you are helping support Share Your Repair, and I genuinely appreciate your support.

I have reinstalled the software a number of times and rebooted.
I never used the software that came with the scanners but highly recommend buying Vuescan. I’m not affiliated with them nor am I compensated by them but I’ve successfully used their software to run multiple versions of these Pacific Image scanners with much luck. Additionally, once you get used to their software, the same software will run virtually ANY scanner you own. Since I don’t own one of these scanners anymore and never used the software you are using, that’s about all I can say.
Hi John, I’m using the disk software that came with the machine: CyberView X5. It says it is for PC/Mac and it has opened up for me before.
Have you rebooted your machine and power cycled the scanner? The other possible troubleshooting step would be reinstalling the software and drivers.
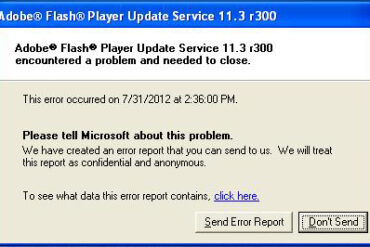
Hi there. My PowerSlide 5000 won’t open on my Mac. It has, I’ve probably scanned 1,000 slides and am close to being done. It has done this off and on throughout my project, but this time is the worst. I just can’t get it to open. I’ve reinstalled the software, used another USB port, and another USB cable. I get these messages:
“English” – I click “OK”
“Initialize scanner. Please wait” – This box stays on the screen indefinitely until I force quit.
What software are you using?
Dear John,
Thanks for your excellent discussion about the Powerslide automatic slide scanners. I’m about to embark on a large (2,000+) job scanning many slides, and from the research I’ve done, it seems that finding one of these old machines is the best way to go about it. But I have a question.
Specifically, is it feasible to buy a Powerslide 3650, or should I look for a 5000? I saw that you’d used both of these machines, and so I’m wondering if one works appreciably better than the other, jams less, and so on?
I will be scanning with a Mac desktop system using a recent version of Mac OS (High Sierra or Mojave), for what it’s worth.
I appreciate any advice you, or anyone else here, may have.
Best,
Josh
I would look at the drivers for each machine and see whether your specific OS is supported. Things have changed since I used these and your OS wasn’t released when I was scanning. The newer scanner most likely is the most supported but I haven’t looked at it for quite some time.
bought this off ebay..its not advancing, i saw from an earlier post that when the slide inserter brings the slide back out, the little black nubbin below and to the left (looking at the machine from the front) is supposed to advancing the slide cartridge (using the straight 50 slide cartridge that it came with), yet when i move the slide inserter back and forth there is no movement on the black nubbin (both with the 50 slide cartridge loaded and when it is not loaded and whether or not i use the machine control or the software scan button.) Also I have tried to move the black nubbin in all directions with my finger with no cartridge it and it does not move at all. I would have guessed that it would moved with moderate pressure, but no go. What am I mising?
Dear John,
Thanks for this great manual. I purchased Powerline X from US very recently (i’m living in the Netherlands), I scanned almost 1000 slides, unfortunately more than the half are out of focus, when i check this on my Slide projector autofocus does the correct job. How can i get this corrected during the scan? I used CyberX bundled with the scanner, i also purchased VueScan butt i don’t see much difference. Can SilverFast do a better job (price is almost the half of the scanner!)? Or is something wrong with my scanner?
I’m using a PowerSlide X (very similar to 5000), and after I finish one batch with VueScan, and load the next batch, VueScan starts scanning and cropping using the previews from the first batch! (ie, if the first slide from batch 1 was portrait orientation, then the first slide of batch 2 gets scanned/cropped as portrait)
Is there a way to clear the previews so the next batch starts “fresh”? So far I am having to close and restart VueScan each time.
I believe the way the software/hardware system is designed is that you are supposed to preview all of them, before each batch of scanning, set the crop and filter settings for each slide, and then scan and it uses the settings you set for the previews. If you don’t set them specifically, it just uses what you last had, like you’re experiencing. What I do is always insert every slide in the same orientation. I do a lot of photo editing (and rotating) post-scan in photoshop. Also, if you pick the right orientation (horizontal in reference to the scanner bar that reads the image), the scanner has the least distance to travel and I think it’s faster.
BYW: Over Christmas I scanned over 1,000 slides on a PowerSlide X. I couldn’t find that it operated any different than the previous versions.
When I finish one tray of slides scanning 1-50 I put in a second tray and select scan all 1-50. The machine then starts moving the slide arm in and out counting down 50,49,48,47 to 1 before actually starting the first scan. I can correct this by turning the Powerslide 5000 off and starting from scratch. any suggestions?
I have not used the software that comes with the PowerSlide but only ViewScan, a 3rd party software package that runs thousands of scanners, so I can’t tell you exactly where to go to do this. But when you finish one batch the scanner ends thinking it is on slide #50. There is a field where you can change that 50 to a 1 and before you start the next batch you need to edit that field and enter a 1, showing the scanner you have manually moved it to slide 1 of the cartridge.
I have used a Braun Paximat 100 slide carousel with good success. Bad slides will still jam which is frustrating regarless of holder used.
We just got this scanner and have been having a hard time understanding this new program, but I think your explanation of this scanner is great. The problem is that the Windows version doesn’t look or show any of the images/options that you have shown with the Apple version.
Do you have any of the same sort of instructions/explanations for the Windows version?
Thanks,
Sean
Hi John –
I have 6000-plus slides all mounted in Hanimex 120 slide circular carousels.
Does the powerslide 5000 take these carousels, or do you know of a product which would?
Many thanks
JohnC
I have a Powerslide 5000 as well, but I am getting a dark vertical band on the scans. they vary from just slightly darker to back. It appears to be in the same area each time. It happens with both the provided slide tray and a Brawn Paximat 100s tray. Do you have any suggestions as to what would be causing this? I am new to this machine. I use the provided Cyberview x5 software that came with the scanner. Any help would be appreciated.
Brian, the first step I would try is scanning without a slide in the scanner and verify whether the line shows up. Have you tried that?