You are probably here because you opened your 2004-2010 Toyota Sienna’s power sliding door and heard a pop and some crunching noise inside the door and now the door will not automatically open. You’ve come to the right place. Don’t throw $1,000+ down the drain at a dealership–fix this yourself! I have successfully repaired both of the sliding doors on my Sienna and have helped hundreds of other ordinary people fix theirs as well. Check out the fantastic comments I’ve quoted in the Encouragement section below and all of them at the bottom of the article and you’ll have the confidence to fix your van with my help.
A note about the main part you need for this repair. Originally you could buy the cable assembly only, but it was over $400. Toyota then came out with a new part number where you could get the cable assembly only, at a lower price (like $350). Now that part is discontinued and you must buy the assembly of the cables AND the motor together. I have all those part numbers listed below.
Hardware/Parts Needed:
- 2004-2010 Toyota Sienna with at least one power sliding side door
- Right (passenger side) slide door cable attachment, Part Number: 69631-08030 Same Part with New Part Number & Lower Price (now discontinued): Right (Passenger-Side) Part Number 69631-08031
Note: this part does not include the motor (and it is most likely you DO NOT need the motor replaced. For the right motor AND cable attachment, part 85620-08042 click here) - Right (passenger side) sliding door cable attachment and motor, Part Number 85620-08043 (updated part number for the motor and cable assembly together)
- Left (driver’s side) slide door cable attachment, Part Number: 69641-08030 Same Part with New Part Number & Lower Price (now discontinued): Left (Driver’s-Side) Part Number 69641-08031
Note: this part does not include the motor (and it is most likely you do not need the motor replaced. For the left motor AND cable attachment, part 85620-08052 click here) - Left (driver’s side) sliding door cable attachment and motor, Part Number: 85620-08053 (updated part number for the motor and cable assembly together)
- Plastic door panel retainer clips
(because some of them will often shatter when you pop off the door panel)
- Slide Door Bracket: Right Side, Left Side (Only necessary if yours is broken–see step 33A to see if you need this part)
- Cable clips (only if you break them, they are pictured in Step 21)
Tools Needed:
- Flat and Phillips Screwdrivers
- Socket ratchet, 10-mm Socket, 8-mm Socket, all included in a Stanley 99-Piece Socket Set
- 6″ long 3/8″ socket extension
(for bolts on bottom of window glass)
- Torx-30 bit
- Electrical tape
(to cover up screwdriver to keep from scratching van when prying up inner door panels)
- Get almost all these tools by picking up a Highly rated 170-Piece Tool Set on Amazon.com
- 5-Piece Auto Trim Panel Removal Tool Set
(if you really like tools and want to have “real” door panel removal tools–but you don’t need these, you can use a flat-head screwdriver too)
A word of caution about the cheap aftermarket part:
There is a cheaper after-market part out there that only replaces the cables, but requires you to re-use your old spool and very careful winding of the cables onto that spool. If you are off by one wrap of cable on either of the cable ends, you will destroy the installation, and must purchase a new part and completely re-do the entire repair. I have not installed the cheap aftermarket part but did get this feedback from one user, who did:
[I] have a 2004 XLE… driver side cable-spool finally jammed/broke as they all do. At that time, followed your instructions, but bought the cable only repair part for around $200. I wound the spool successfully, and it’s not that hard to. I will concur it is easy to screw this up, and would not recommend anyone try winding the spool unless you’re mechanically savvy and completely understand how this thing works. After 10 months of daily door operation, I’m sitting here today with the cable broken again. The plastic cable coating failed, and ultimately cross tangled on the spool leading to the cable snapping. No warning, just “bang”, dead. I believe the root cause is one of two things or both: 1) The replacement cable was of insufficient quality, 2) and/or the spool was compressed or compromised during the initial failure. Words of wisdom… If you’re going to keep your Sienna, buy the good kit with a new spool. Although this is a straightforward repair procedure, it’s still a ton of work and you don’t want to do it again (like me). –Bill
If you correctly install the OEM parts linked above I’m confident you will get nearly 10 years out of the installation, which likely will outlast your ownership of the van. I recommend you do the repair correctly, with good parts, the first time, and you will be able to enjoy your powered sliding doors for the remainder of the life of your van. Read on to hear about all the people who successfully followed my guide, repaired their Sienna, and saved a lot of money…
Encouragement from readers who have used this repair guide:
If you can follow instructions, have access to the tools I list in detail above, and are reasonably good with your hands, you can definitely do this repair with my help. I walk you through the entire repair (including reassembly), step-by-step, with lots of pictures. I have had men, women (one was 7 months pregnant), those as young as 14 and as old as 80, all successfully repair their Sienna with my tutorial. Below are excerpts from some of the great feedback I’ve received from people who successfully repaired their Sienna with my tutorial. Also be sure to check out the nearly 400 comments at the bottom of the article as well.
These instructions prepared me for everything. –Tony
[I] wanted to tell you how much I appreciated your instructions on replacing the sliding door cable assembly. I’m in my 80’s and not very nimble anymore, but with your excellent instructions I was able to accomplish this rather complicated task with no problems. It took me quite a bit longer than some of your “clients.” Day and a half. 🙁 But I kept checking on my iPad a lot to make sure I didn’t make any huge mistakes. But now it works perfectly. Thanks again for your explicit instructions and photos. I would never have attempted this without them. –Ezra
Thank you so much John! With the help of your excellent tutorial, my fourteen year old son (with a little help from Mom) was able to fix the sliding door on our 2004 Sienna. –MM
These instructions were fantastic. I was able to complete the repair with no issues in about 3 hours. I’m not an expert by any means and have never done a repair this complex, but the instructions were great! Not to mention it saved me $1,500 bucks under what the Toyota dealer quoted me. –Michael
I followed the directions listed and the repair went smoothly beyond my expectations. … The left door on our 2010 Sienna van broke a few months back and I took it to the dealer and spent $1500.. when the right door broke I decided to do the repair myself.. and I am glad that I did… –John
Hi, I can’t thank you enough for this detailed article! I consider myself a competent home mechanic, but I was a bit daunted by the prospect of this repair. Your step by step guide was absolutely invaluable, got it done in less than 3 hours… –Mark
Your instructions were amazing and made it possible for an amateur like me to complete the job! Thank you for saving me so much money in labor costs!! …thank you for helping us get our sliding door up and running again! –Ben
I can’t even begin to tell you how much your tutorial helped me on this. I consider myself pretty savvy and was ready to tackle this but this gave me a lot more confidence to even feel like I could do this. Spending almost $2K was not even an option, and quite frankly absurd. … Thanks for doing this! –Nick
I was able to replace Toyota Sienna’s passenger side sliding door cable assembly with my friend’s help in about 6 hours. It was only possible due to your awesome step by step instructions. I work in the auto industry and we make good operator instructions–your instructions taught me on how to make great work instructions. Thank You. … And the satisfaction and confidence I gained is “priceless”! Feels like I can disassemble and rebuild the entire minivan (if you make instructions…just kidding!) Thanks again! –Hari
John, you rock. I just finished this repair on my 07 Sienna driver’s side door today, and everything was spot-on, almost like it was written just for me (I guess it kind of was). Thank you so much for all this work and these incredible instructions and pictures. Even down to the electrical tape on the socket to remove the window bolts. Really. Just awesome. Thank you. –Mike
John’s article saved my family well over $1,000 dollars! The dealer told me the cable motor needed to be replaced, but the motor was fine. This was by far the most challenging repair I’ve ever done, but I was jumping with excitement when I successfully fixed our sliding door in Nov 2017. Still works great! Thank you so much! –Daniel
I just finished replacing the cables on the left hand side of my Sienna. You Rock! Not a single hitch. Even used your electrical tape trick. Worked like magic. Thanks for saving me a grand! –Joe
I want to say thank you for such detailed steps in this article. I have used it 3 times successfully to replace the sliding door assemblies in our Sienna 2009 doors (9 months apart) and just this weekend in the driver’s side of our neighbor’s 2008 Sienna. Your attention to detail and many photos … make it possible for us DIYers to fix the problem and save a lot of money. Many thanks! –Larry
I decided that saving close to $2000 was worth giving it a shot. It turns out the part you’ve listed above does indeed work on a 2009 Sienna! So, if you have a 2009 Sienna and the dealership is trying to tell you that this part and procedure will not work, they are wrong. 🙂 It does work and with John’s impeccable instructions, you can save a ton of money! Thanks again John!! –Mark
Fantastic Website! Easy to follow – I had no issues… Way better than any manual. Huge help. Thanks a lot! –Steve
Hello! 37 y/o female did the repair today. Amazing instructions! –Lauren
John, thanks for the help. Got the door cable replaced without any significant issues, and your fabulous guide anticipated every wrinkle and question I encountered. –Martin
Also, please feel free to ask me any questions in the comments below and I’ll get back with you as soon as I can (almost always the same day).
How long will it take for this repair?
I have been asked many times how long it takes to do my repairs but that is difficult because I take literally HUNDREDS of pictures during these repairs (for my radiator replacement repair and thermostat change, I took over 750 pictures so I could make sure to have every angle necessary for the instructions). On most repairs I’m doing it for the first time, without a guide like this, so, it takes a lot longer to figure out the repair. Now that I’ve done this repair twice, I feel I could do it in two hours. I have heard reports from readers for anywhere from 3-6 hours for this repair the first time. Give yourself plenty of time, print this article off or have it on your laptop or tablet handy, and check off the steps one-by-one, and you can do this repair on a Saturday afternoon and save yourself a ton of money and feel great about repairing your own vehicle. I’ve received reports of men, women, elderly, husband/wife teams, and parent/child teams successfully complete this repair with my help!
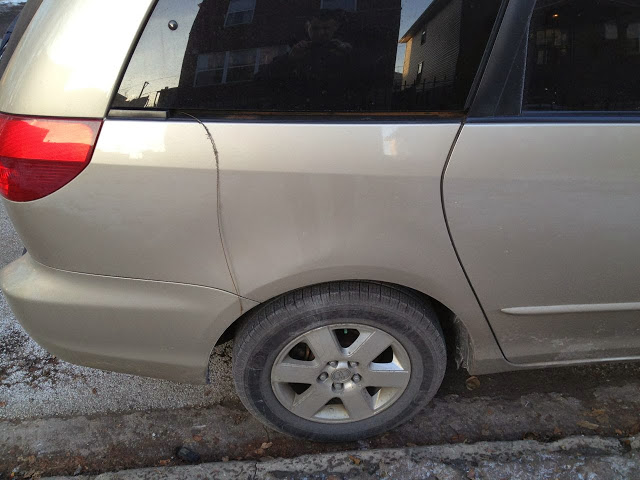
The back story:
The cable on the power sliding door of our 2004 Toyota Sienna XLE had been fraying and making a clicking noise whenever the door would open and I had just been trimming the fraying wires from the cable. We had some really cold weather and the force required to open the door exceeded the remaining strength of the fraying cable and it snapped. That in turn rendered our sliding door inoperable. This diagram is helpful in showing you an overview of the sliding door motor/cable assembly:
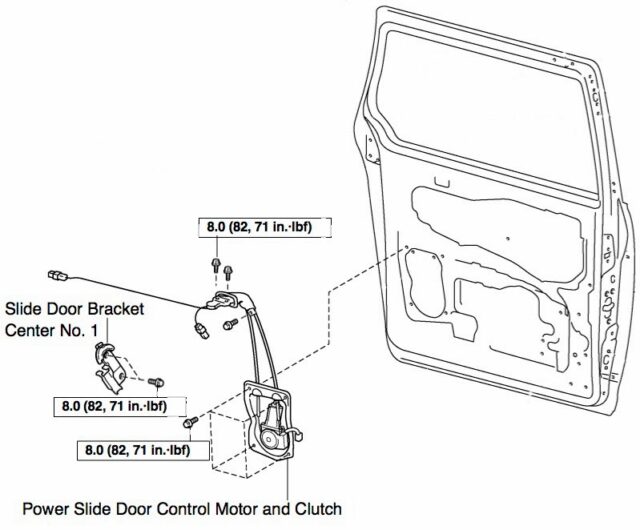 |
| 2004-2010 Toyota Sienna Power Slide Door Control Motor and Clutch Assembly Diagram |
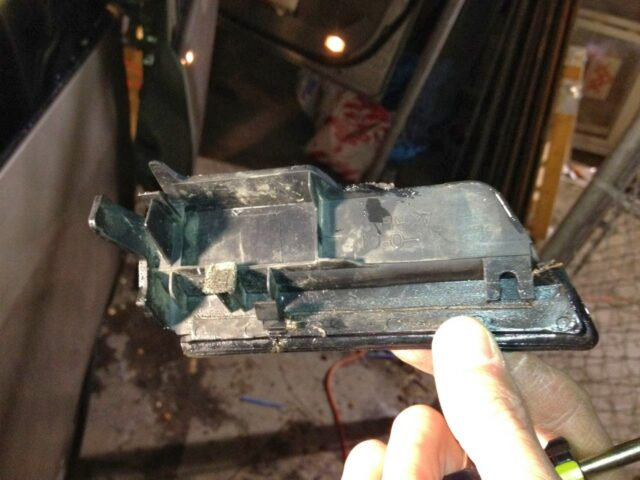
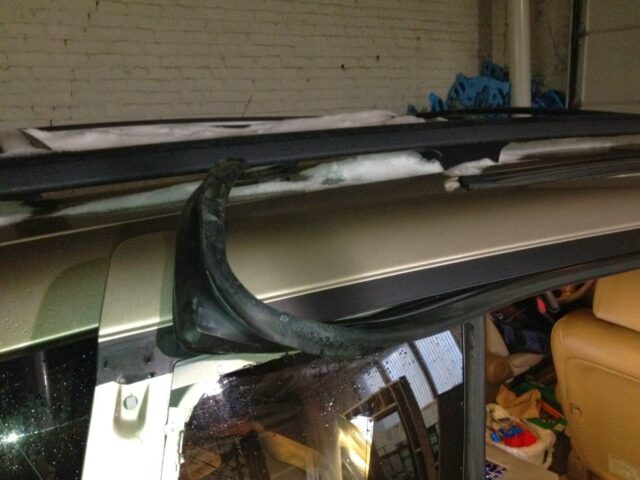
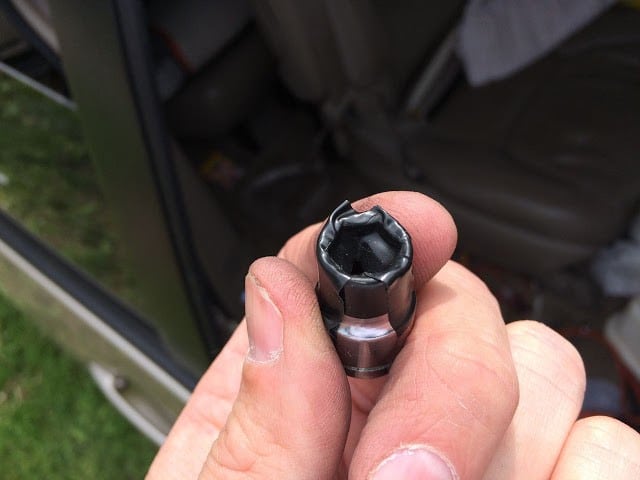
It turns out that the motor reeled in the entire remaining cable and it wound around the drive pulley and filled up the plastic housing, shattering it, and then the cable wrapping around the shaft forced the pulley off and this is what I was left with (right door) when I removed the inner door panel:
 |
| The destroyed passenger-side cable pulley housing and bearing |
Left door:
 |
| When the left cable broke and wound up on the pulley it looked like a birds nest |
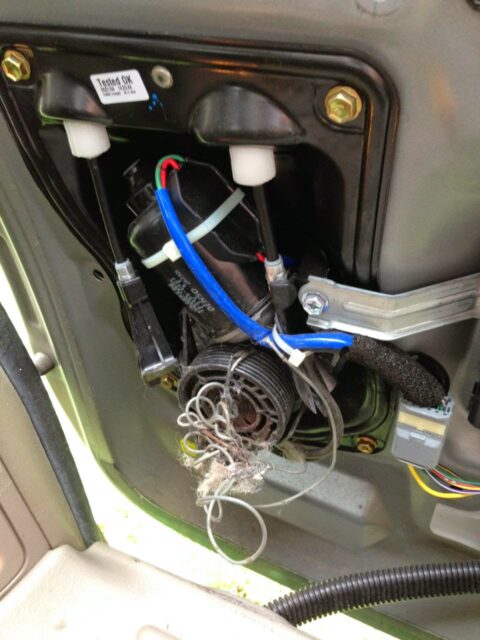
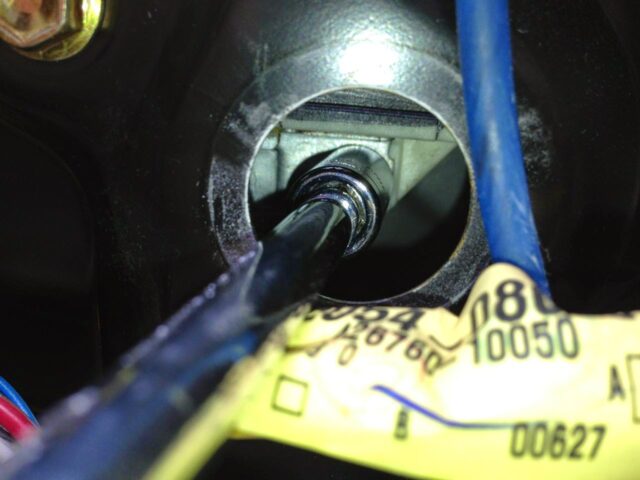
I.E. when the cable breaks, the cover on the pulley mechanism self-destructs and the cables get twisted around the shaft. Here’s a close-up of what the motor shaft looked like:
 |
| Toyota Sienna Power Sliding Door Cable wrapped around the motor shaft |
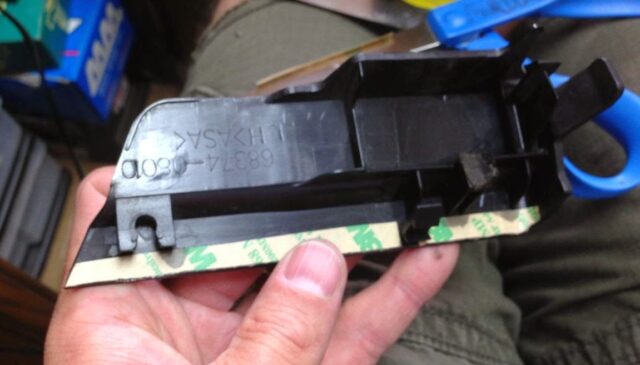
And the plastic case that once housed the cable pulley (note: this part comes assembled on the new part so you can throw it away):
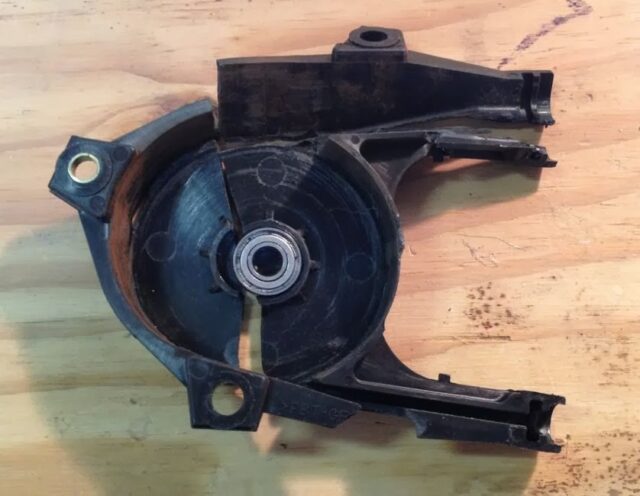 |
| Shattered pulley housing |
The problem is that these cables are coated in plastic and the coating wears off, the cables rust and then fray, and then they break. One thing I want to note–I’ve never heard of the motor needing to be replaced. These motors are very robust and the weak link is the cable and the pulley housing. All you need is the cable assembly I have linked at the top of this page.
Question: Can I clip off the broken cables? People have asked me questions about where to cut the cables so they can operate their door manually until they get the parts they need to do the repair.
Answer: Cut the loose ends off! Life must go on and you need to use that door, even when the cables are broken. You can safely clip off the cables and keep using the door in manual mode (just don’t slam it shut hard as the motor will still pull the rear edge of the door shut). I’ve written an entire article to show you how to trim your broken cables so life can go on before you do the repair:
How to Trim Broken Sliding Door Cables on 2004-2010 Toyota Sienna
How to replace power sliding door cables on 2004-2010 Toyota Sienna:
The order I’m going to give these steps assumes you are going to:
- Investigate your problem first by removing the inner plastic panel of the sliding door
- Electrically disconnect the motor so you can continue to operate the door manually while waiting to repair the van and to receive your parts (life must go on!)
- Remove the motor out of the cable assembly so you can install it into the new (uninstalled) assembly when it arrives
- Order the needed parts and wait
- Install the old motor into the new part
- Install the new cable assembly into the door and put everything back together as good as new
- Feel great about saving a lot of money and doing it yourself AND the other door is going to go bad too and it will be a piece of cake to do it the second time!!
Repair Outline:
Click/tap on the following links to jump directly to the step. Also, when other steps are referred to in the article (or comments) you can click on the link to jump directly to that step.
- Step 1: Remove the “Slide Door Window Garnish.”
- Step 2: Remove the “Side Trim Board Cover.”
- Step 3: Remove the Rear (side) Door Trim Board Sub-Assembly.
- Step 4: Remove the motor from the bad cable assembly.
- Step 5: Remove the 2 screws from the bracket of the door multiplex computer.
- Step 6: If necessary, remove the 3 screws from the actuator cover.
- Step 7: Remove the 3 nuts from the motor.
- Step 8: Remove motor from the assembly.
- Step 9a: Insert the drive motor into the new cable assembly.
- Step 9b: VERY IMPORTANT Cautionary Checkpoint
- Step 10: Seat the actuator cover assembly onto the motor shaft.
- Step 11: Bolt down the actuator cover to the motor.
- Step 12: Disconnect the old front cable tensioner from the van.
- Step 13: Remove the rear window lower trim.
- Step 14: Disconnect the rear cable tensioner bracket from the van.
- Step 15: Remove the rear sliding door window frame moulding sub-assembly.
- Step 16: Remove the rear channel of the sliding door window.
- Step 17: Unbolt the window and lift it out of the door.
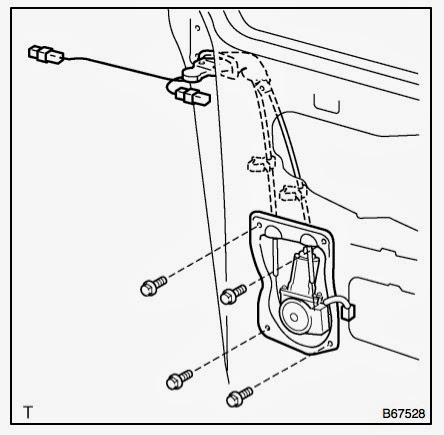
- Step 18: Remove the 4 bolts from the motor/clutch pan.
- Step 19: Remove the 3 bolts from the top of the motor/clutch assembly.
- Step 20: Remove the bolts from the black internal access panel (technically called the “attachment panel”).
- Step 21: Unclip the cables from the door.
- Step 22: Pull the cable assembly down and out of the door.
- Step 23: Feed the new cable assembly up through the door.
- Step 24: Verify the path of the cables through the hinge hole.
- Step 25: Reinstall the 3 bolts on the pulley end.
- Step 26: Insert the cables into the two clips.
- Step 27: Reinstall the 4 lower bolts on the cable assembly.
- Step 28: Re-bolt the black metal panel (technically called the “attachment panel”) in place.
- Step 29: Reinstall your window.
- Step 30: Reinstall the rear window channel.
- Step 31: Secure the window channel.
- Step 32: Reinstall the rear sliding door window frame moulding sub-assembly.
- Step 34: IMPORTANT Caution Checkpoint after connecting both cables
- Step 35: Reinstall the rear lower trim piece that covers the rear tensioner.
- Step 36: Test the power door.
- Step 37: Reinstall the interior trim of the sliding door.
- Step 38: Reinstall the “Side Trim Board Cover.”
- Step 39: Reinstall the “Slide Door Window Garnish.”
- Other Helpful Links
- Comments (read the ongoing conversation of how others successfully repaired their Sienna)
Before you Start-Take out The Middle Row Seat
Take out the middle-row seat on the side of the sliding door you are working on to give yourself some room inside the van.
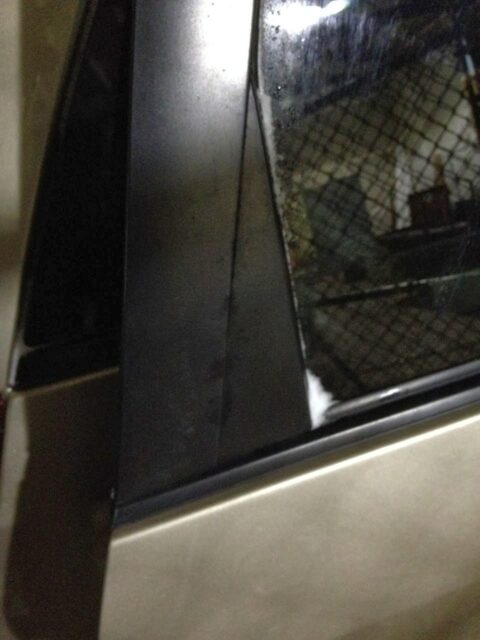
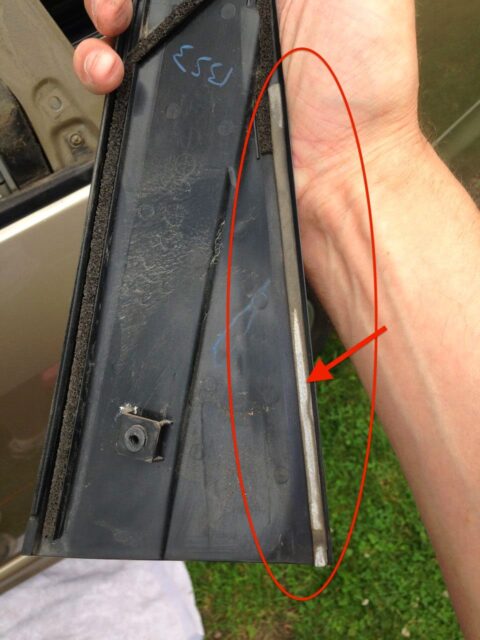
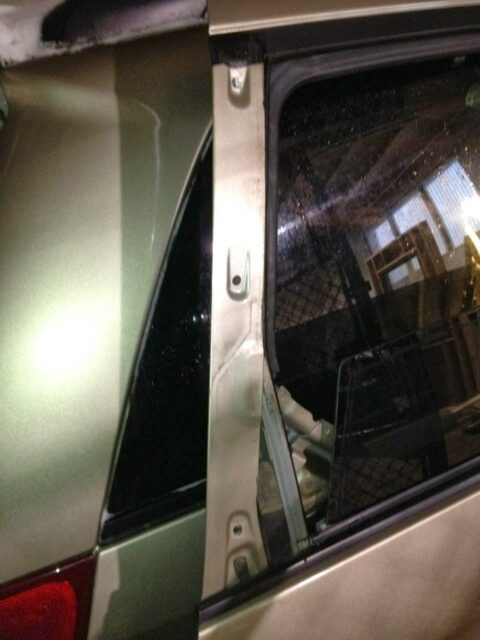
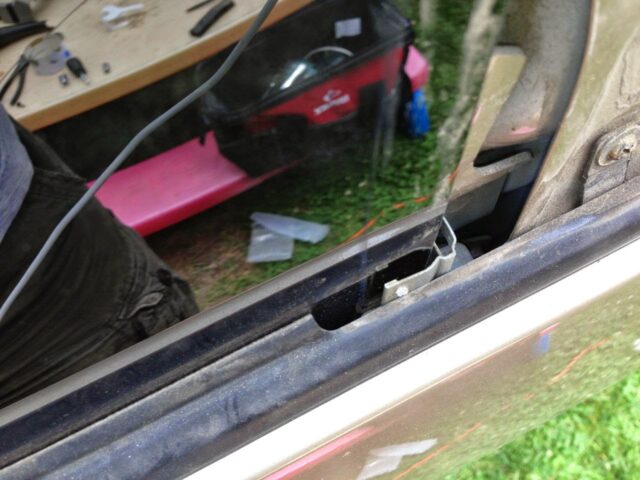
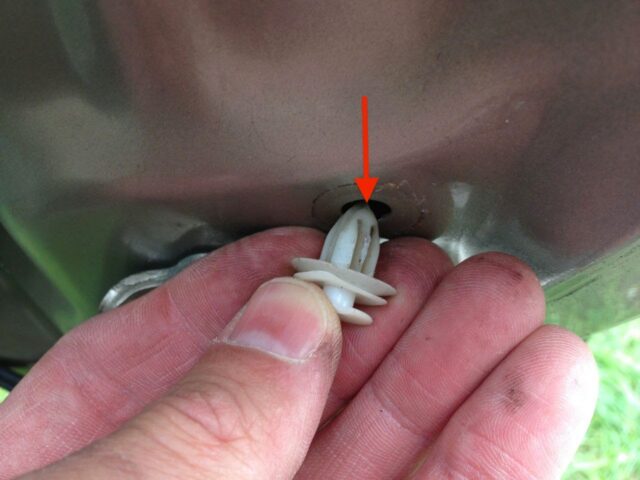
Step 1: Remove the “Slide Door Window Garnish.”
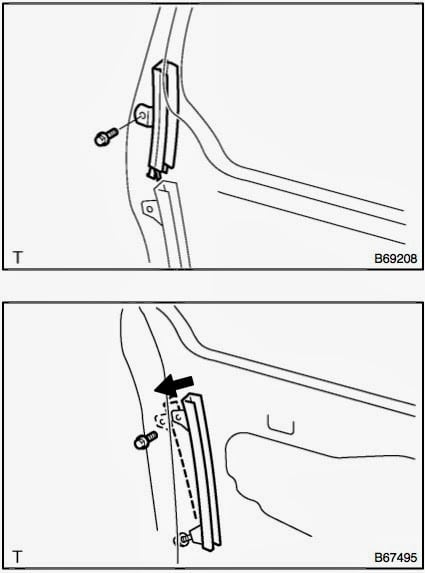
This is the black plastic piece that wraps the lower rear corner of the window opening. If you are looking at the shop manual picture below it is a bit misleading because the image shown is the view from the outside with the window removed and in your situation the window will completely cover it up. If you don’t remove this corner piece you cannot remove the plastic cover from the inside of the door. Lower the window as far down as it will go and pry out the center of the plastic plug in the middle of the clip and then the entire clip will come out–make sure not to lose the center of the clip.
 |
| Slide door window garnish as seen in the shop manual (shown as the left door view) |
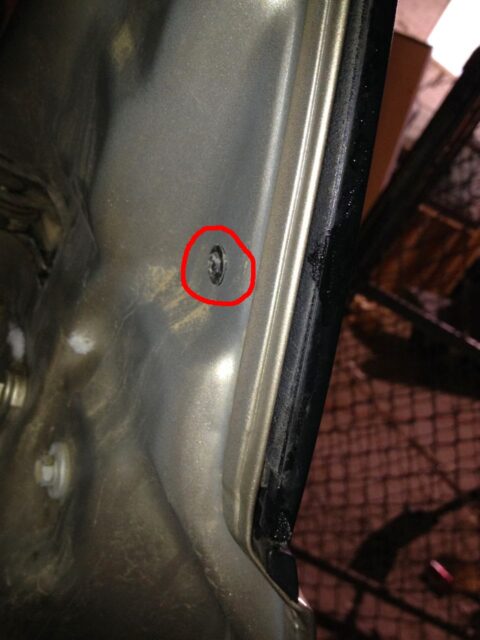
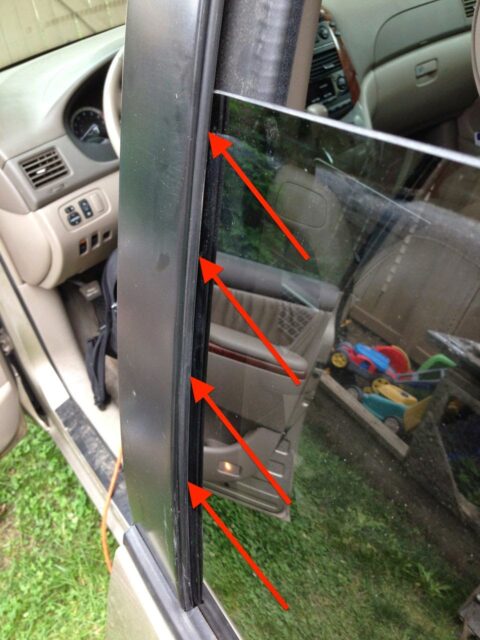
A wide angle view of the slide door window garnish, circled in red:
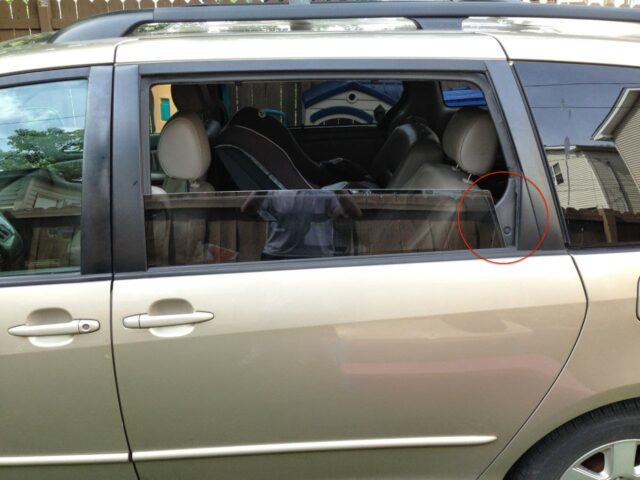 |
| Location of the slide door window garnish |
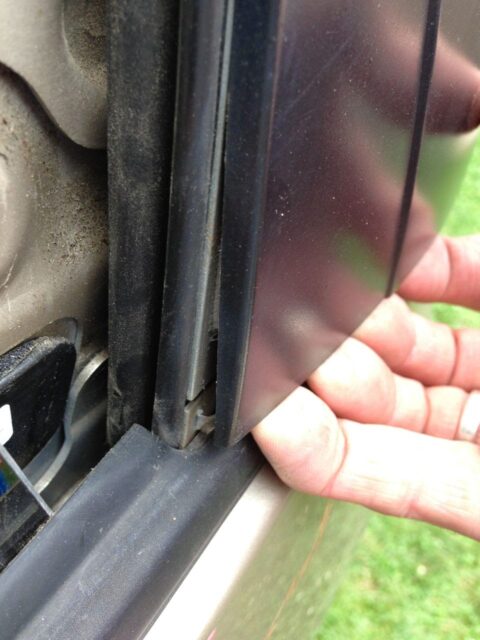
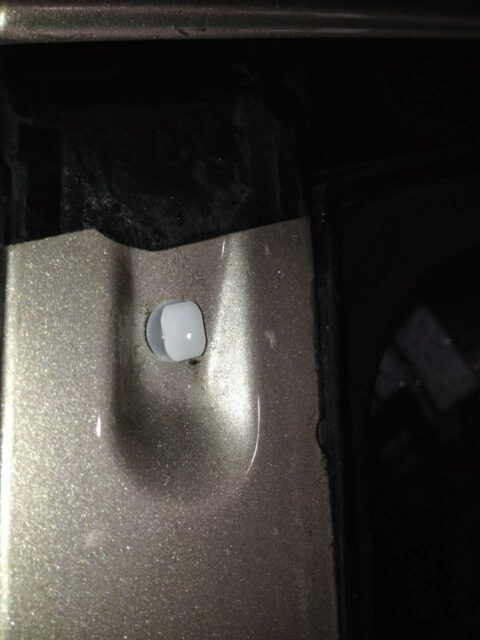
This piece is held in place by a two-piece plug. First use a thin flat screwdriver to lift out the center of the plug as seen below:
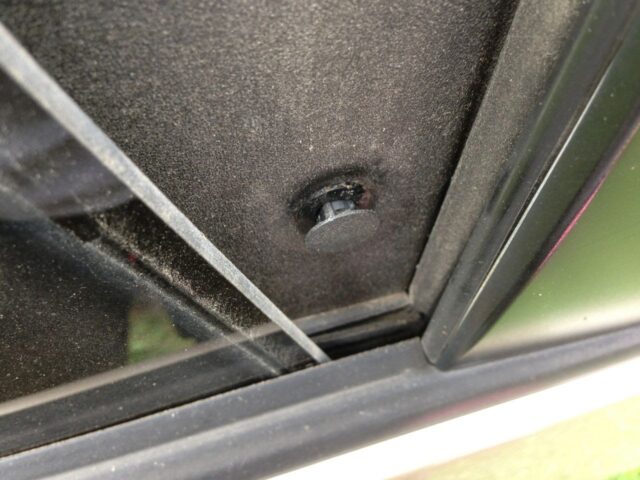 |
| Slide door window garnish plug unsnapped |
Once you have popped out the center of the plug as seen above then you can take a flat head screwdriver and pull the plug completely out. Here’s what the plug looks like when you take it out:
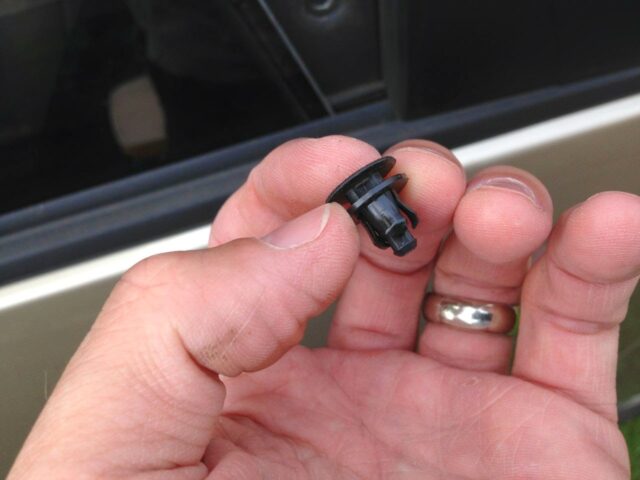 |
| Slide door window garnish plug removed |
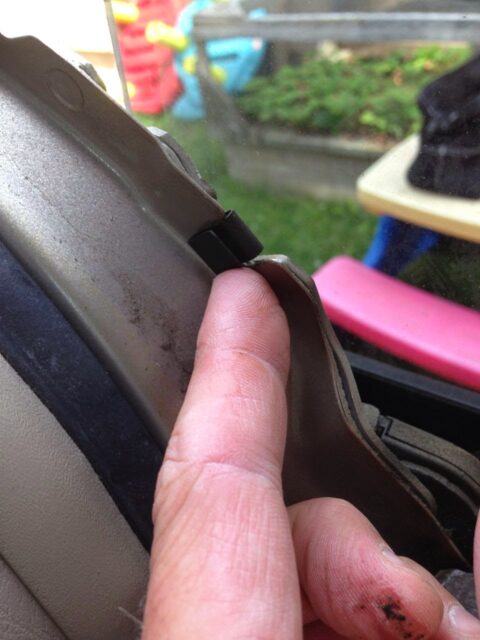
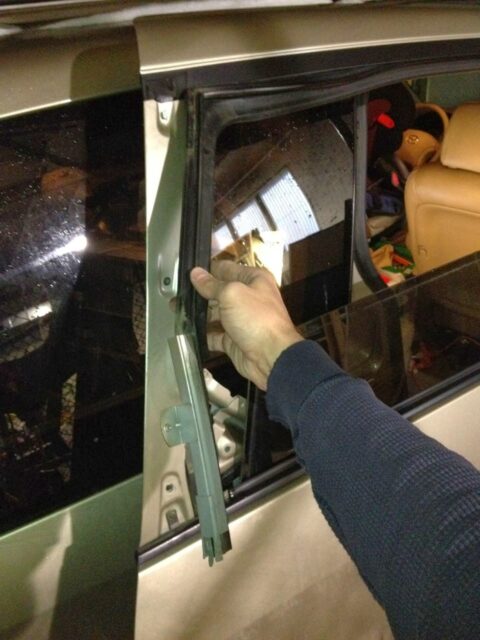
Once you have the plug removed you can pull off the window garnish by getting your fingers under the inside edge and pulling towards the window opening as seen below:
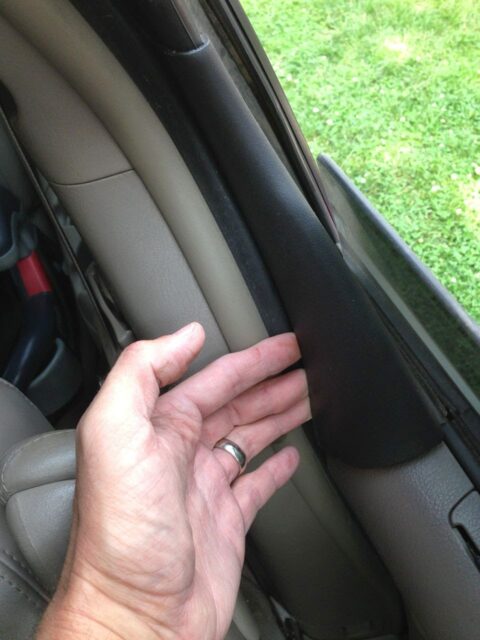 |
| Removing the slide door window garnish |
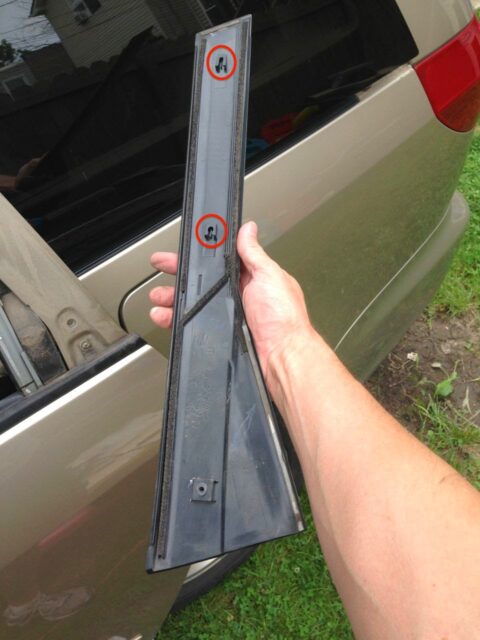
One thing to note is that there are two metal clips that are supposed to stay on the plastic window garnish but may remain on the door or fall off. Place the clips back on the garnish as seen below:
 |
| Clip location on the slide door window garnish |
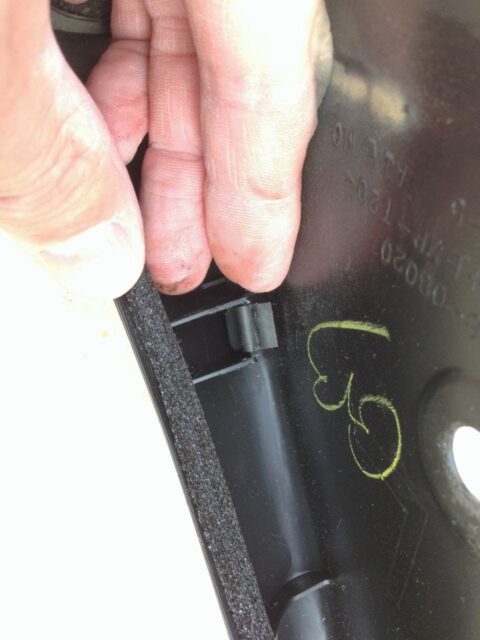
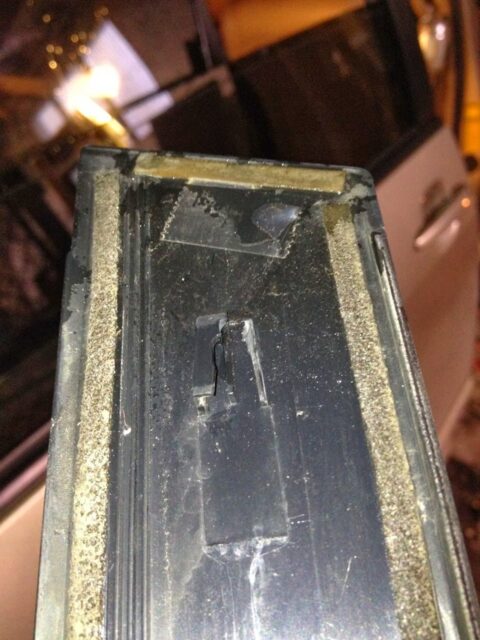
One of the clips remained on the door as seen here:
 |
| This clip stayed on the door |
Put the clips back on the plastic trim right away so you don’t loose them but make sure the tab is oriented on the right side (one side is meant to be clipped on the plastic and one side is made to be clipped on the metal door body) like this:
 |
| Clip orientation |
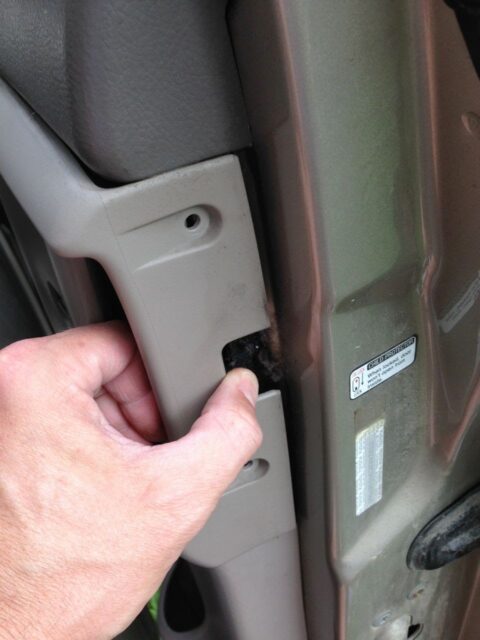
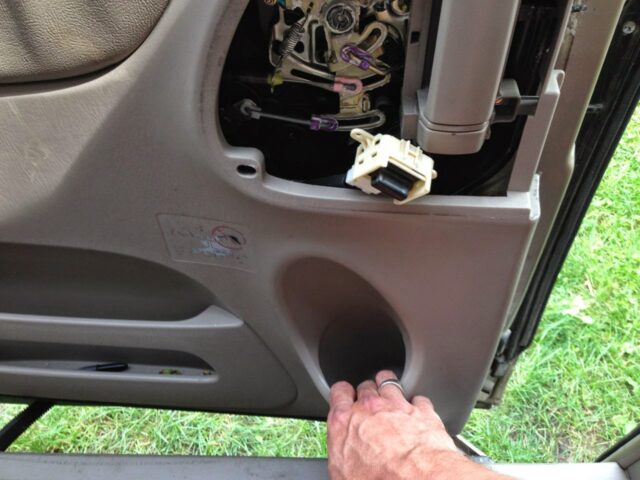
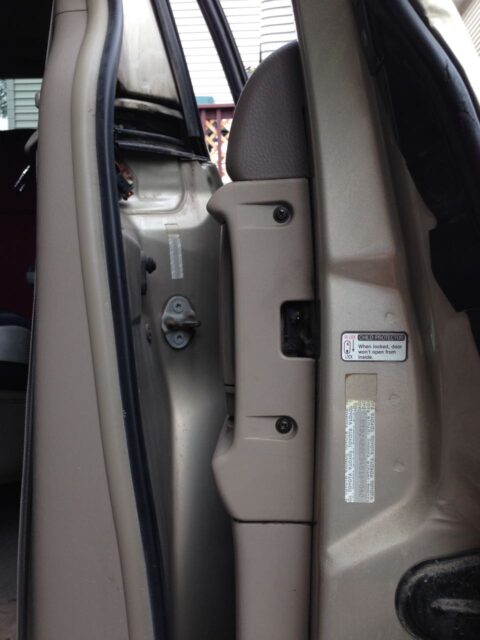
Step 2: Remove the “Side Trim Board Cover.”
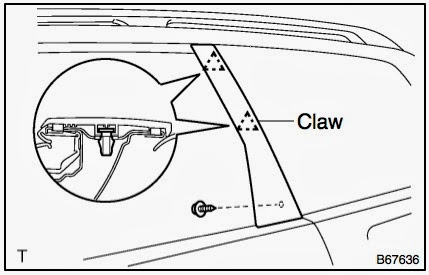
This is the plastic piece that surrounds the inside door handle as seen in the diagram below:
There are 2 screws on the front edge of the door so you MUST be able to get the door open to remove it. At first I was not able to get my door opened but by playing around with pulling the handle on the inside while pushing out on the door (front and back of door) I was able to get it to open.
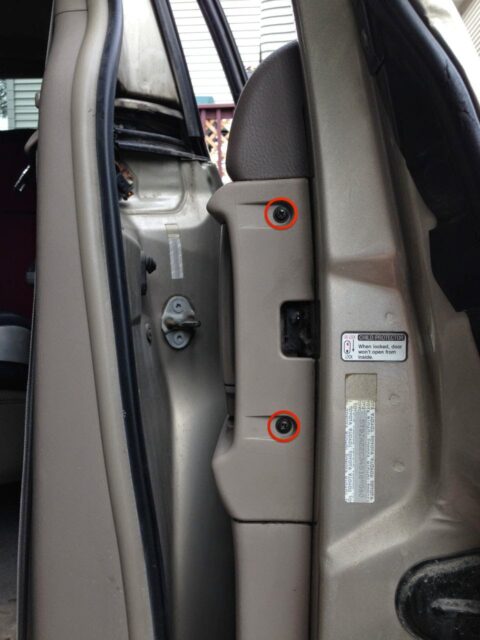 |
| Screw locations on the side trim board cover |
Once you’ve removed the two screws you can pop the cover off by pulling toward the inside of the vehicle at the location shown below:
Important: Don’t pull this plastic cover away from the door forcefully. The window switch is retained by the electrical wiring running to the power window switch. Simply remove the switch from the cover by removing the two Phillips head screws. Reinstall the screws into the trim board cover so you can keep track of them. You need the switch later on in the repair because you cannot operate the window without the slide door’s switch installed (not even by using the driver’s door switch). Here are the switch screw locations:
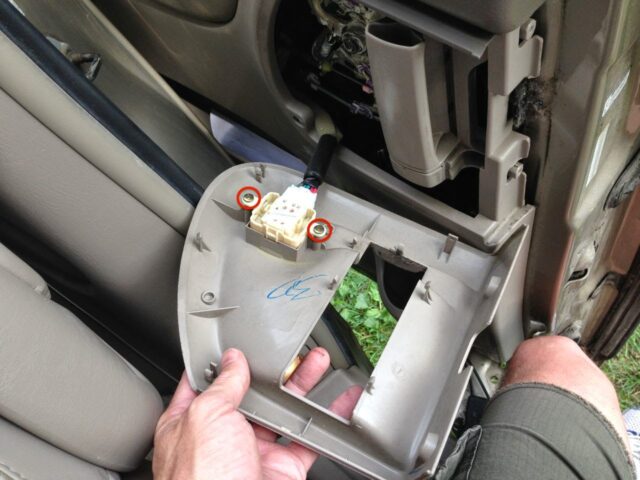 |
| Remove the two screws from the window switch |
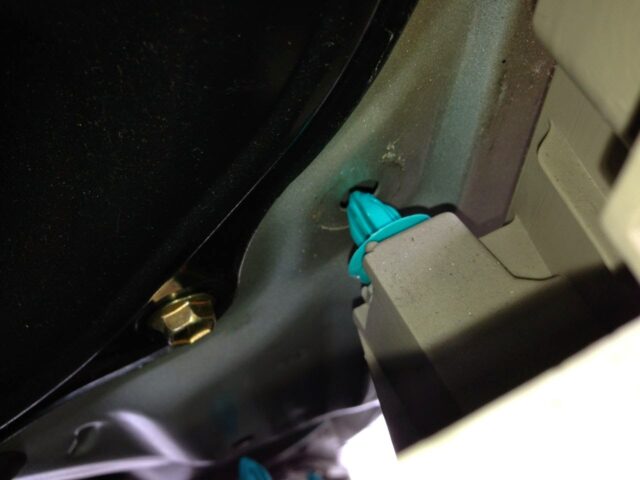
Note: At some point you will either want to disconnect the positive battery terminal from your battery or, an easier route, by simply put the sliding doors in manual mode so you can manually open and close your sliding door as needed to complete the repair. The button to put the sliding doors in manual mode is located at the left knee of the driver (off is when the button is IN, with no orange showing on the top edge):
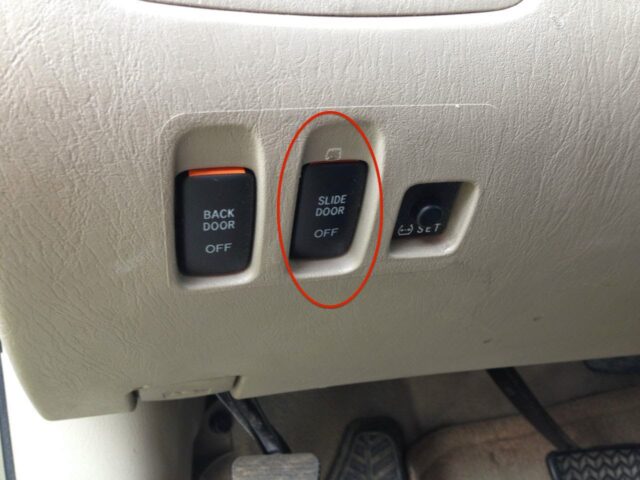 |
| Sliding door manual button (in manual mode–pushed in) |
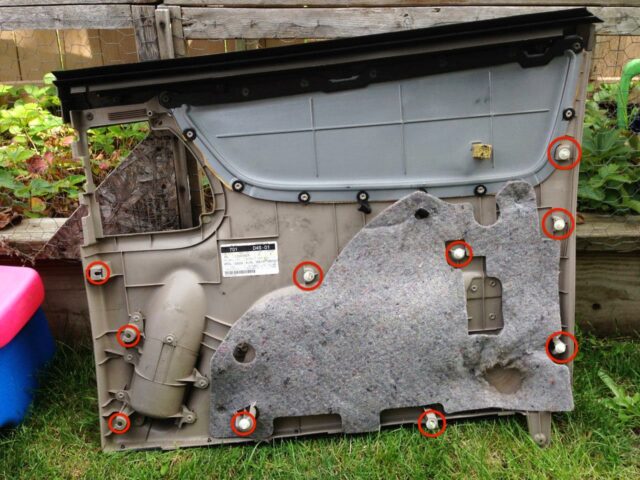
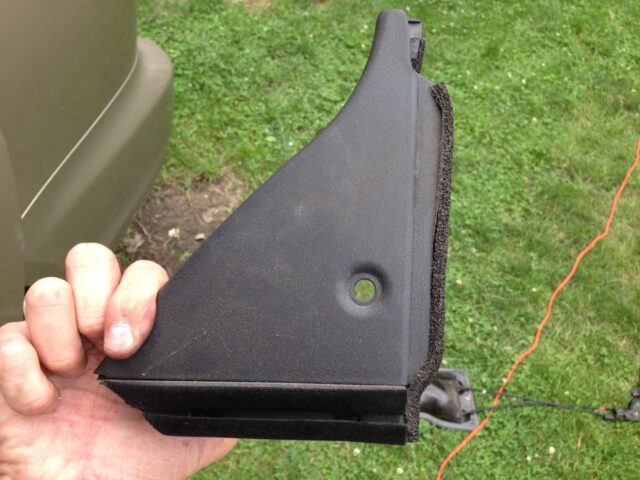
Step 3: Remove the Rear (side) Door Trim Board Sub-Assembly.
This is the main plastic panel on the inside of the door:
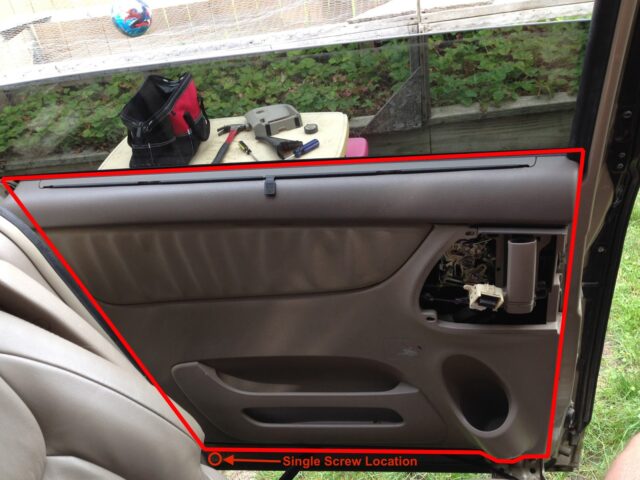 |
| The side door trim board sub-assembly |
Important: there is one phillips/hex-head screw at the very bottom rear corner of the trim that must be removed before prying the trim lose. It has a 8-mm nut head on it. I suggest using a socket to remove it. I first tried using my trusty short phillips screw driver but I wasn’t able to put enough force onto the tip to get it to budge. I’d use a socket and ratchet if I were you.
 |
| The single screw on the side door panel located on the lower rear edge, as seen from floor level with the door open (right door pictured) |
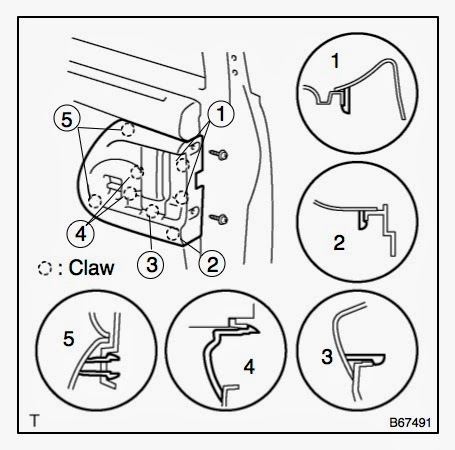
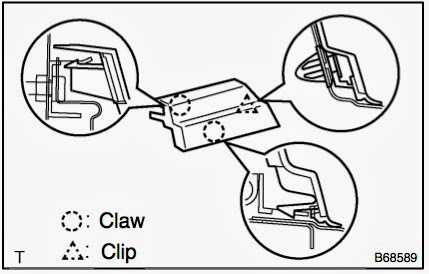
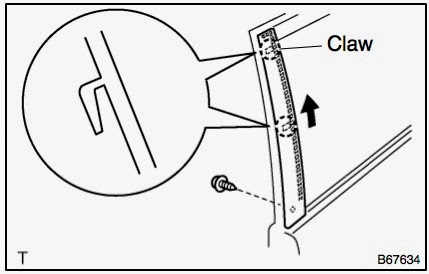
Here is the diagram of the clips (indicated by dotted triangles). I don’t know what they are talking about in regard to “protective tape” because I didn’t run into any protective tape.
 |
| Side door trim board sub-assembly clip diagram (note: this diagram is for the left door) |
The first time I did this repair I wrapped a large flat screwdriver with electrical tape and used it to pry up the panel, working my way around the edge. Once all 9 clips are freed then you will lift up the panel and it will lift up and out (it “hangs” from the top). Note: if your van has the built-in window shades you DO NOT need to mess with them, they come off with the plastic assembly, all in one piece. You can also pop the inner door panel free by pulling on the cup holder like I did the second time I did this repair as seen below:
 |
| Popping the panel free by pulling on the cup holder |
Then I pulled here on the front edge of the inner door panel:
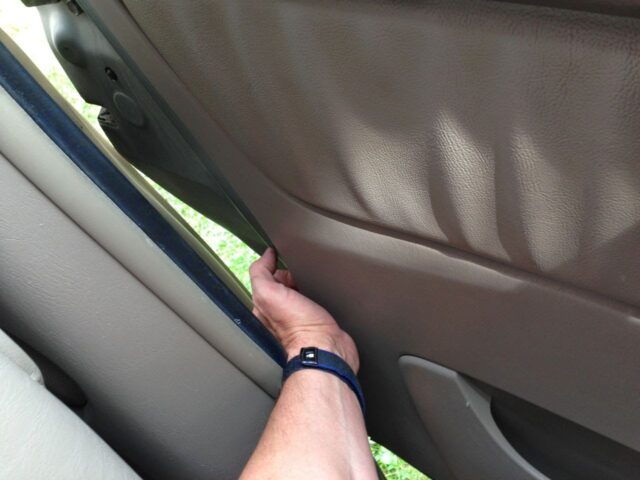 |
| Popping free the rear edge of the interior panel |
Once you have the interior trim removed you can determine the part you need to order. Please refer to the parts links up at the top of the article.
I left my door with the inside trim off except for removing the power window switch from the side trim board cover so I could leave it hooked up to the wiring just in case I needed to roll down the window.
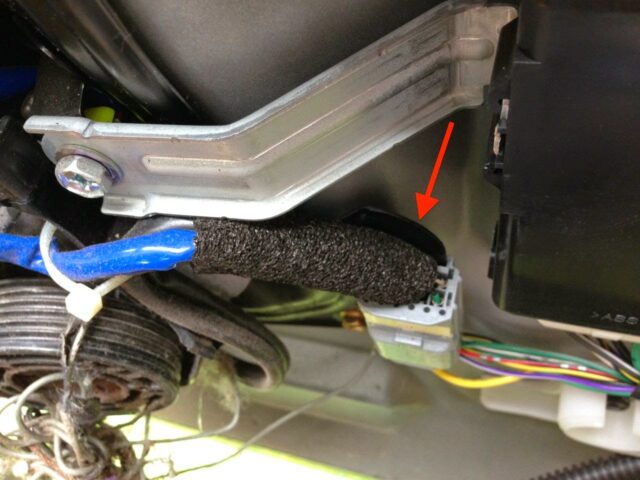
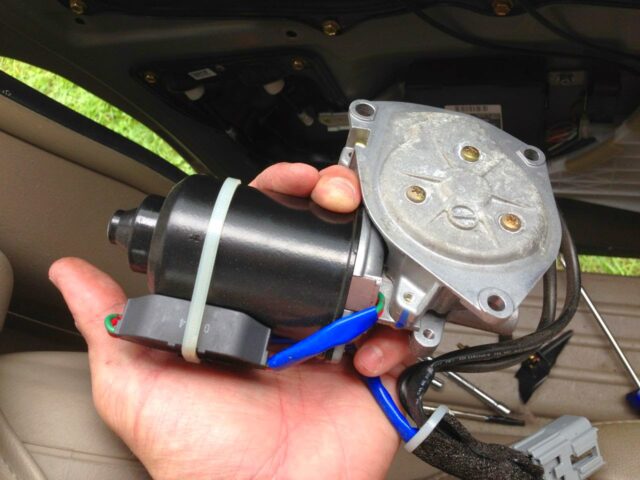
Step 4: Remove the motor from the bad cable assembly.
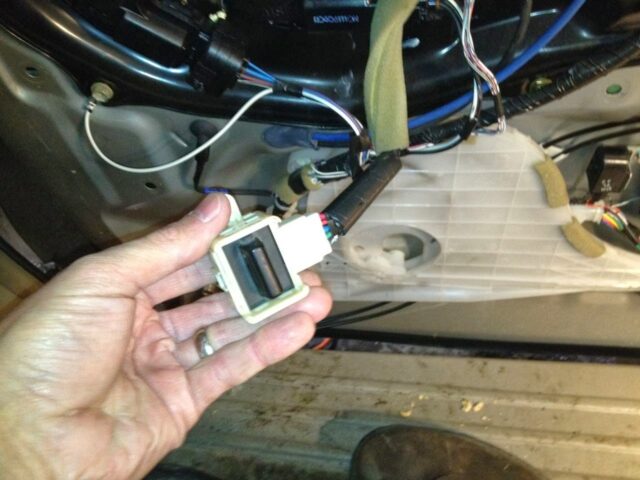
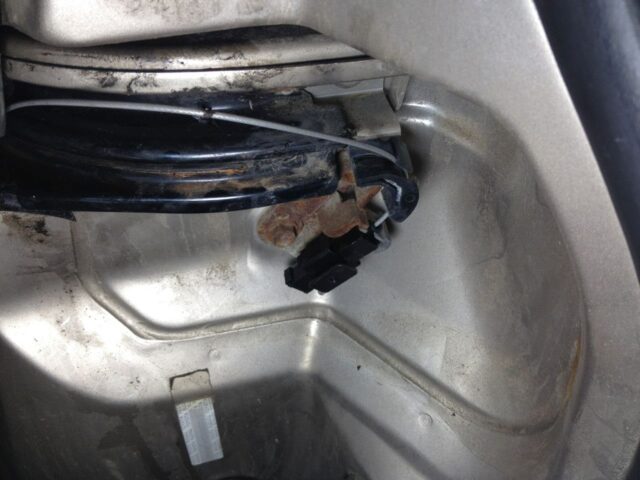
You could wait to do this until the new part comes but I did it right away, while it was still attached to the door. It was nice to be able to install the motor into the new part in the comfort of my workshop and not out in the van. I removed the motor when I did this repair on both sides. To do so you must first unclip the electrical connector. One side of the connector is mounted on a metal tab, the black object that is shown in the picture below:
 |
| Motor electrical connector mounting tab location on right door |
Once you’ve bent the tab out you can use a screwdriver to lift up the catch to remove the entire motor electrical connector assembly to make it easier to disconnect:
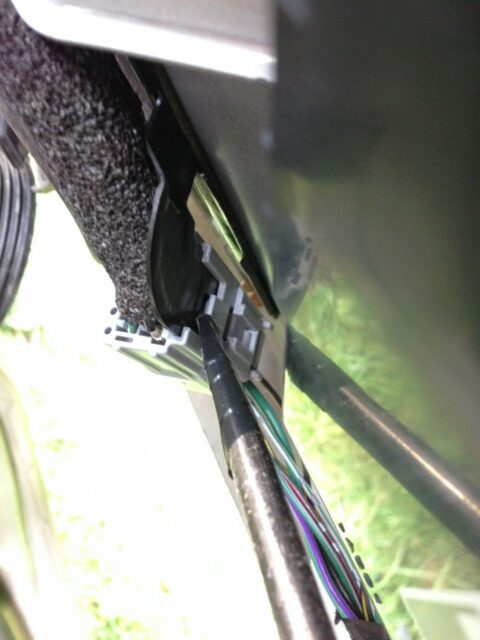 |
| Removing the Connector from the tab |
And disconnecting the connector by pressing down the tab (under my thumb):
 |
| The motor electrical connector |
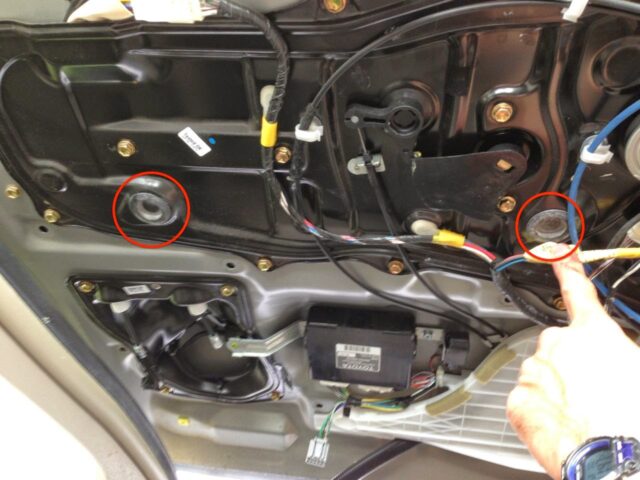
Step 5: Remove the 2 screws from the bracket of the door multiplex computer.
They have 10-mm heads on them. In the picture below I have their locations circled in red, but I had already removed them when I took this picture. The second time I did this repair I only removed the screw from the motor side and left the other screw in place:
 |
| Screw locations of the door’s multiplex computer |
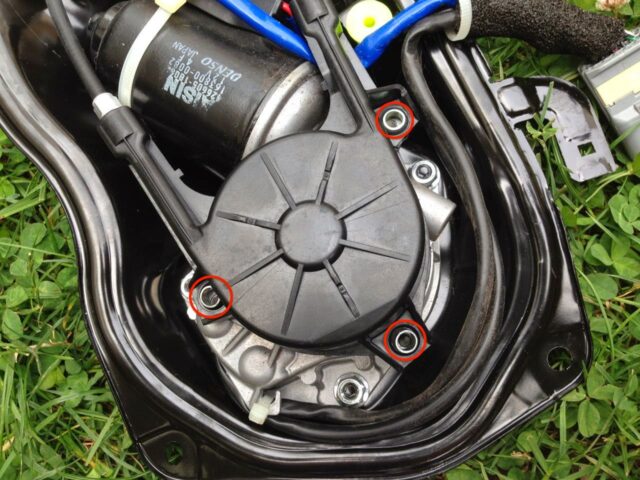
Step 6: If necessary, remove the 3 screws from the actuator cover.
Important Note: if you purchased the part which includes a new motor (which typically is more expensive and unnecessary) then you can skip this step and jump down to Step 12: Disconnect the old front cable tensioner from the van.
Because the cover on my actuator cover had pretty much exploded this wasn’t really necessary though.
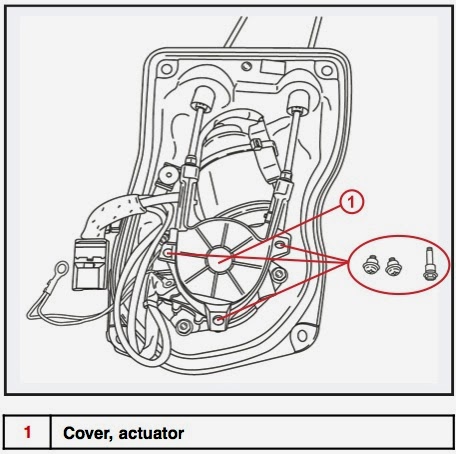 |
| Actuator cover screw locations — don’t lose the collars if you are going to re-use the bolts because they are necessary |
Here’s what they look like in real life (left door):
 |
| Lower actuator cover screw location (with the actuator cover shattered) |
 |
| Upper actuator cover screw locations (actuator cover has already been shattered) |
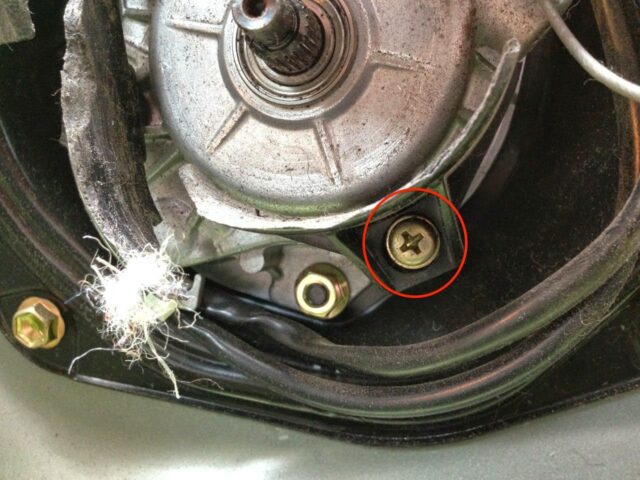
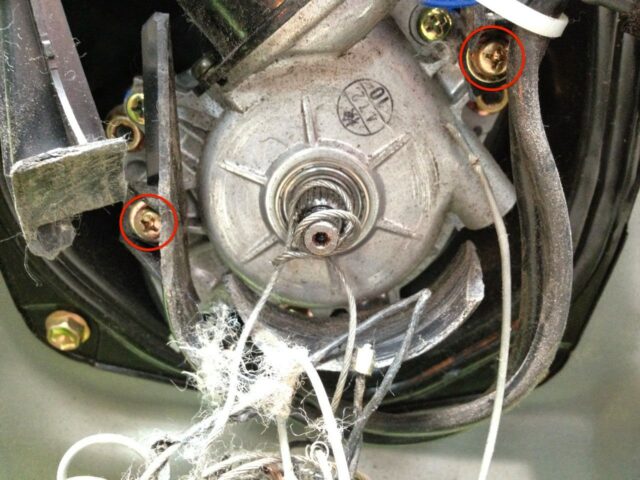
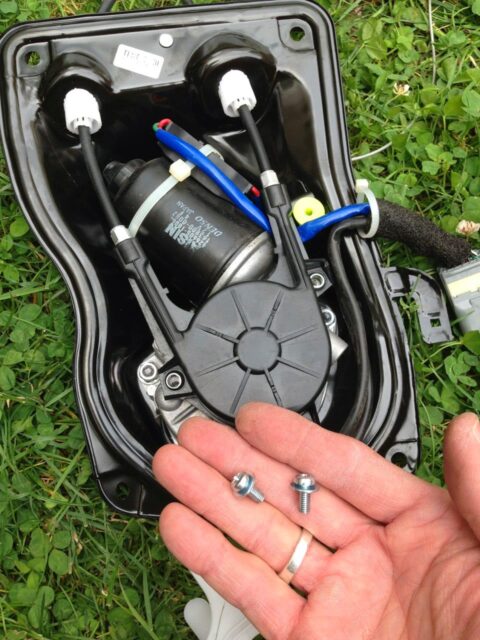
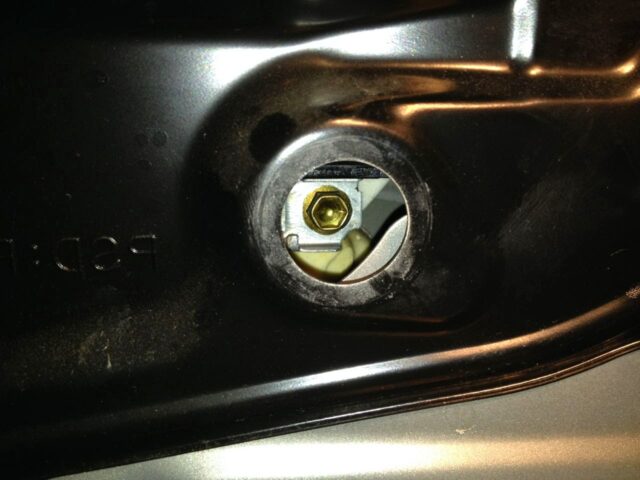
Step 7: Remove the 3 nuts from the motor.
They are 10-mm nuts.
 |
| Locations of the nuts that secure the motor (circled on the left) |
 |
| Location of the motor’s three nuts |
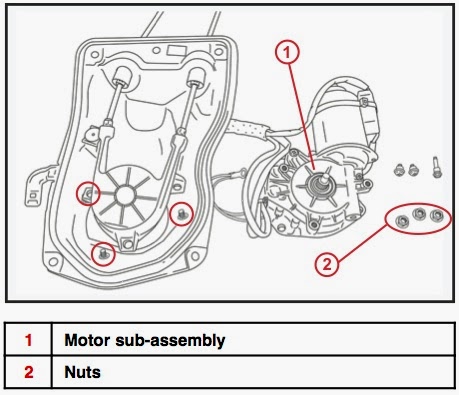
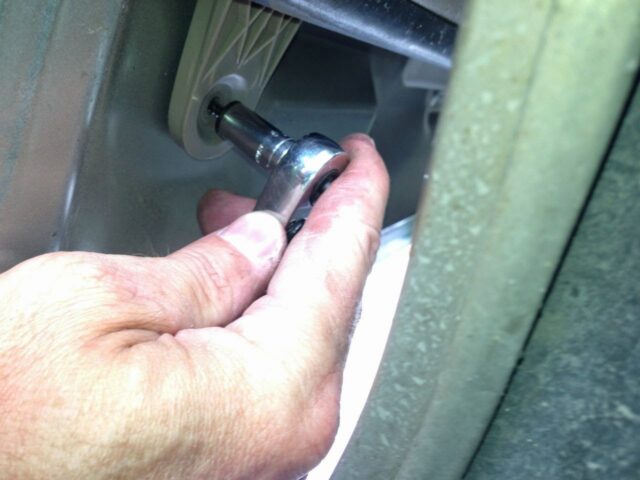
Step 8: Remove motor from the assembly.
On my right door I needed to disconnect 2 ground wire screws. The left motor did not have ground screws. Once you’ve removed the motor from the assembly set it aside for reinstalling into the replacement cable assembly.
Left motor:
 |
| Left motor removed |
 |
| Right drive motor and clutch for right power sliding door of 2004 Toyota Sienna XLE |
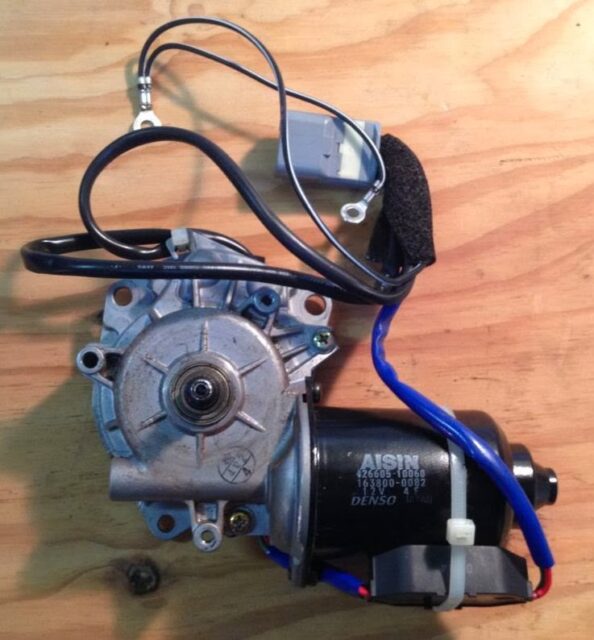
Step 9a: Insert the drive motor into the new cable assembly.
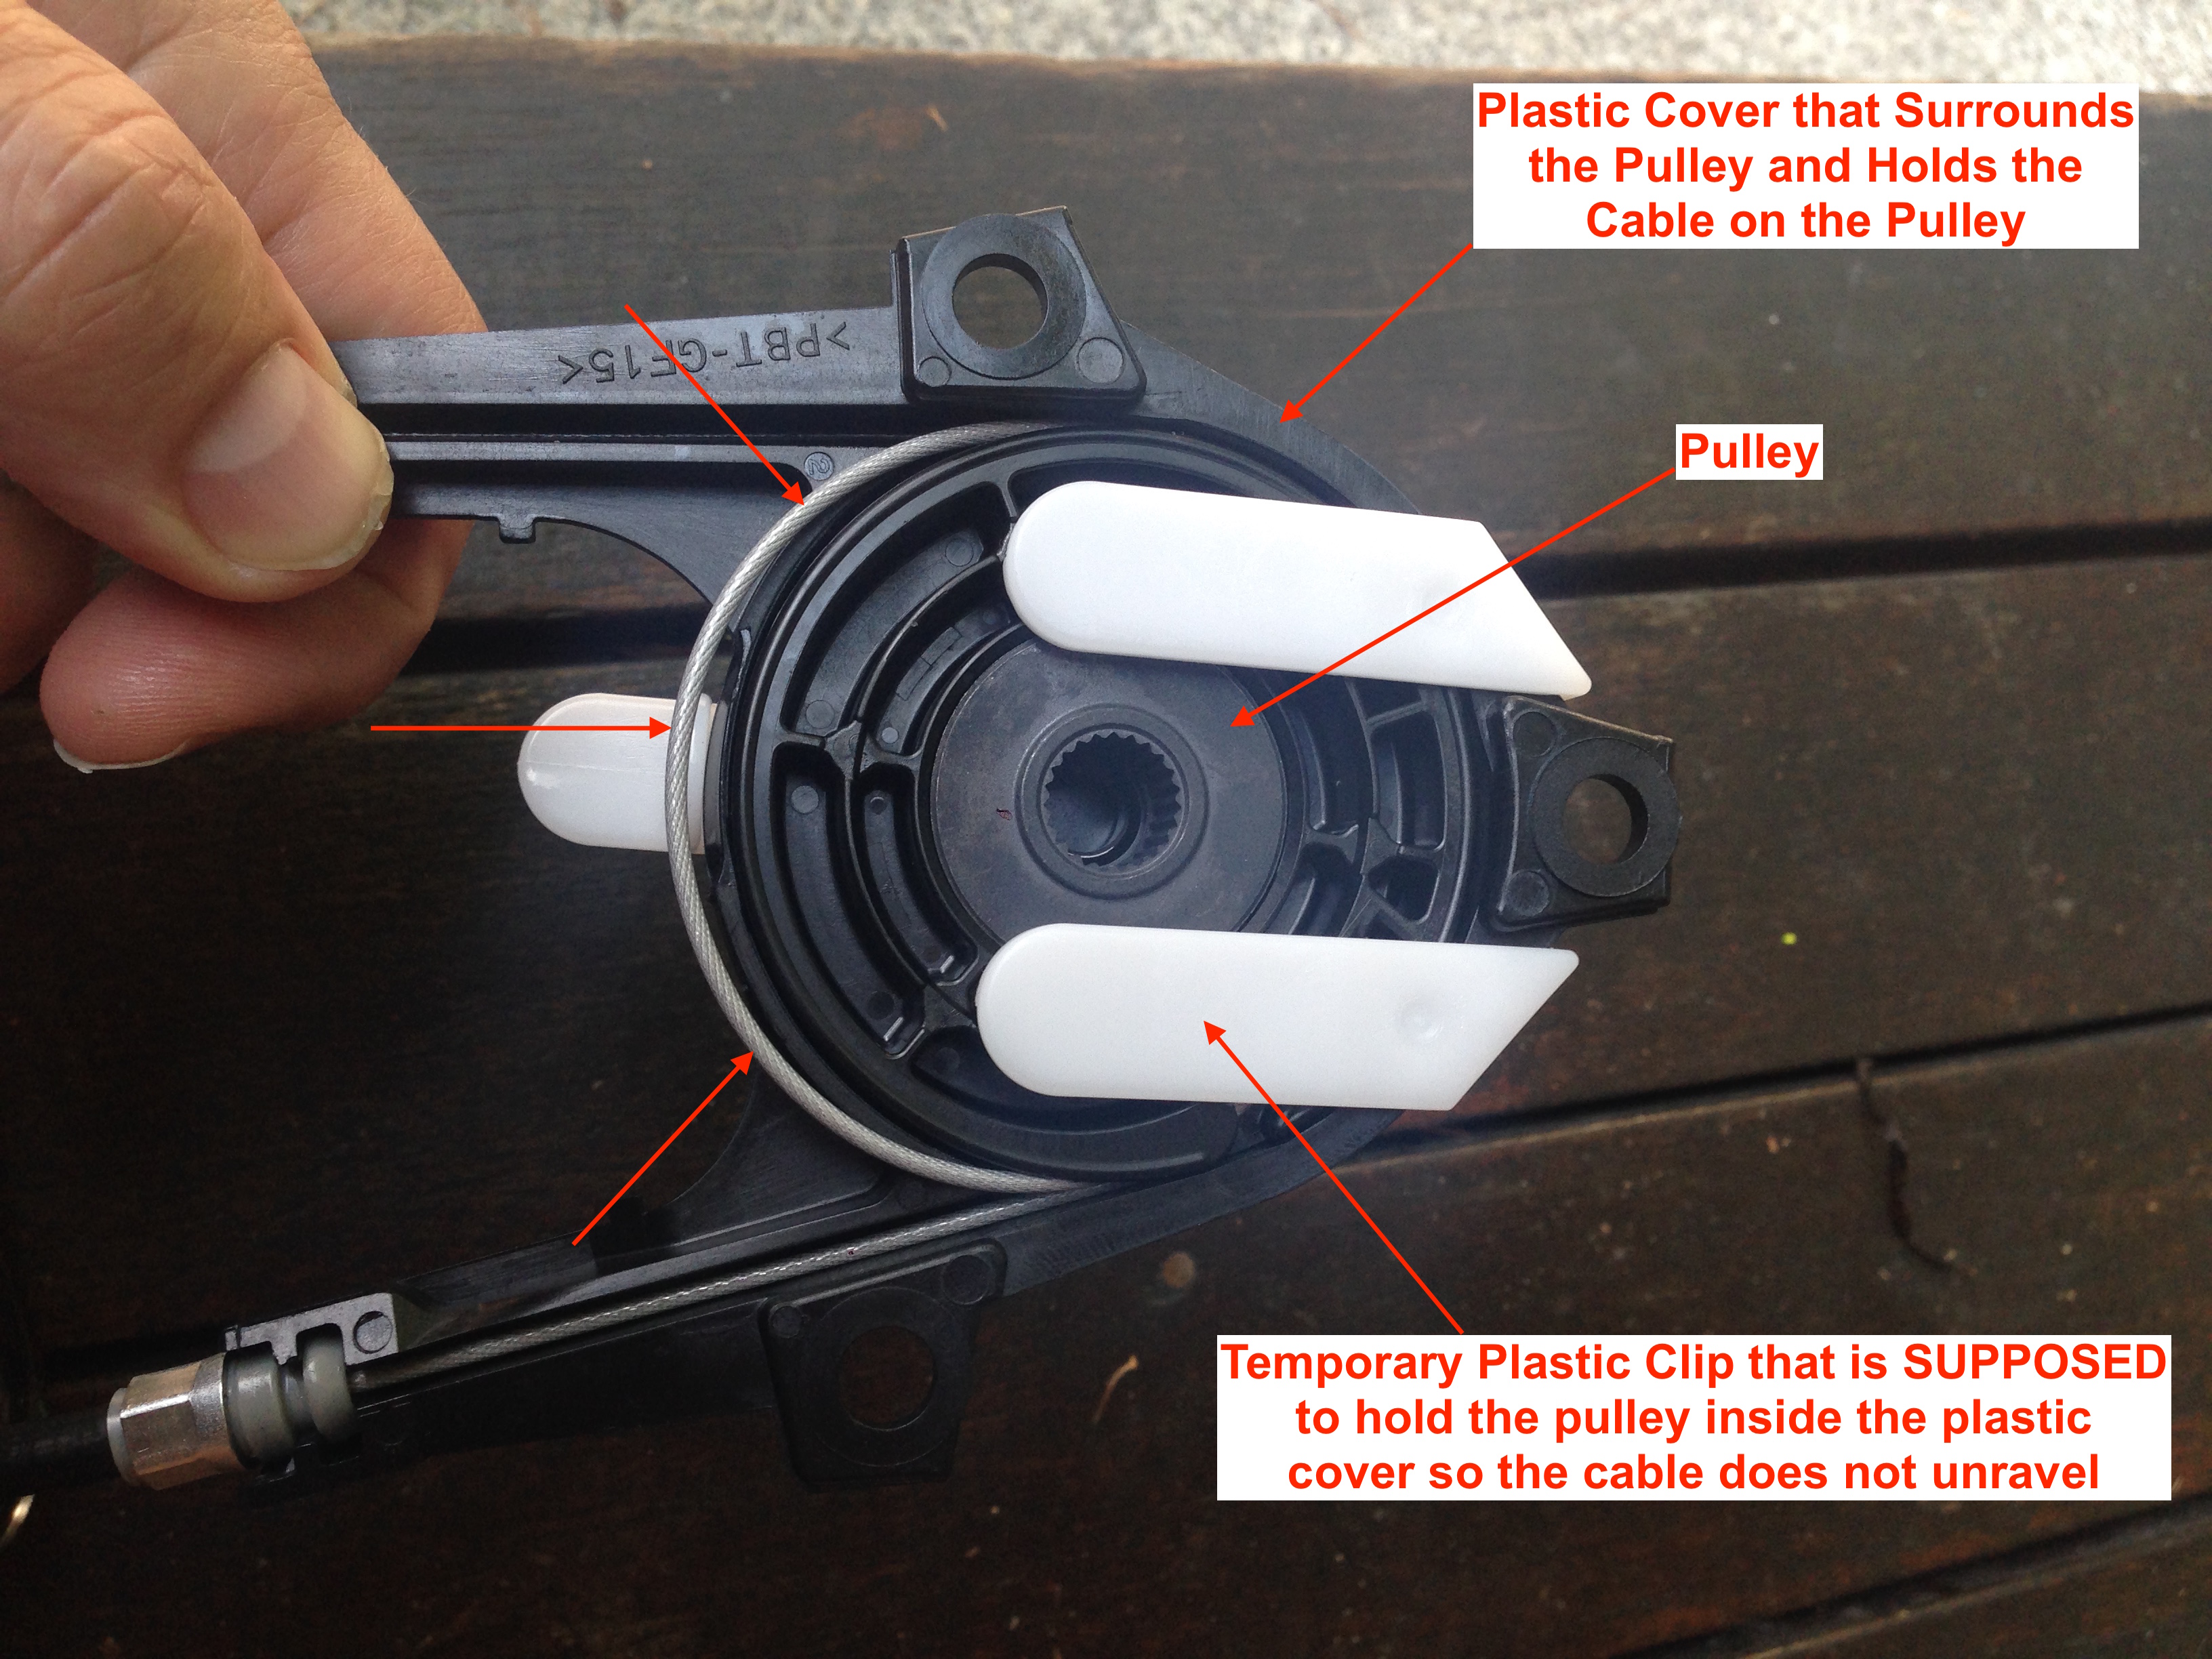
You can lift the cable spool/cover assembly up and out of the pan to make room for the motor. Be VERY careful to keep the spool up inside the black plastic cover as you do not want the cable coming off the spool–each end is wound around the spool the exact number of times, in the correct direction, and cannot be off by even one loop. Just be careful when handling it:
 |
| Pull back the actuator cover assembly to make room to mount the motor–be careful that the pulley doesn’t pop out |
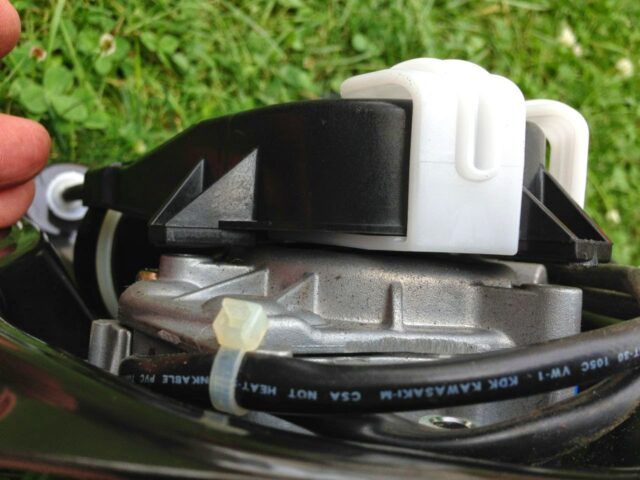
Then place the motor in the pan and install the nuts to secure it. Important: Again, make sure the pulley doesn’t pop out of place while you’re doing this. The nuts are 10mm. The motor bolted in place on the new cable assembly:
 |
| The motor mounted inside the replacement cable assembly |
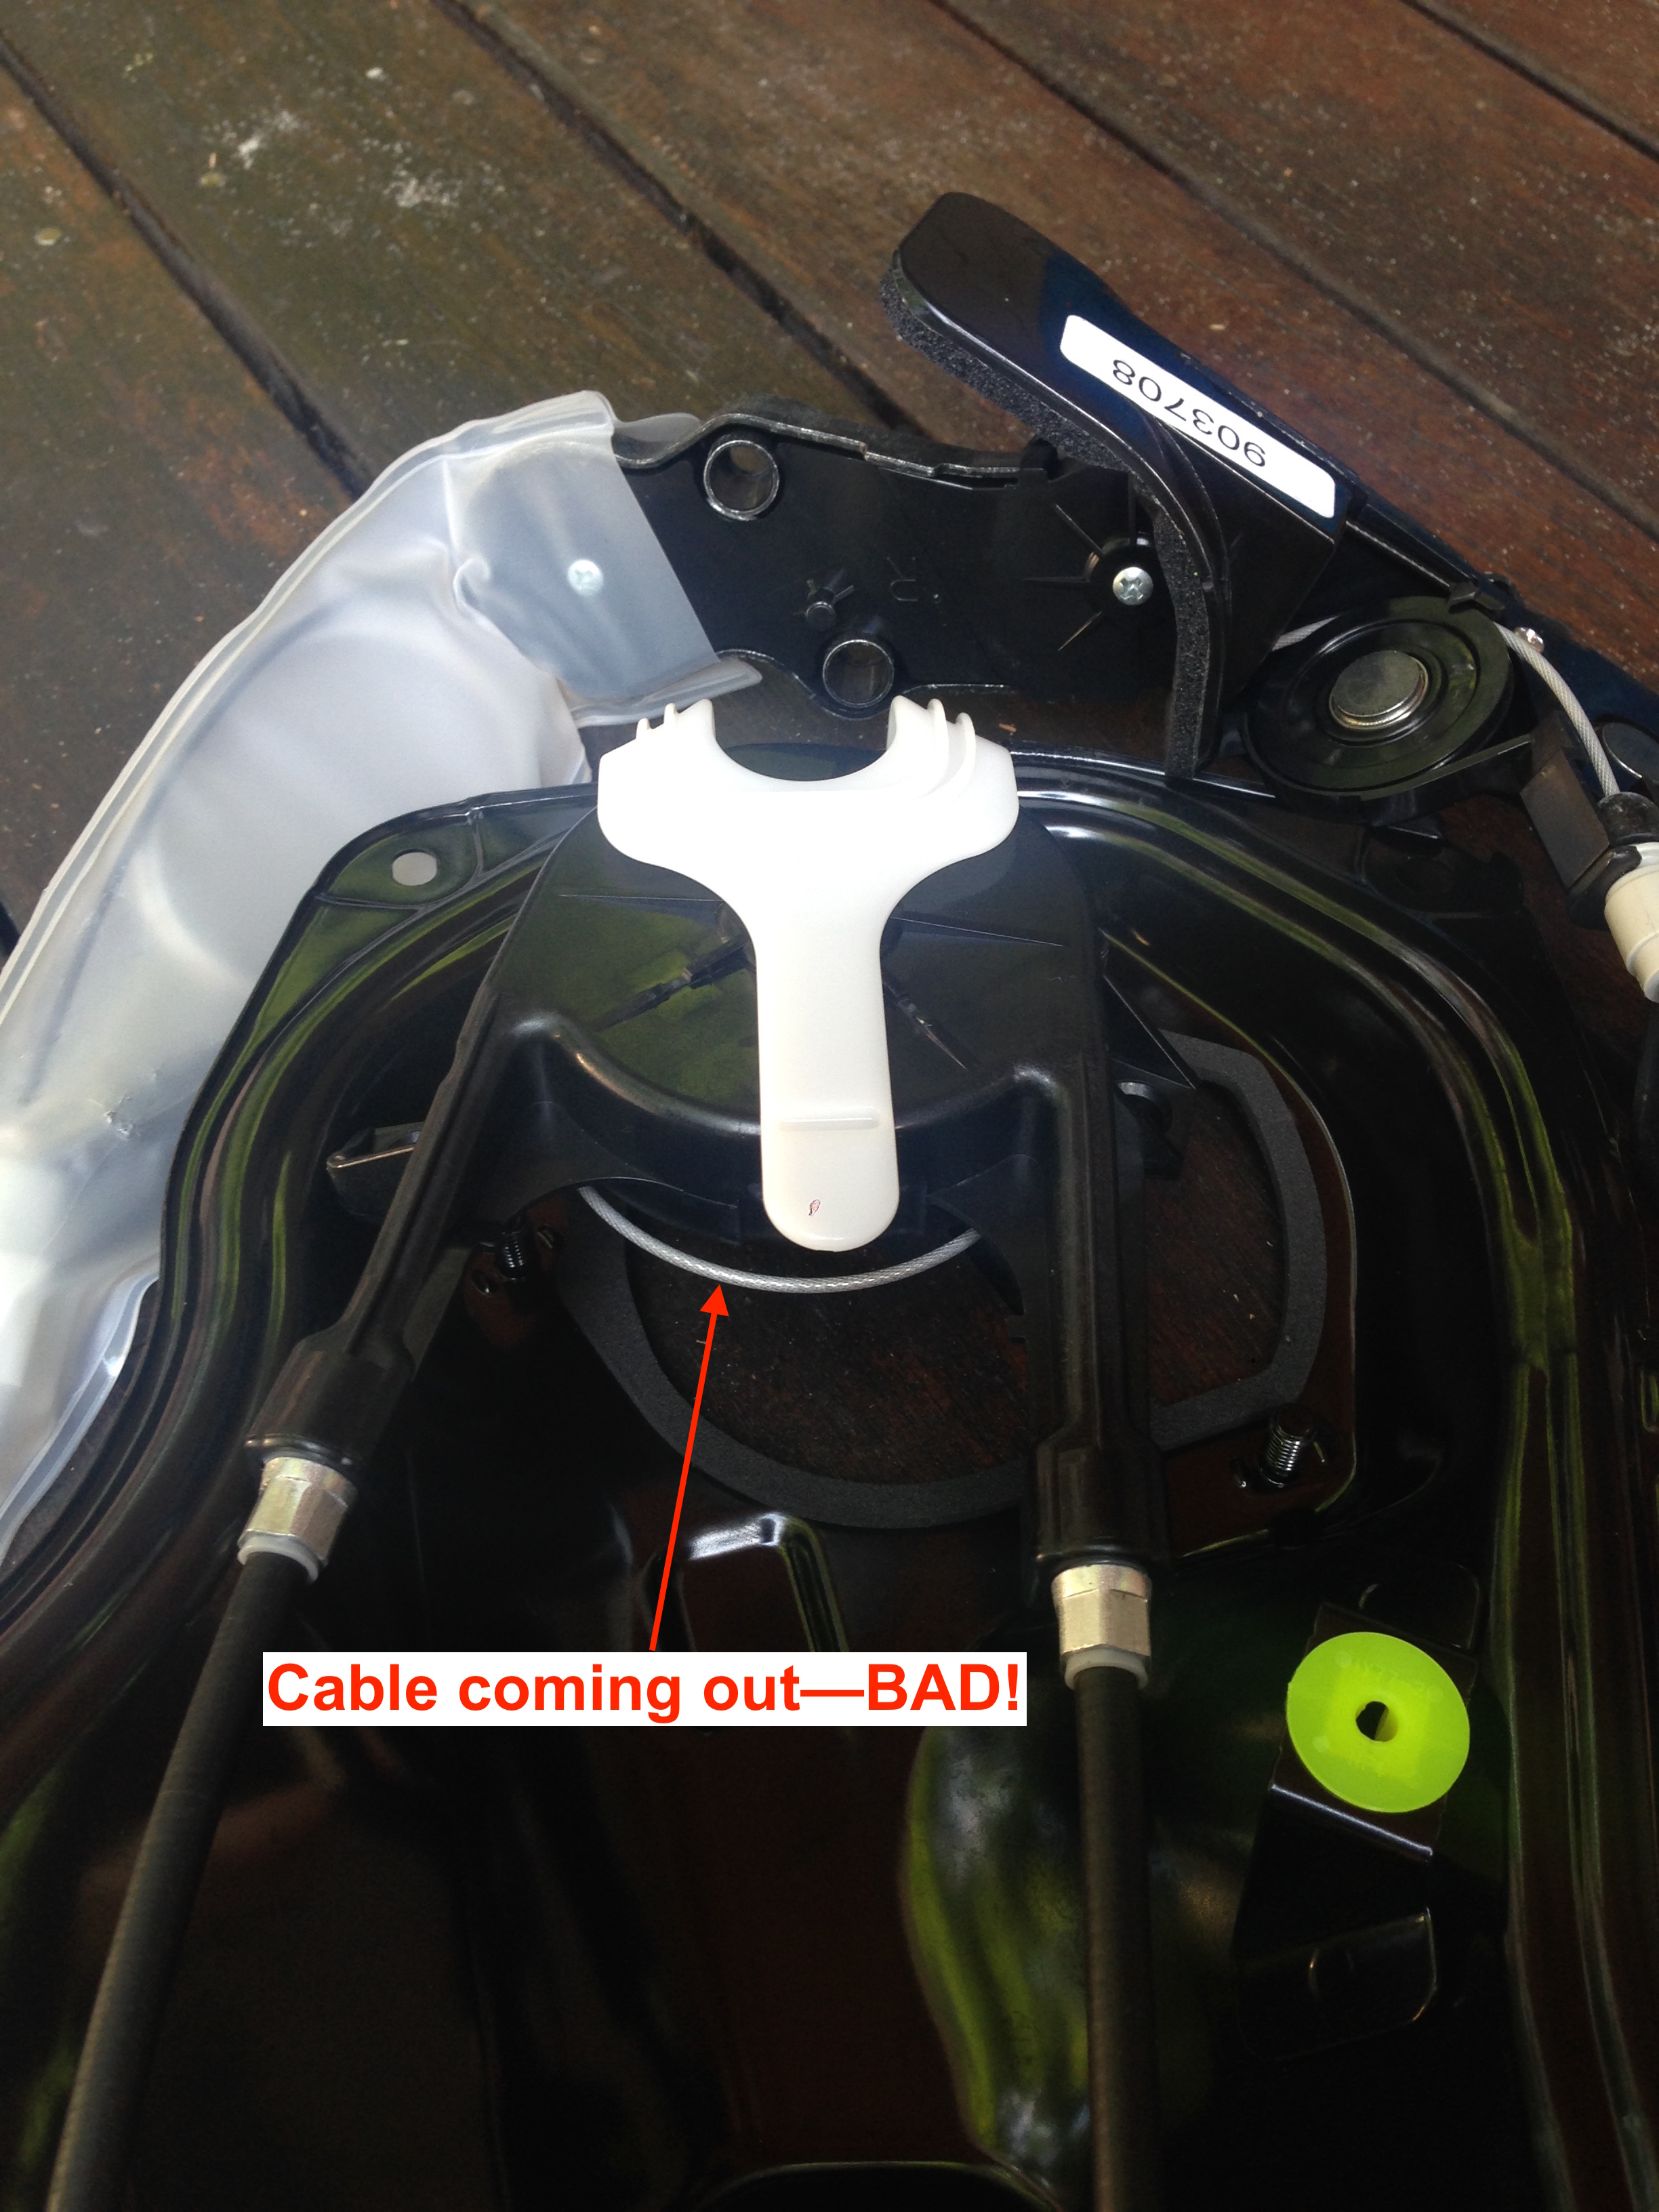
Step 9b: VERY IMPORTANT Cautionary Checkpoint
You will botch your entire installation if you mess this up! Special thanks to Richard, who shared this pictures with me. Before you install the cable onto the motor you must make sure none of the cable is coming out from under the plastic cover around the pulley. This may have happened in shipping or when you were handling the part. If the cable is coming out, you will see something like this:
While being careful to hold the pulley up in the plastic cover you can flip the assembly out of the metal pan, and see the back side:
If you see what is shown above you need to gently pull both cable ends (the ends with the white and black clips) simultaneously, and allow the loop of cable that is sticking out to pull back into the pulley and sit down into the groove in the pulley. Alternatively, one reader suggested that it was helpful to have a second person pulling both cables while they pushed the pulley down–if you have a second person handy, that may be easier. Regardless if you do it alone or with a helper, that exposed loop of cable MUST NOT come off the pulley but must be wrapped back onto the pulley. The cable must be tightly wrapped around the pulley and all of it must be inside the cover or you will ruin the entire part when you try opening your door. If you are unable to get the cable to go back onto the pulley and inside the plastic cover, which holds it all together, do not go any further and give Toyotapart.com a call at 800-581-3033 and they will help and/or exchange the part for your but DO NOT go forward if a loop of cable has come off the pulley and pulled out the end of the assembly (i.e. unwrapped once).
Step 10: Seat the actuator cover assembly onto the motor shaft.
If you haven’t carefully read Step 9b go back and read it–you may ruin your expensive part if you move forward and do not take note of what I mentioned above!
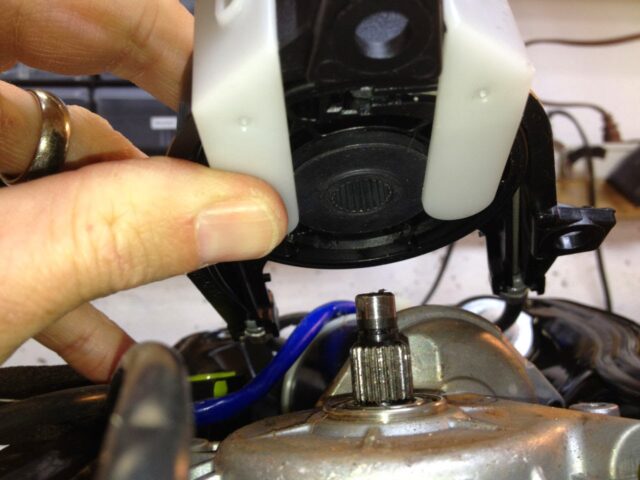
Place the cable pulley on the motor shaft like this leaving the plastic clip in place to hold it in the cover:
 |
| Placing the pulley onto the shaft |
 |
| At this point you can remove the white plastic retainer clip |
Once you have placed the pulley down on the shaft as far as it will go you can remove the plastic clip.
Step 11: Bolt down the actuator cover to the motor.
Important: Make sure to place the 3 bolt collars over the bolts (or place them in the holes first) before tightening them down because you will break the cover when you tighten them down if you don’t have collars on the bolts. Below you can see the collars slipped down into the plastic holes of the actuator cover:
 |
| Actuator cover collars in place |
The middle bolt is long and the two outside ones are short. Also, don’t forget to place the ground wire on the left bolt (note that according to the picture this is the ground wire that only has 1 wire running to it, although it probably matter logistically and definitely won’t matter electrically).
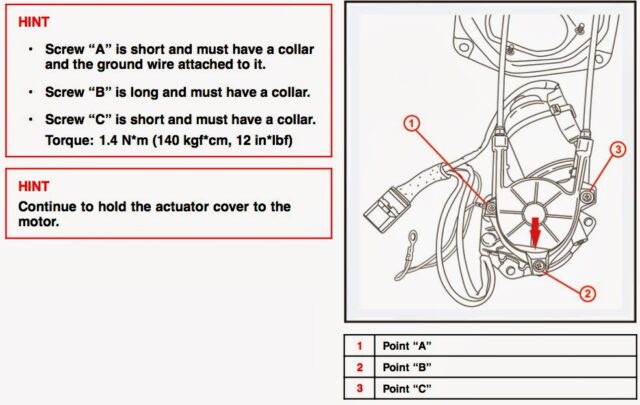 |
| Collared bolt locations on the actuator cover |
Lower long bolt:
 |
| Lower actuator cover bolt–the one long one |
 |
| Two lower short actuator cover bolts |
Here is the newly re-assembled part (right door):
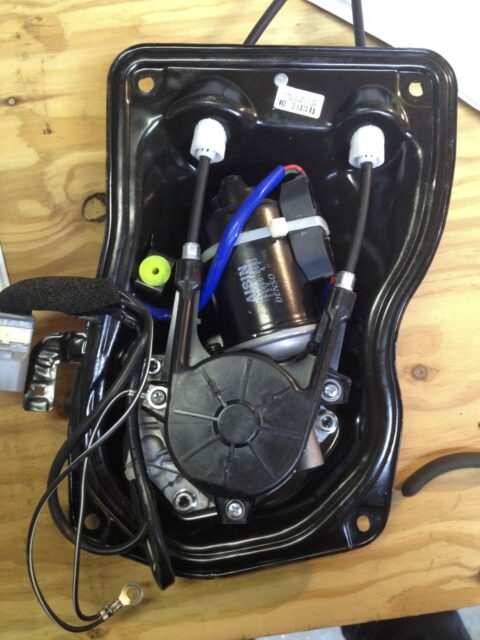 |
| The new cable assembly with the old motor installed in it, ready to be re-installed in the van |
Now that you have a refurbished part you can reinstall it back into your van. Now I’ll continue from where we were at having removed the plastic trim from the inside of the sliding door…
Step 12: Disconnect the old front cable tensioner from the van.
The black rectangular box that the cable terminates in houses a spring that supplies tension to the cable. If you put a knife or a thin flathead screwdriver in between the two “wings” on the sides it will slide straight out out:
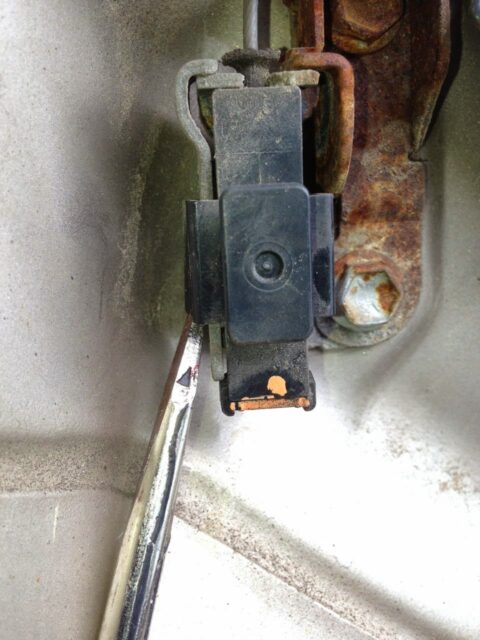 |
| Using a screwdriver to gently lift the tab to remove the front cable tensioner |
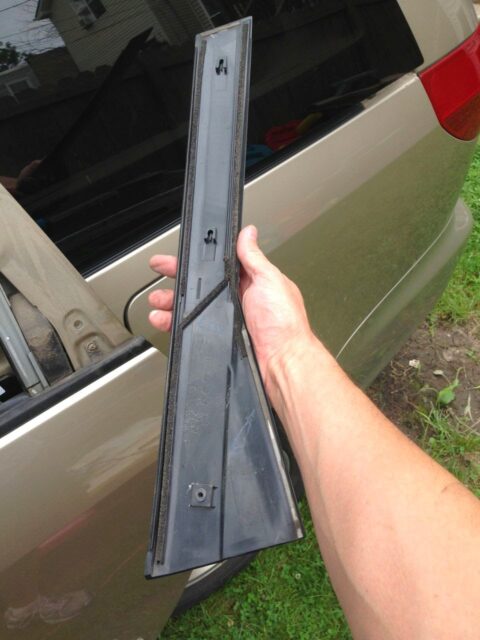
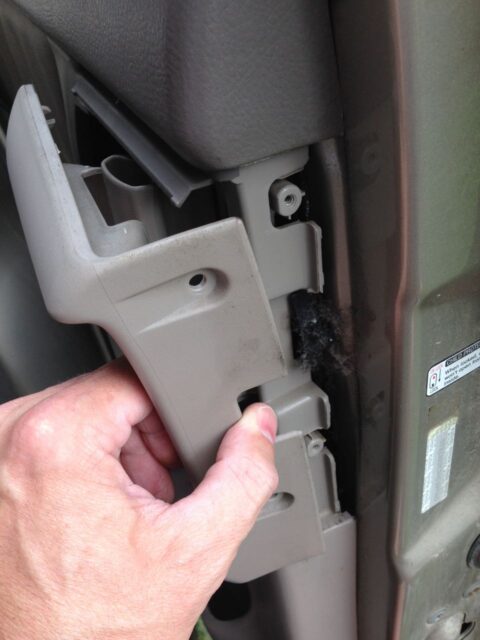
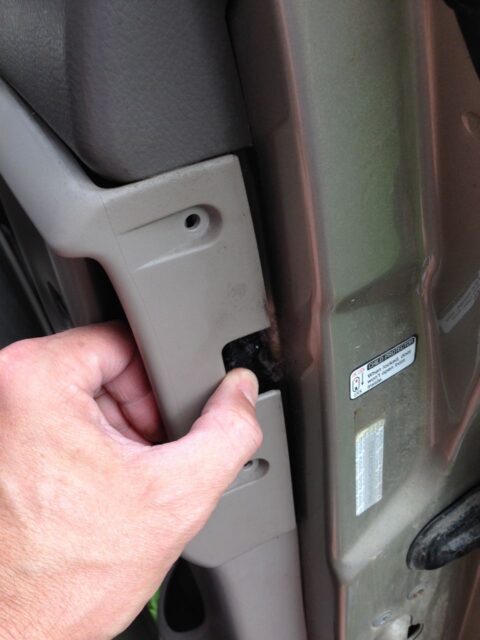
Step 13: Remove the rear window lower trim.
Important: The rubber skirt at the bottom of this piece is attached to the trim so make sure to pry BELOW the skirt against the body of the van. This covers up the rear cable tensioner. In order to pop this cover off you need to take your tape-wrapped flat-head screwdriver and pry up on it.
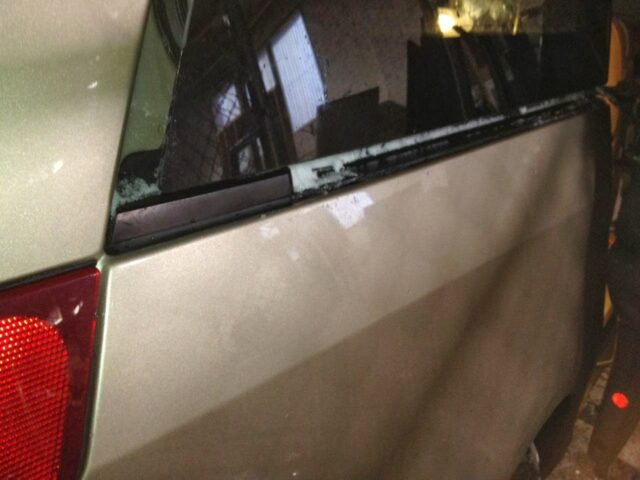 |
| The rear side window lower trim piece must be removed |
On the left side:
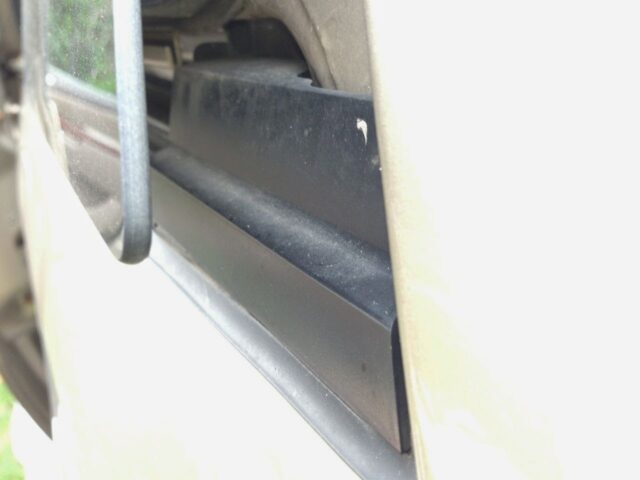
Here is a look at how the piece is attached:
 |
| Quarter Glass Moulding attachment details |
This is what the trim piece looks like on the back–this will help you see what you’ll need to remove it:
 |
| Rear window lower trim piece removed–note the notch on the right side that sits down on the snap |
The second time I did this repair the rubber skirt on the bottom of this part came off. I cleaned the adhesive off the skirt and the plastic trim piece and re-adhered the skirt to the trim. It actually turned out well:
 |
| Applying double-sided adhesive to the lower edge of the trim piece to re-attach the rubber skirt |
 |
| The rubber skirt re-attached with double-sided adhesive |
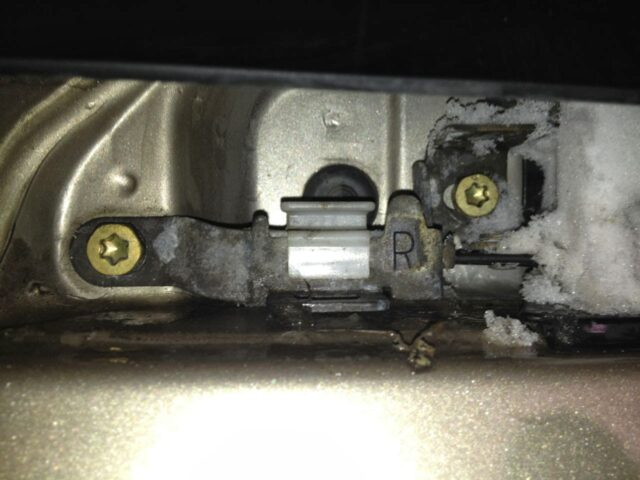
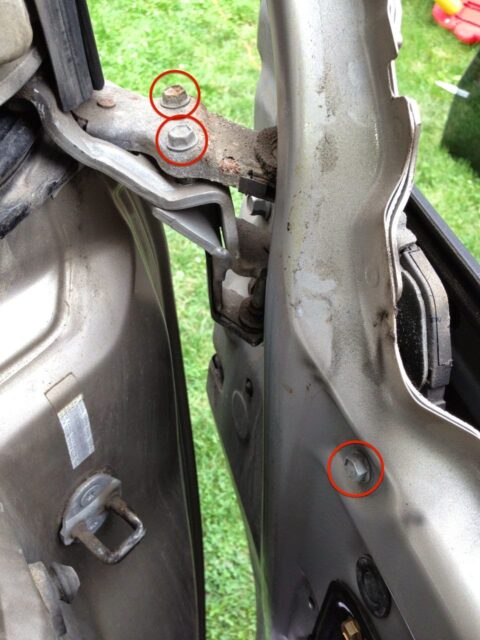
Step 14: Disconnect the rear cable tensioner bracket from the van.
It would be possible to just unclip the cable tensioner from the bracket but I think this one is easier to do if you just completely remove the bracket from the van. It will be easier when you are re-assembling to have the bracket removed too. On my 2004 Sienna, they were connected with two Torx-30 head bolts. I’ve heard at least one other reader with a 2006 report that theirs were attached with 10mm bolts.
Once you have the bracket off you can gently pry off the old tensioner with a pocket knife or a flat-head screwdriver.
Step 15: Remove the rear sliding door window frame moulding sub-assembly.
Caution: read all my instructions below to avoid damaging this piece.
 |
| Exterior rear trim piece of sliding door window |
There is one Phillips-head screw on the inside of the door:
 |
| Screw location on inside of door for rear exterior trim of sliding door |
From the manual, slide the trim piece straight up to remove:
 |
| Rear Door Window Frame Moulding Sub-Assembly |
 |
| Rear Door Window Frame Moulding Sub-Assembly Detail |
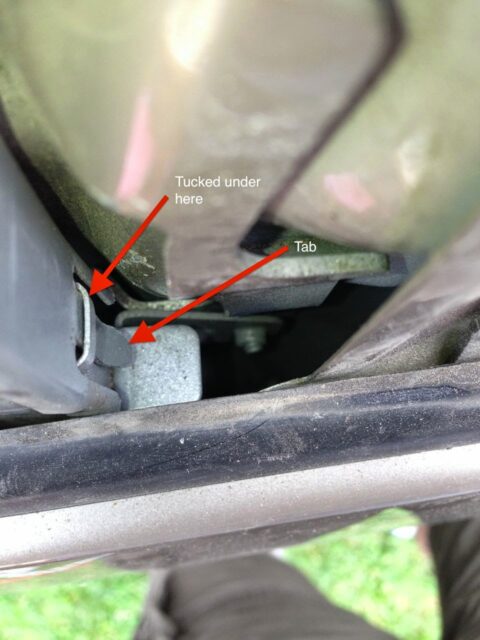
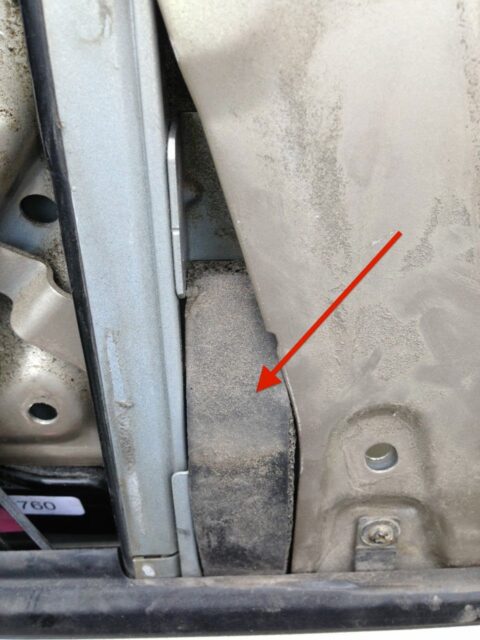
When this part was originally installed there was double-sided adhesive located on the area circled below. The arrow points to the white area where the adhesive remained “stuck” after all these years. The shop manual suggests heating up this piece with a heat gun to loosen the adhesive before removing this part but after 10 years the right side didn’t even stick at all and this side didn’t have half the adhesive stuck at this point.
 |
| Location of adhesive strip on front edge of Rear Door Window Frame Moulding Sub-Assembly |
I gently lifted up the lower front edge to test what adhesive still held at this point. Be careful not to lift up the top half too much because it is still being held in place by the two snaps.
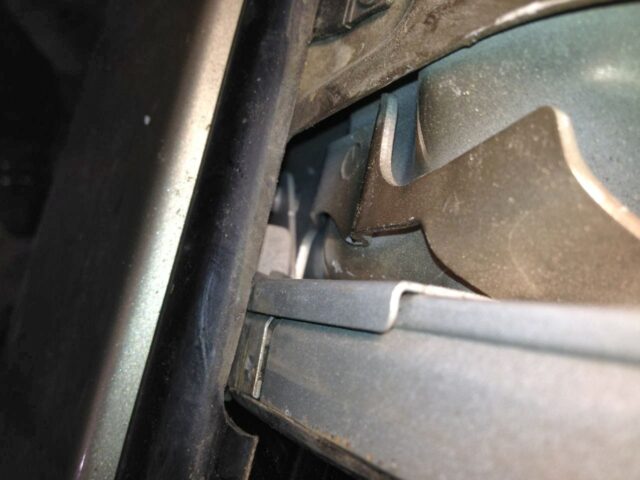
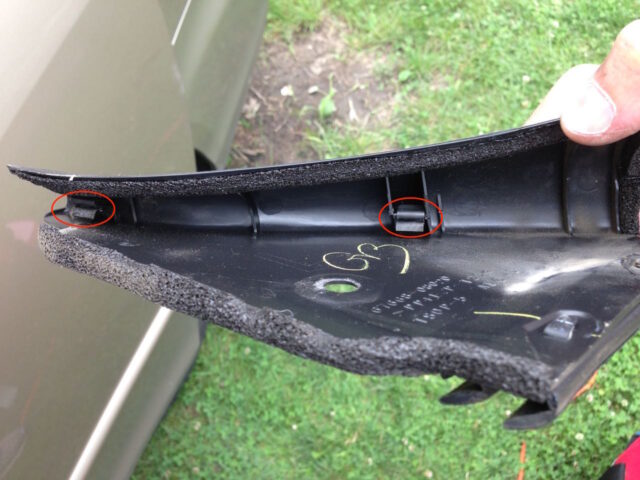
The first time I did this repair I had not read ahead well enough and it was difficult for me to get off because I didn’t slide it up–DON’T MAKE THAT MISTAKE. Here’s a good look at the part in tact:
 |
| Location of the top two “hanging” clips that hold this part tight to the door frame |
There are two clips that the part “hangs” on, on the top and I broke the place where the connector connects to the trim of the top connector:
 |
| Broken piece of the top connector clip–luckily a little was left |
The door with the trim piece removed:
 |
| Door with the rear exterior trim removed |
Tip: that piece of foam you can see wedged between the rear edge of the door and the window channel may fall down into the door. Remove it and set it in a safe place and I remind you to reinstall it later (thanks to reader RobDS for pointing this out).
The top clip stayed on the van (and broke the trim):
 |
| Top clip of the exterior window trim |
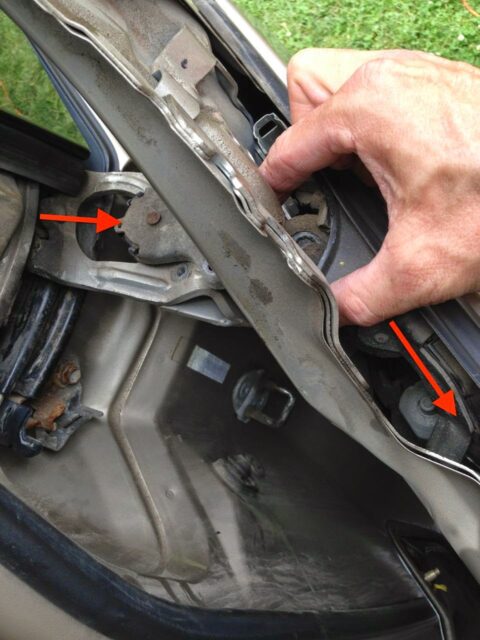
Step 16: Remove the rear channel of the sliding door window.
This is necessary for completely removing the window. Important: Do not remove the bottom nut, only loosen it half way! Remove the top two bolts:
 |
| Location of bolts for the rear window track assembly–DO NOT REMOVE THE BOTTOM BOLT |
This is the shop manual’s view of what we’re dealing with here:
 |
| Slide Door Window Track Assembly Bolts |
Now you can pull down the rubber channel and lift out the metal part from below:
 |
| The rear channel removed |
It tried to store the channel out of the way but it kept falling down:
Reader Ronald P. shared a tip with me in the comments that he used a bungie cord to tie the window channel up and out of the way until he removed the window. After removing the window, he put the piece back in its place until the window reinstallation. This “manages” that awkward part so it doesn’t get in your way or scratch the paint job of your van. Thanks Ron!
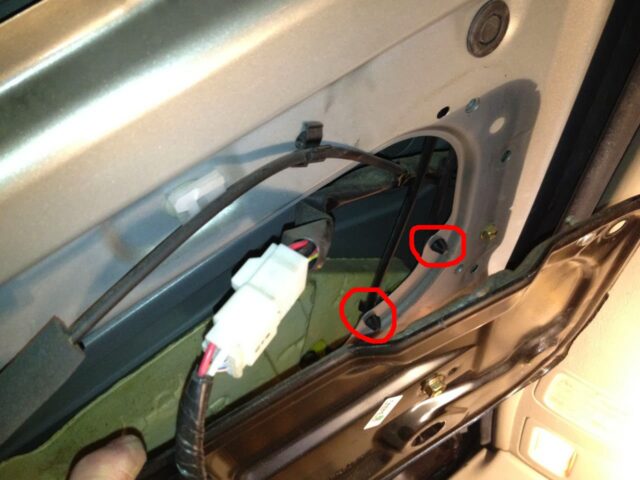
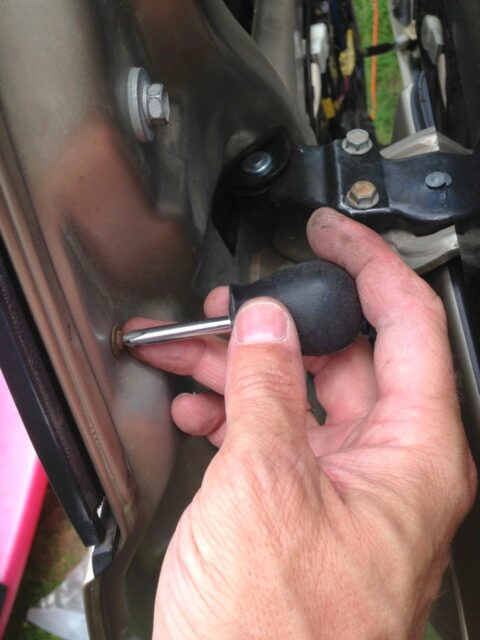
Step 17: Unbolt the window and lift it out of the door.
On the inside of the door look for the two rubber plugs:
 |
| Remove these plugs to access the bolts that hold the window |
Remove these two plugs and then adjust the window height so you have the window bolts centered on the holes:
 |
| You can line up the window bolts with the holes for much easier removal |
If you disconnected the window switch then you’ll need to re-attached it to the wiring so you can roll the window down. I tried rolling down the window with the driver’s door switch but the window will not operate without the door’s switch installed:
 |
| Power window switch |
Caution: Be careful not to drop the bolts or socket down into the door when you are removing them!! The second time I did this repair I actually did drop the left bolt down into the door frame. I was able to retrieve it easily once I removed the pan that houses the motor/cable assembly. A trick I figured out when doing another repair on this door is to put some electrical tape up and over the edge of the socket so that the socket fits tighter over the bolt and then the bolt will stay in the socket:
 |
| A little electrical tape wrapped over the edge will help retain the bolt when it is freed |
 |
| 10mm socket on one of the two window bolts |
 |
| The bolt will stay in the socket (and not drop down into the inside of the door) with the extra electrical tape on it |
One reader, David D, mentioned they accidentally caught their socket on the sheet metal and dropped the socket head down into the door. If you want to be really safe, use my tape trick to secure the bolt in the socket AND, in addition, tape the socket onto the extension, so you are less likely to drop either into the door. Thank you David for sharing!
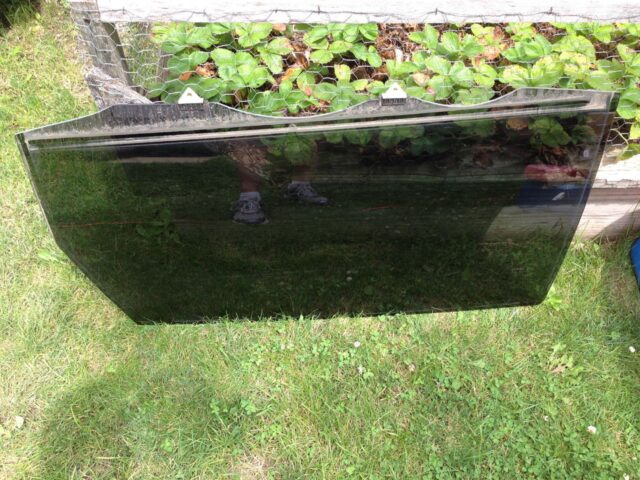
Once you have removed these two bolts you can lift the window up and out of the door. Be careful not to break the window (by bumping the edge on concrete, etc) once you have it removed from the van. One reader, RobDS, mentioned that by removing the window trim it made it much easier to remove the window. To remove the lower window trim there is one screw on the back end and then the trim piece is held in place by friction tabs.
Here’s what the window looks like removed:
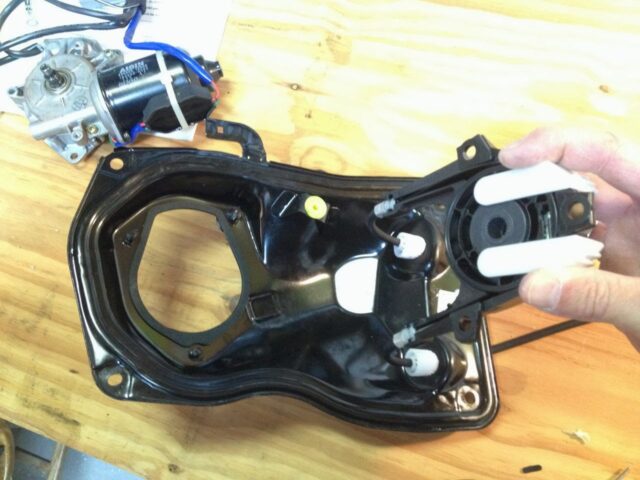
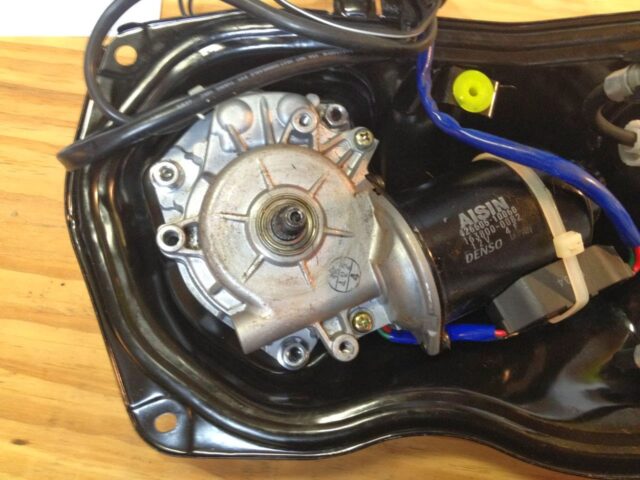
Step 18: Remove the 4 bolts from the motor/clutch pan.
They have 10-mm heads on them. One thing to note is that there is a pin that sticks out of the top of the pan and into the van door and you do not need to remove this. Once I removed the bolts the rubber gasket holds the pan in place. I needed to use a flat-head screw driver to break it free.
 |
| The 4 bolts that hold the door drive motor assembly pan to the door |
In real life:
 |
| Bolt Locations on the pan of the cable assembly |
Step 19: Remove the 3 bolts from the top of the motor/clutch assembly.
The image below only shows one bolt on the top but note the two paths of dotted lines going down into the assembly to indicate the two bolts on top.
 |
| Remove the 2 bolts on the top where the pulleys are and the 1 bolt on the inside of the door |
 |
| Top three bolt locations of the motor/clutch assembly–remove all three |
FYI: All three bolts are identical.
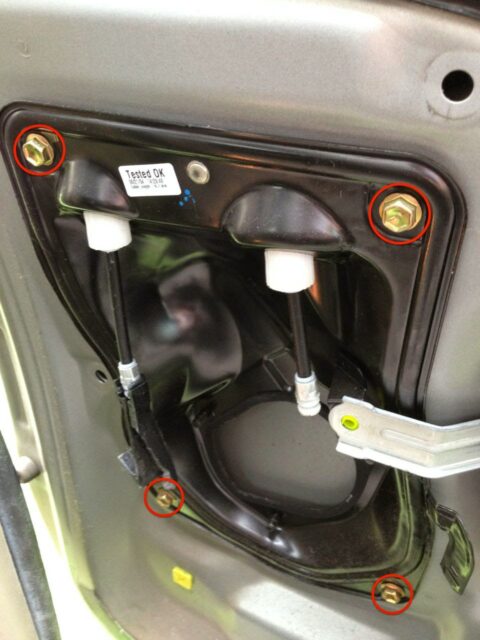
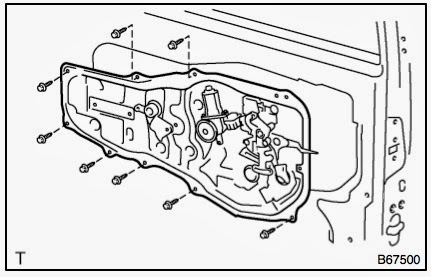
Step 20: Remove the bolts from the black internal access panel (technically called the “attachment panel”).
This will give you access so you can unclip the cables and then guide the old cable system out and then new one in. The image below doesn’t show the bolt that goes through the plastic handle assembly, which must be removed as well.
 |
| Bolt locations of the internal access panel–note this is for the left door |
In real life, circled in red are the 9 bolts you must remove:
 |
| 9 bolt locations on the internal access panel |
On the right door, which had ground wires attached to bolts, I taped the grounds in place so that I would remember to re-connect them:
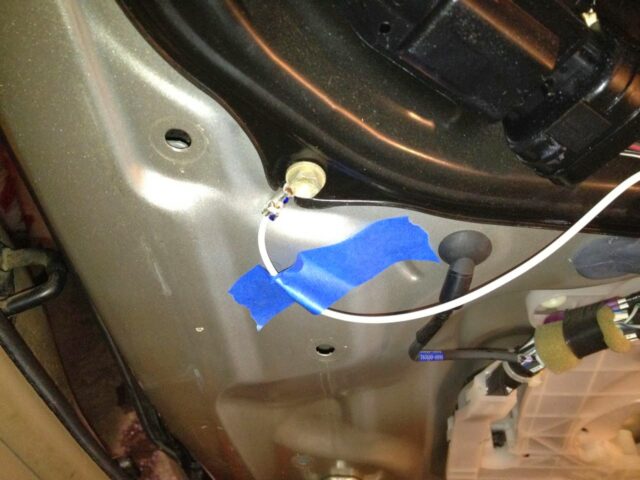 |
| One of the grounds taped in place (because I have bad memory) |
Take note that the ground bolts are longer:
 |
| The ground bolts |
You will need to pry the panel away from the door because there is a foam gasket that makes it stick to the door. I was able to do this with my fingers though. You are not going to move the panel far from the door because it will still be attached to various other cables.
Step 21: Unclip the cables from the door.
You won’t be able to pull the cable assembly down out of the door if you don’t unclip these first. You don’t need to remove the clips from the door frame, simply slip the cables out of the clips. The view from the top of the cable clips (on left door):
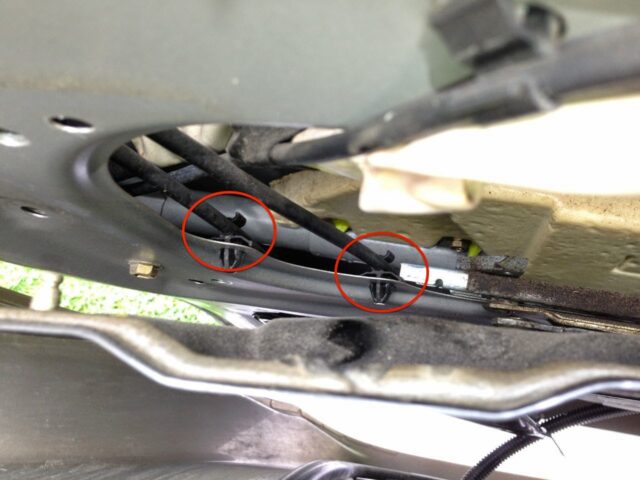 |
| Cable clip locations (view from top looking straight down) |
The cables unclipped:
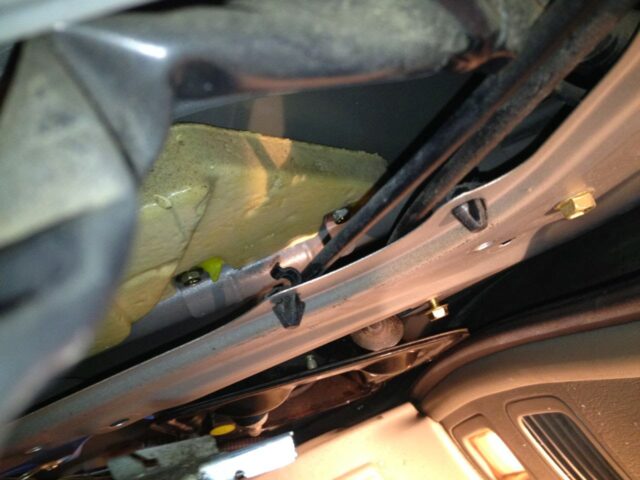 |
| Unclip the cables so you can remove the assembly from the door |
One reader reported that they accidentally broke one of these clips. They are Toyota part number 90467-13046 and you can buy them here.
Step 22: Pull the cable assembly down and out of the door.
This takes a little trickery and playing around with the assembly to get it to go through. I haven’t found a trick to it but it does not exactly go easily.
 |
| Beginning to feed the cable pulleys into and down into the door |
 |
| Pulling the top pulley ends of the cable assembly down and out of the door |
It takes a little wiggling around to get the cable assembly out of the door. In my experience they tend to catch on the bottom of the pulley.
Step 23: Feed the new cable assembly up through the door.
This took a little work for me and I’ve heard it reported in the comments that this step is one that takes some persistence. That pulley end will fit through there but you have to stay at it.
Make sure you run the cables in front of the other door latch cables and don’t get the power door cables twisted when you feed the pulley ends up and through the door (I did this the first time–you won’t have enough cable length if they are twisted. Reader RobDS mentioned that disconnecting the wiring harness from the other cables made this step easier. Mental note, here is a picture of which cable goes in front of the other:
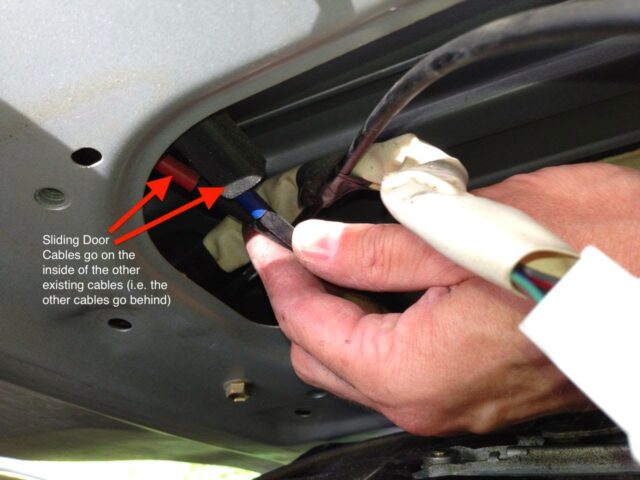 |
| Cable Paths |
Step 24: Verify the path of the cables through the hinge hole.
Make sure to feed the cables down through this hole before completely feeding the pulleys up and into place.
 |
| Feed the cable ends down through that hole in the door arm |
One reader forgot to do this crucial step and it scraped up his cables. Make sure to run the ends of the cables through the hole pictured above before going forward with the repair.
Another one of my readers, ttrantham, made the following comment about this step that may be helpful to you when you attempt to line up the bolts of the pulley assembly:
be sure you close the door enough so the top of the hinge is clearly visible and you can see how the pulley fits into the hinge. I had the door open too far, and I didn’t see the tab at the top of the pulley wasn’t thru the hole in the hinge. It was still a challenge to line up the holes, but pulling the door shut more made it easier.
Make sure the plastic dust shield is clipped in place. Here is a picture, compliments of reader George M, which shows the dust shield properly clipped in place:

Step 25: Reinstall the 3 bolts on the pulley end.
Start by just inserting the bolts but not tightening until you have started all three bolts. I started the lower one first:
 |
| The lower bolt of the pulley end of the cable assembly |
 |
| Installing the very top two bolts on the cable assembly |
Step 26: Insert the cables into the two clips.
 |
| Re-clip the cables |
Step 27: Reinstall the 4 lower bolts on the cable assembly.
If you are working on the right door, make sure that the lower left one includes the ground from the motor:
 |
| Don’t forget the motor ground |
 |
| Lower bolt locations of the cable assembly |
Re-connect the motor’s power connector. You’ll need to reinstall the one arm from the computer too, since it screws to the cable pan.
Step 28: Re-bolt the black metal panel (technically called the “attachment panel”) in place.
There are two “pegs” that stick out of the top edge of of the metal panel that allow you to “hang” the panel in place so you can then easily bolt it in place:
 |
| Diagram of the attachment panel |
Step 29: Reinstall your window.
To slide the window back into place make sure you HAVE NOT reinstalled the rear window channel. This is what it should look like going back in:
 |
| Note: the rear window channel is not installed when reinstalling the window |
Make sure not to drop the bolts down into the door when you are re-bolting the window in place. Use my trick of putting electrical tape up and over the edge of the socket to help retain the bolt so you don’t drop them down inside the door:
|
| Put a couple small pieces of electrical tape up and over the edge to retain the bolt |
Put the tape on as seen above and insert the bolt head into the socket as seen below and make sure it fits tight and does not fall out:
|
| The bolt will fit tightly into the socket |
Also, check the front and back rubber window track once you have reinstalled the window. The rubber track was kind of turned inside out and I wasn’t able to roll up the window all the way until I untangled it.
 |
| Make sure this rubber gasket on the front edge of the window is not accidentally twisted or tucked in |
Note: Don’t forget to reinstall those plastic plugs that gave you access to the window bolts. I re-assembled my door and forgot–ugh. And I’m particular so I tore it apart and reinstalled them!?!?
Step 30: Reinstall the rear window channel.
 |
| Reinstalling the upper section of the Rear Window Channel |
 |
| Top view of inserting the metal window channel down into the part that stayed in the door |
This piece of foam needs to be reinstalled as well:
 |
| Foam piece goes on the rear side of the metal window channel |
Step 31: Secure the window channel.
Reinstall the two window channel bolts and then tighten the lower bolt. More than one reader has reported cross threading one of these bolts when reinstalling the top two window channel bolts–even after adding this warning, so please don’t ignore it. I would start by turning them backwards by hand and then when you hear/feel the threads drop down, turn them clockwise to get them started and then you can use a socket and ratchet to tighten them.
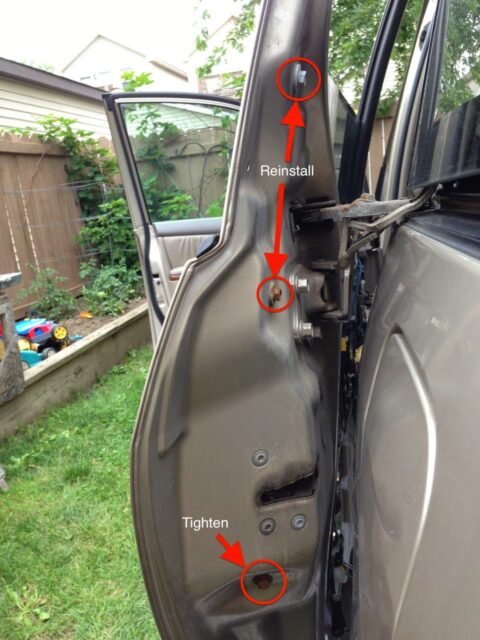 |
| Location of rear window channel bolts– Reinstall the top two and then re-tighten the lower one |
Step 32: Reinstall the rear sliding door window frame moulding sub-assembly.
 |
| Rear sliding door window frame moulding sub-assembly ready to be reinstalled |
Slide the moulding down over the top two clips and then reinstall the Phillips head screw.
 |
| The moulding must slide down and onto the two white button-headed clips at the top |
 |
| Reinstalling the lower screw |
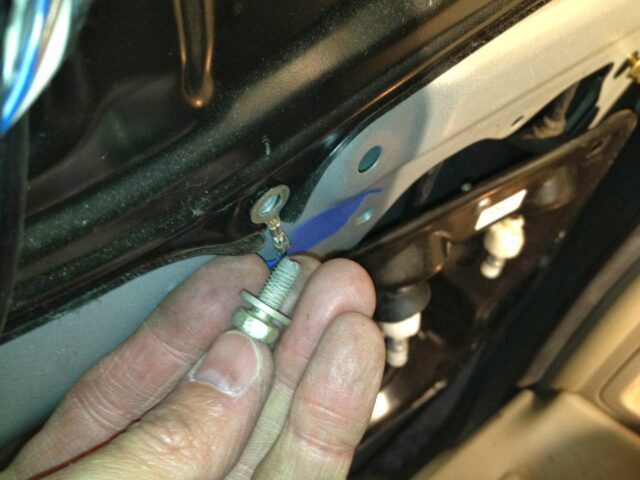
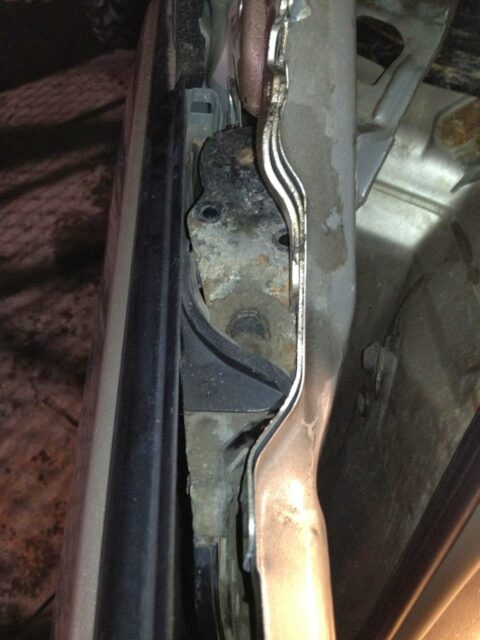
Step 33a: Connect the FRONT cable tensioner FIRST.
I tried installing the rear one first but was forced to backtrack. Install the front one first while there is slack in the cable (this is a picture of the right door):
 |
| The front cable tensioner installed–make sure the cable follows the correct path |
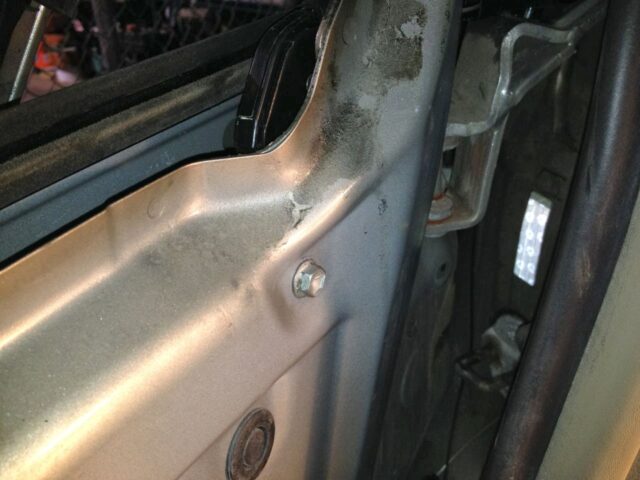
Important Check:
Reader Rolan Y. ran into problems with his repair because the black curved plastic piece on the end, which keeps the cable from slipping off the edge of the bracket, was missing. DO NOT proceed unless this black piece is in tact. Here is a picture he provided with the broken bracket and the other side where the bracket was in tact:
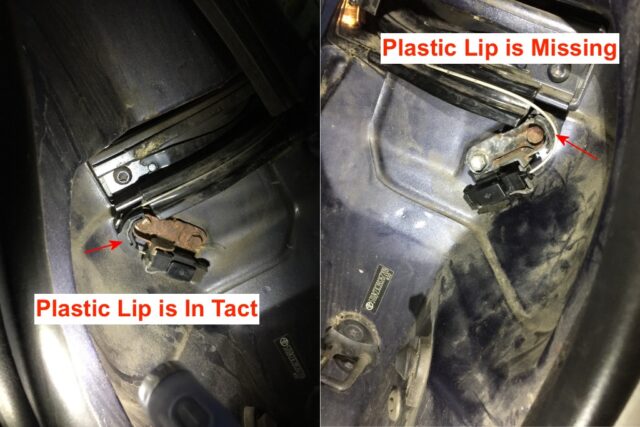
Here is a link to order the part if yours is broken: Slide Door Bracket
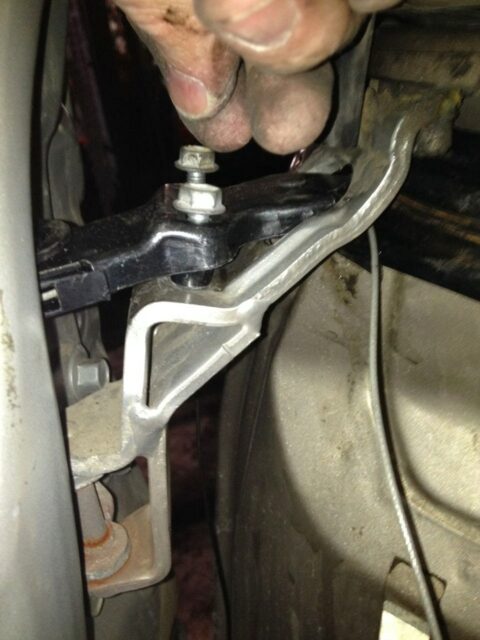
Step 33b: Connect the rear cable tensioner.
Tip: It is MUCH EASIER if you have completely removed the bracket from the van and installed the tensioner onto the bracket first:
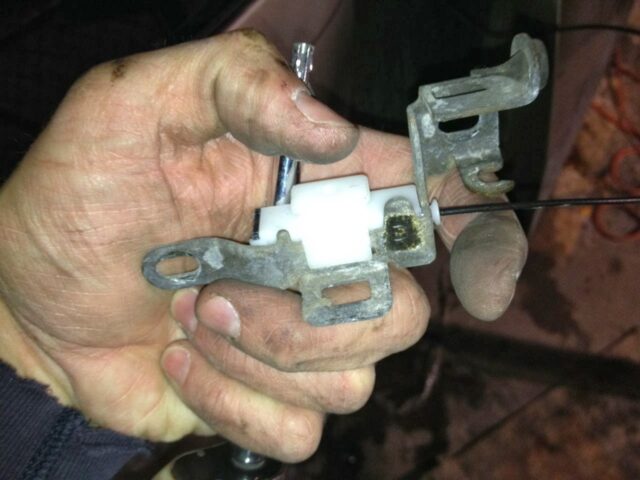 |
| Rear tensioner installed on its bracket while removed from the body of the van |
Now make sure to hook the bracket onto the post on the van, sliding the door so that all the slack it taken up from the front cable:
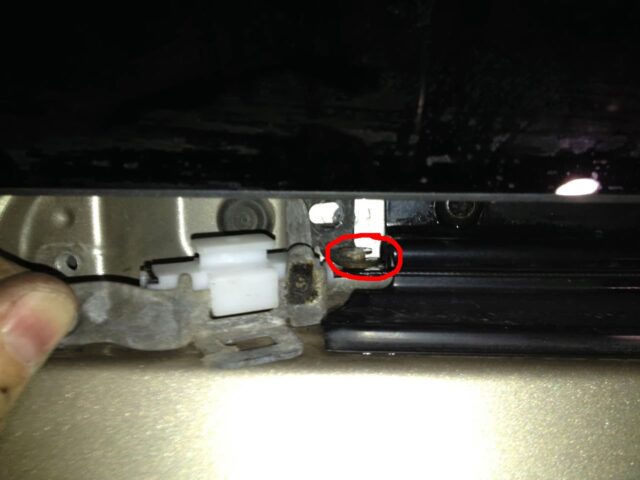 |
| Circled in red is the place where the bracket hooks onto the post of the van. |
Troubleshooting Tip: If your cable appears to be too short at this point you should slide the door towards the back of the van while holding this cable tight. This will take up any slack in the system. One other reader reported this solving his “short cable” problem.
Bolted down (this picture is actually from when I mistakenly installed this one first, not the front one first, that’s why there is slack in the cable–when you install the second cable there should NOT be any slack in the cable):
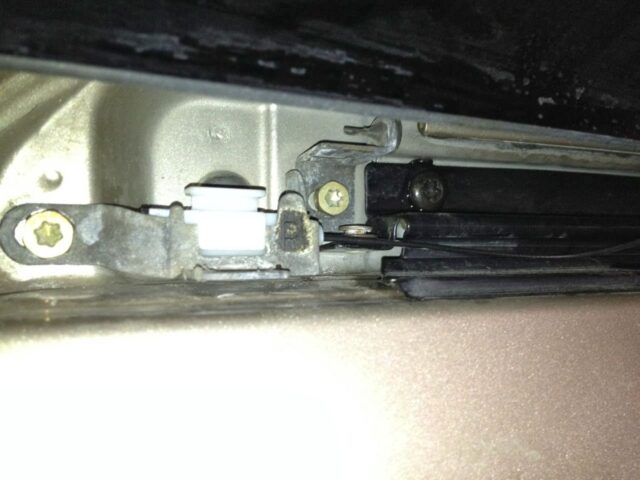 |
| Rear tensioner installed, please excuse my flash overload |
Tip: One reader, Darin Gemmer, commented that they needed to “tighten” the cable slightly by pushing the metal bracket towards the rear of the vehicle as far as you can before tightening the two torx bolts. This solved an issue for him where his door wouldn’t quite shut all the way and would open right back up. I never did this when replacing the cable assemblies on either of my doors (but simply hooked the bracket on that post) and didn’t have a problem with the door shutting correctly. The reader suggests trying out your door before you reinstall the plastic cover over this tensioner, which isn’t a bad idea and doesn’t hurt anything.
Step 34: IMPORTANT Caution Checkpoint after connecting both cables
VERY IMPORTANT: If you have completed Step 33a and Step 33b and one or both of your sliding door cables are loose then you have a problem and you MUST NOT go to Step 35 without resolving the issue with the slack cable(s) first. If one or both of the cables are loose now that you have both cable ends snapped onto their brackets then somehow a loop of one of the cables came unwound from the pulley before it was installed on the motor and extra slack has entered into the system. The cables must be wound around the pulley the correct amount of times (as they are wrapped in the factory) for this system to work correctly. If you have slack on one or both of the cables and you go forward in the repair and operate your door then you are VOIDING the warranty of the part and you will blow up the cover on the pulley and/or the pulley too, and you will be wasting your time. The reversal of this problem is a complicated problem to solve at this point but it IS recoverable. The extra warning I give in Step 9b is to help keep from having this problem but you MUST backtrack and wrap one extra loop of cable around the pulley, on the end that has the slack, to remove the extra slack from the system. With much thanks to one of my readers, Slava S, I have the following solution for if you have one or more slack cables at this point. Only complete Step 34b if you have slack in one or both of your cables at this point:
Step 34b: Slack Cable Resolution Steps (compliments of reader Slava S, slightly edited for the context of this tutorial by the author John Mueller):
Caution: ONLY follow these following sub-steps 1-9 if you have slack in one or both of your cables at this point (otherwise skip to Step 35):
- Make sure the power doors are shut off. This would mean that the button at the driver’s left knee is pushed in so no orange shows around the edge of it. Alternatively you could disconnect one of the terminals of the battery.
- Remove the middle seat on the side of the door you are repairing to free up space so you have access to the pulley at the low rear corner of the door. The remainder of the job will be done while comfortably laying on the floor of your van.
- Follow Step 6 (above, in the main tutorial) to remove the 3 screws from the pulley cover. Don’t lose the collars that are on each of the 3 screws. Once done, remove the cover completely by unfastening it from the black thick cables. At this point you can see the pulley and loose cable on the motor shaft. Hopefully the cable is not damaged.
- Remove the pulley from the shaft. Be careful not to unwind the cable further.
- Pull all the loose cable from the assembly above (I had to open the door a bit for this) and unwind the loose part of the cable while carefully keeping the part that is still on the pulley, on the pulley. Move the pulley down and left to create tension on the cable.
- There are two ways you can put the cable back on the pulley:
- Hold it steady and place appropriate number of loops back on the pulley, making sure the cable goes right in the grooves and that the cable stays under tension as you do it.
- Manually turn the pulley, winding the cables back onto the spool, in the correct grooves (very important), while raising up the pulley as the slack is taken out. Slava S, the reader who suggested these steps had to do 3 turns. Any way you do it you will reach the point when the whole pulley is populated with the cable and the center of the pulley is right in front of the motor shaft. I do believe mathematically there is only one way to do it correctly so you can’t go wrong as long as the pulley is fully populated and the cable is in the groove.
- The pulley snaps right on the shaft easily using a bit of the extra space the tensioners on the ends of the cables provide (no need to unzip or remove the tensioners). You may need to rotate the motor shaft to find the proper position for it to slide into the pulley. After the pulley is in place you can move the door a little bit, just an inch or so – if everything is OK you will see the pulley rotating and the cables properly winding/unwinding while staying under tension with no loose cable.
- Reinstall the cover. Please consult Step 11 above in the main tutorial for the completion of this sub-step and make sure the bearing that is inserted in the cover, and which slips over the end of the motor shaft, is in place. Also make sure you install the collars on each bolt or you will break the plastic case when you tighten the bolts.
- Try your door in manual mode for a full open-close cycle and then proceed to Step 35 in this tutorial.
Step 35: Reinstall the rear lower trim piece that covers the rear tensioner.
This is the piece on the lower back corner of the rear window.


I had to play around with this quite a bit to get it to stay. After reinstalling this piece you should be back in business for the most part and you can test your installation in the next step.
Step 36: Test the power door.
I accidentally discovered mine was working fine after I hooked up the motor and had already connected the cable ends. You may need to push the button next to the driver’s left knee to turn the power doors back on if you turned them off. In my case I was inside the van and I pulled the handle and it opened right up. I understand that there can be issues with the computer remembering where the start and end is of the door closing so you may need to disconnect the battery and then close the door and then re-connect the battery to overcome this issue but I did not have any problems with the microcomputer in the door knowing where fully closed or fully opened were when I fixed either of my doors.
Will your door not quite open fully? If you have the window down, there is a metal tab that interferes with the door latching in the full-open position (so someone isn’t constricted by the open door). Close the window and the door will open all the way.
Step 37: Reinstall the interior trim of the sliding door.
Same as when you took it apart but reverse of course. You will almost always break some of the plastic clips that hold the trim in place so I ordered a bag of them from amazon (link for a bag of 25 of them here).
 |
| Location of where there should be a clip–note that the three left ones did not come off with the panel |
Make sure there are no clips still stuck into the metal body of the sliding door of the van and make sure the clips are seated all the way into their slot on the trim before you try snapping it back on the van.
 |
| Use a screwdriver to remove any clips that did not come out with the door panel |
I ordered a package of 25 of these retainer clips from amazon.com, which I used in both repairs.
 |
| 25 clips for $6 at amazon.com |
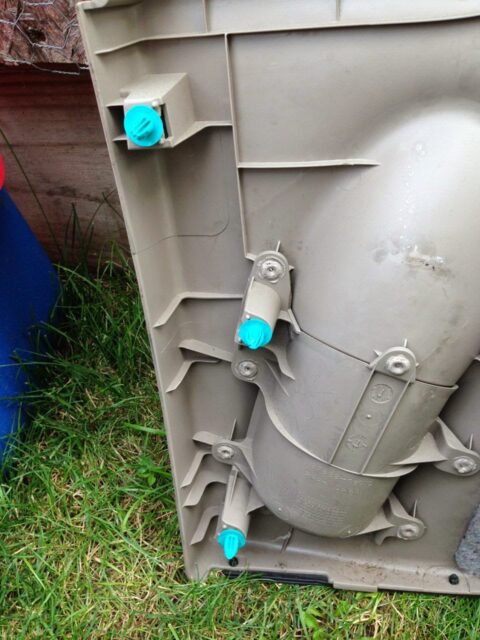 |
| Replaced (blue) clips |
In order to put the interior trim panel on the door you need the sliding door partially open. If you have successfully repaired the power door cables at this point you will be stuck with it wanting to be all the way open or all the way closed. I disconnected the battery’s positive terminal in order to accomplish this. I’ve also read that the power needed to be cycled with the door all the way in the shut position so the computer can remember the position but I’m not certain how this works. Never-the-less, I power cycled my van by disconnecting the battery each time I did this repair and everything worked great (after I reset all my radio pre-sets).
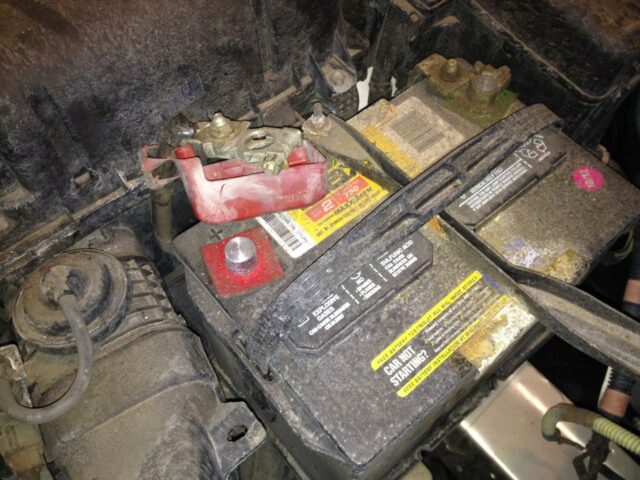 |
| Disconnect the positive battery terminal to put the sliding door in manual operation mode |
You can also simply turn off the sliding doors by pressing the button by the left knee of the driver:
 |
| Button to place power sliding doors into manual mode (when pressed in) |
Hang the top of the interior trim on the top edge of the door–it should fit snug against the window. Look along the edge of the trim to see that the snaps are lining up with their holes and then start snapping the trim on the metal door frame.
 |
| Line the snaps up with the holes before pressing (or banging) on the door panel to snap back together |
Finally, don’t forget to reinstall that one sneaky 8mm head screw at the bottom rear of the door:
 |
| Reinstalling the lower screw |
Step 38: Reinstall the “Side Trim Board Cover.”
Reinstall the window switch screws.
|
| Reinstall the two window switch screws |
Snap the trim board back into place:
Reinstall the two screws on the edge of the trim board as seen below:
Step 39: Reinstall the “Slide Door Window Garnish.”
Make sure that both clips are in place before snapping it in (they could have stayed on the body of the van when you removed it):
Align the piece with the hold and snap the plastic clip back in place:
 |
| The window garnish reinstalled |
If you have issues with the door not opening and closing after you have done the repair you may need to disconnect the battery so the door’s computer resets its memory as to whether it is open or closed–make sure the door is fully closed when you reconnect the battery.
 |
| Disconnect the positive terminal of the battery to reset the computer’s memory |
 |
| Toyota Sienna Slide Door System Location(s) |
Share YOUR Repair!
If you were able to repair your Toyota Sienna sliding door cables with my tutorial will you please leave a comment to encourage others that they can do it too? If you have a questions please leave that too, in the comments, and I’ll get right back to you. Please note that if you do not have an approved comment on this site, your comment will require my approval before it shows up (no spam on ShareYourRepair.com!). Also, make sure to check the box so you are notified when you get a response. Thanks, John.
For a list of my 30+ Toyota Sienna articles, please click here.
Other Helpful Links:
- Toyota Technical Service Bulletin: Sliding Door Diagnostic Tips, 1998-2003 (pdf)
- Toyota Technical Service Bulletin: Power Function of Sliding Door Inoperative (pdf)
- A bulletin explaining the warranty extension to 9-years or 120,000 miles on this part (pdf)
- 2004 Toyota Sienna Recalls, Bulletins, and Investigations
Amazon Associate Disclosure: As an Amazon Associate I earn from qualifying purchases. This means if you click on an affiliate link and purchase the item, I will receive an affiliate commission. The price of the item is the same whether it is an affiliate link or not. Regardless, I only recommend products or services I believe will add value to Share Your Repair readers. By using the affiliate links, you are helping support Share Your Repair, and I genuinely appreciate your support.
John, just wanted to let you know your excellent write-up is still helping helping people. Thanks a lot! (BTW I went with the cheap aftermarket cable kit so I might be back 🫤).
Great write up. The cheap part where you have to wind the cable yourself is $50 on amazon, and that’s what I did today. Some helpful videos: https://www.youtube.com/watch?v=j0hirBoBBos
https://www.youtube.com/watch?v=-XTdfSGjcJw (in this video, you can see how the guy winds it a bit)
Thanks for the links, Tim. I had one of the new cables I ordered come unwinded in the mail and had to figure out how to wind it. It’s totally doable but if you get it wrong you destroy the part. Hopefully these videos will help folks who go that route.
Hi John.
First let me thank you for your outstanding instructions. (IMO it can serve as an example of how to help others online!!!).
I’m replacing my driver sliding door cables because they fryed.
The cables I bought on amazon came unspooled. I’m trying for hours to find a good source of understanding how to wind them successfully.
Any suggestions would be greatly appreciated!
TIA. Saul
Hi John.
In the meantime I found how to wind it.
I have only 1 question left. While taking apart the passenger sliding door I noticed the gray cable is spooled in the bottom part (the one sitting on the motor) and the black in the upper half).
Will that be the same with the driver’s side door or the oposite, the black cable on the bottom half?
Thanks in advance.
I’m sorry for the very slow response. Notifications somehow got turned off on my comments. The two parts should be mirror copies of each other with the same color connector going toward the back end of the van and the same color going toward the front.
John, thank you so much for this write-up. The cables on my 2004 had long ago lost the plastic sheathing, and were starting to rust a bit. So I decided to replace them before they failed. This made it *so* much easier! Thank you!
Glad you got the job done Andrew–good work on fixing your ’04!! We finally parted with our 2004 Sienna last summer but it was still running well at 270K miles with both its replaced sliding doors working too!
John, have you purchased a later model Sienna? if so, your thoughts about later Sienna models?
Thank you for asking Khurram, yes, I purchased a 2013 Sienna with 154K on it last summer. I had hoped to buy a newer one with lower miles but the price of used vehicles has gone up so much and good used Siennas are scarce. We have put 20K on it so far and have had no problems except that the left sliding door cable broke. As you know, I wrote the book on sliding door repair but the new system is different, easier, but also trickier than the ’04-’10 version. The most difficult parts were 1. removing the rear end of the cables as the cover that covers up where it attaches is impossible to remove and I could not find anyone who could tell you how to remove it, without breaking it. I got it partially unattached and was able to reach in with my socket and do what I needed to do by lifting up the bottom edge of it. The second tricky part was reinstalling the inner plastic door panel. It was difficult to get it right and I had to do it a couple times to get it right. BUT, the sliding door cable part was only $38!!!!! I don’t know why they had to charge so much for the old part. You don’t need to remove the window anymore, so that is nice too. I did not write up the repair because now that I have an engineering job and 4 kids, I don’t have time to document these repairs like I once did and I get my fill of this kind of thing at work. I still reply to comments though!! Thanks for asking.
Hey, John! I bet you didn’t know how much traction this repair guide was going to get! We just changed out the right door cable, some five years after using your guide to change out the left. This one didn’t go as smoothly, as the door wouldn’t close completely at first. And we used a cheaper/not fully assembled part that we had to play with to get it seated and wound correctly, but everyone’s advice about making sure the window was up, disconnecting the battery to make sure the little controller resets, and moving the rear cable tensioner to its maximum rear position all worked together so it worked in the end. -whew!- Feels good. Again. Thank you, John. And thank you, Jesus!
Truly brilliant repair instructions, thank you very much John! Everything you said was correct, and grateful for many many helpful tips to prevent mistakes like the electrical tape on the socket. I used part 85620-08043 (OEM, ~$375 online Toyota parts dealer) to fix R side door in 4 hours using your instructions. One error – I broke the rear window trim clip in Step 13 but it still snaps in place. I got slightly confused around steps 6 through 11, because 85620-08043 doesn’t need any manipulation of the motor/actuator, it’s the entire part, so I think one can skip those steps if you buy the entire assembly. At Step 27, I also forgot to put the computer bracket screw (from Step 5) back in, but just needed to pull off the trim quickly to do that. Thanks very much again!
Thank you for the feedback. I added a note at the beginning of step 6 which directs one to skip to Step 12 if you purchased the part which includes a new motor. Thanks for the tip and now the instructions will be easier to follow!
Great guide. Thanks so much.
Brilliant tutorial! Four hours, step-by-step, job was done without a single hitch. Well, except for threading that pulley assembly back up through the door. You definitely have to keep at it! And it came out so easily . . . Thank you, John, for helping me save a cool grand.
Thanks for sharing James and good job at persisting and fixing your van. It sure does feel good when you are done, doesn’t it!!
Very well put together , I had no questions following these ( time intensive instructions and photos put together ) while I have good mechanical skills, I would have likely broken trim and wondered if the unit could be taken out, much less put back in without your details.
I did buy the part from Toyota on line ( essentially dealers ) with the cost being very close anywhere I searched. $ 310 to $ 345 tax and shipping. Ours is a 2007 now being sixteen years young , with 198,000 miles always Mobile One full synthetic from new.
Replaced one front engine oil seal at 90 K miles, no leaks anywhere. This is likely the few , if not only time I bought Factory parts for any vehicle ( Fiats Included )
So , Blessed for sure and doubly with this site.
Hi John,
I just completed the removal and replacement of the cable assembly on my 2010 Sienna using your most excellent tutorial, thank you for your work!
When the problem appeared, my wife and I were on a 1400 mile trip, and not having that door operational was a real problem (we were traveling with a dog). When we arrived at our destination, I found your instructions for clipping the cables, and disengaging the auto open\close function. Once we got home, I was determined to do the repair myself given the level of detail your tutorial provides. While I am pretty handy, I had never attempted a repair of this complexity before.
Seeing as I probably saved around $1200 by virtue of your willingness to share your repairs, I just donated $25 as a small token of gratitude for this resource. In case others may be similarly motivated, the donate section is at the very top of of each of the articles, I wanted to share with your audience were the link is.
Top of each article, on the right side.:
SUPPORT SHARE YOUR REPAIR
The articles are all free but if you’ve been greatly helped and want to give back…
Now in the spirit of Share Your Repair, I wanted to provide my observations that may help others.
1. Despite your warnings, diagrams and pictures I still managed to crack the rear window cover. Was able to repair with 5 minute epoxy. Worked fine.
2. When I was routing the cable assembly up through the door (purchased from Olathe Toyota, great price!) I managed to break one of the cable clips. Local Toyota dealers did not have the part, so I looped a zip tie with a sufficiently large head to not get pulled through the clip hole. Worked fine.
3. I navigated the window door screw removal and install using the electrical tape trick. However a moment of inattention on the removal of the socket from the door hole, I caught the socket on the edge of the hole…and yes it fell into the door cavity. I did not have a spare 10mm socket arghh. Once I got another socket I was able to remove the panel and retrieve the fallen tool. while you are taping up the socket, you could also tape the socket to the extension to avoid what happened to me.
After driving my 2009 Sienna for about 6 months with the passenger slider stuck closed, I finally came around to buying a genuine Toyota door motor assembly, and repaired the door in about 4 hours.
I decide to purchase the genuine replacement unit since I have had bad luck in the past using after market parts on my Japanese cars.
One of the more time consuming tasks was to figure out how to get the door open in order to disassemble the door panel since the cable was bound up on the motor spool, causing the door to jam in the closed position.
I clipped the cables at the tensioner and with the door set in manual mode, had an assistant pull the exterior handle while I was seated on the floor of the van, and with both feet I pressed the the door forcing it to open enough to access the lone bolt on the bottom of the door panel which then allowed for its full removal.
Once the door panel was removed, I followed your tutorial step by step for the rest of the disassembly.
Another difficult part of the job was fishing the cables and pulley through the door since I’ve been cursed with big hands and little patience.
All in all, your tutorial was spot on, and in the end I have a functional power door opener.
I am very grateful that you took the time to post this tutorial.
Thank you.
Jim C.
Good work on fixing your Sienna James, and thanks for sharing!
Thank you so much for posting this amazing guide! Our left side door cable broke moments before we were to list our minivan for sale and I was able to order the right parts and do the fix thank to you instruction 🙂
Great to hear, thanks for sharing about your successful repair!
You have done a good job on this tutorial
I just checked , this part is no longer available
Scott, I have at least 8 different part numbers linked on this article. I do see that the less expensive part, which came out after I did my repair, is no longer being made, most likely because of the age of these vans. If you click on a part number and the part says no longer available there is also a note in the description which tells you which part to order. I don’t have anything to do with the part availability but I can show you how to fix your van if you can find the part! Hang in there and keep looking–I’d try ebay as well.
Thanks for the help to fix my 2010 Sienna with broken power door cable. Took about 5 hours with lunch! Did spend a little time looking for bolts and screws. They sure know how to hide them. Anyway figured I made nearly $75 an hour today by not paying the garage to fix it. Not bad for a retired guy!!
Good work Glen, I wish I was retired! Thanks for sharing about your successful repair.
What a great resource! Bought the correct part and installed it without breaking anything else! Thank you!
You rock. The project took me the whole day, and failing to understand the sliding door mechnism caused me to mess up a $300 part. I know understand the only one of the cable is extended at the time and I regret buying the whole assembly because all I really needed were the cables. I came back here to QA my work and realised that the 3 metal inserts that came with the assembly were usefull so I had to go back and put them in. In the end, it was not too bad and I’m proud I was able to do it and save some money. Used 60$ to buy a power wrench which was tremendous help. Thank you so much for this.
I just did the the driver side sliding door but I cannot say it was easy on my 2009. Took me the whole day, as the messed up the $300 replacement module I got from Mcgeorge Toyota. Breaking this expensive part force me to drill down and understand the inner working of the cable and cylinder. When I was done, i regreted not buying the $25 cable only set. That would have worked as well. I was a little intimided with the job, but in the end, it is nice to know that whatever the case is with a Sienna sliding door, I will get down to it and fix it myself. Special thanks to all the kind souls who take the time to share this knowledge online.
Shipment Details
Part Number
Part Name
69641-08031
Shipping (USPS – Priority Mail):
$16.09
Total:
$315.57
I just did this on my 2009 Sienna and it went great. The door broke last spring so I ordered the part but never found the time when my 4 year old wasn’t around (he would be “helping” me if he were around). It took me a little less than 5 hours which included looking for some tools and then when the kid got home I had to help him with a scraped hand. Everything went smoothly with no issues and we’re happy to be able to use the doors again. I’ll be having child #2 in a couple months so it will be much nicer. It would’ve been easier had I done this without a big pregnant belly getting in the way 🙂
I love it Chris, thanks for sharing. We’ve now had old, young, men, women, and now even pregnant women fix their Sienna sliding doors with this tutorial. Great job and I hope your pregnancy goes just as smoothly as this repair!!
Hiya Mike! Happy to hear of your success! Where did you find the parts? Last I went looking the ones mentioned were no longer available for my 2008. 🙁
I just finished this repair on my 2006 Sienna and it was really great. This is the second door I have had to replace cables on and this tutorial was much easier to follow than the last one I used. Took about 4 hours once the parts arrived, but I read every step multiple times. Well done and Thanks!
Oh good, thanks for sharing Mike and good work on fixing your second Sienna sliding door!
Hi, your instructions were excellent and everything has gone smoothly, but I am now hooking up the back tensioner and the cable is about 1/2 inch short. I bought the kit from Toyota, so it should be made correctly. I am not sure what to do. One thing, when I was putting the spool on the motor shaft, the cover came off the spool for a second, but he cable did not come off. When I had it together I was able to pull the two ends of the cable freely back and forth with no binding. Do you think I messed something up when the cover came off the spool?
I would first make sure the cables are not twisted when they come out of the door hinge in step 24 and step 25. This I where one goes to the front and the other goes to the back. I don’t think you would only be off by 0.5 if it was a spool issue.
Thank you so much for this tutorial! It was really helpful and if I had only had the YouTube videos (helpful, but not nearly as detailed as this was) I think I would have messed things up.
Lots of work put into this tutorial. Really appreciate it, otherwise I’m sure I would have broken a bunch of plastic clips.
Thanks to this tutorial this repair is made quite easy to perform. Thank you John Mueller
Thanks for the feedback Paul. Good work on fixing your van!
John, my 2008 Sienna with 225,000 miles is a great car. The door cable broke and I had time on my hands. I bought a cheap replacement and with your excellent and detailed instructions, I got it done in 4-5 hours. Works great and no left over parts. My old cable was wrapped around the gear and looked like the picture you have posted. The pictures were very helpful. Much appreciated.
Glad to hear Dan, good work on fixing your Sienna!
Hello John, I was reviewing your tutorial and I believe it will help me repair our 2004 Toyota sliding door with a broken drive cable. I have just one big problem, I can not open the door manually. The door latches appear to be jammed and will not allow the door to be opened. Not sure how to get the door opened to complete the other needed repair. I have found the cables that go to the latch releases and they appear to be going the correct amount of travel, but the door still will not release?
If the latches are actuating it’s is probably your frayed cables which will no longer slide inside the conduit that is keeping the door from opening. I’d encourage you to read what I’ve prescribed in other comments where you push the front and back of the door with each of your feet while actuating the door handle (easier to do with the seat removed sitting on the floor).
Hi John
Just a thank you for all the details you incorporate into your post. I couldn’t have fixed my 2006 Sienna without the help you provided. I went the cheap route and got the set-up without the motor or pre wound pulley. The instructions that came with the unit were less than stellar and took me a little while to figure out which cable was wrapped on the bottom and which was on top. There seem to be a couple of differences between the left and right side parts. All said and done the door works as it should. I did spray some lithium grease in spots and figure it won’t hurt. Thanks again!
Excellent guide, the definitive guide anywhere! I have a 2010, replaced passenger side in 2017 and had to do the same thing on the drivers side 2020. Parts got cheaper, paid $430 in 2017 and only $301 in 2020 (+$15 shipping). Cheapest I found for OEM parts were at https://toyotaparts.mcgeorgetoyota.com/ (no affiliation, just thought I’d share where I got mine). I have to say that steps 22-24 were the hardest parts. Getting that door pulley piece down and out the door and then having to finagle that thing back up mounted correctly was a pain.
In my research, this site has the lowest price for the OEM part. https://www.oemgenuineparts.com/oem-parts/toyota-control-slide-dr-at-6964108031
Seems to beat the others by about $50. I figure every dollar matters on a car of this age.
Repair completed in about 3 hours, instructions were great. Definitely needed to take the window out, but that wasn’t as terrible as I thought it would be. It helped that I had taken the door apart a few times before to fix the door lock actuators. Hoping I never have to open it again! Thank you so much for the great tutorial, you saved me $700!
Good work Mike, thanks for sharing.
Ok! I’ll see what happens when I get in there. Appreciate it!
Hello John, what a great site. Thank you for providing this wonderful set of instructions for us DIY’ers. I have recently repaired both door lock actuator motors on my van, so I’m excited (sarcasm) to open up the door again for this repair! On the previous jobs, I was successfully able to remove both the main door panel and the inner attachment panel without taking out the window glass by lowering the window partially, taping the glass up into place and then disconnecting the regulator from the window glass (with the window hanging in place). That seems like it would save a lot of steps removing the outer door trim to get the glass out. Do you think I would still have room to route the new cables if I tried this method?
Mike, I have used that technique of taping the window in the closed position on another repair I detail on this website, replacing the door latch motor (link below), but in this repair, when performing Step 22, removal of the cable assembly from the door and reinstallation of the new cable assembly you really need to get your hands right in the space occupied by the window. I’ve not heard of anyone in the hundreds of people who’ve used this tutorial to be able to skip the window removal. I’d be more than willing to write about your success if you are able to pull it off. I removed the window both times I did this repair. Here’s the other repair where I tape the window up: How to Fix 2004-2010 Toyota Sienna Sliding Door Will Not Open or Close With The Remote-How to Replace the Slide Door Lock Release Motor Assy
Just finished a driver’s side replacement on my wife’s 2010 van. It took me longer than I was anticipating (~6 hrs) but the instructions walked me right through it. Part of my problem was I was using someone else’s instructions first and was having trouble so I started looking for others when I found this one. This one is much better. If you follow these instructions, you’ll be able to get through it. Leave yourself time and plan on working it straight through.
Hey John. Great instructions. I completed the repair on my drivers side door for my 2007 Sienna in a leisurely 4 hours. Mine was just like yours in that the actuator cover blew up. Re-installing the motor to the assembly was easy. The one issue I ran into was because of rust. In Step 16, the bottom nut for the rear channel track for the window was rusty. Even after soaking in some WD-40, it still managed to break quite easily. As a result, the track fell to the bottom of the door. I easily fished it out with a coat hanger because it has a hole in the top to hook into. To hold the track in place but allow flexibility when re-installing the window, I used duct tape. That worked well and I removed the tape when done. It now has the top bolt holding it in place and the nub of the bottom bolt I sealed up with silicone to prevent water getting in. Duct tape also works as a great cable holder for the ones that inevitably break.
great guide – thx for time. I think I’m missing something between steps 8 and 9b – how do you get the pan out? I see something like a rivet at the top (I’m doing the left, driver’s side) – do I just drill it out? thx
Mel, that rivet is just a post that fits into a hole in the van door. The pressed metal “pan” has a rubber gasket on the back edge of it that sticks to the door. If you have removed the 4 bolts you should be able to just use a flat head screwdriver and pry the pan free. When you go to reinstall the pan you can insert it into the door and it will “hang” on that rivet post once you insert it into its hole. It aids in lining up the part in the opening.
Hi John. I took pictures when I did my second door. How do I provide them to you?
I agree John….should have clarified my situation was that the motor was bound up by the cable, causing the frozen door.
I believe the motor was still ok (still have it), but it was such a mess that I replaced the entire motor/cable assembly from Conicelli Toyota ($380 with shipping), and still saved a ton. The time saved in just installing the entire assembly, along with the likely quietly fixed bugs by Toyota, was worth it to me. Thanks again for your help!
John may have more wisdom, but this happened to me. If its the motor, deactivate the automated door using the dash button and cut the cable at both ends. Should operate as a manual door until the fix.
I love how the community here is helping each other out—thanks Charles. In all the hundreds of people who have repaired their Sienna sliding doors I cannot recall a single bad motor. The motor is one of the strongest parts in the sliding door system so it is much more likely that a weaker part, like the failure prone braided cables (which is what has brought us all together on this article) are failing. In this case I would assume they are unraveling to the point they will no longer slide through the routing tubing-fixing them in place. Again I would say I can’t know for certain without looking at the van myself.
Since it is half open, you have access to the screws to take the “side trim board” off. You’ll see how to replace it in step 38. Removing it gives you access to the cables at the front of the door. If you pull on the right one you will most likely release whatever is causing it to be stuck. I can’t tell you which one but I’ve been there and found it by trial and error. Of course it could just be the rollers at top or bottom of the door need cleaning and lube.
Hi John, My door is frozen half open. It will not budge to open or close. For the last few months it has needed assistance closing all the way. Since it is half open we can’t access to remove the panel. Can you help?
It is difficult to recommend exactly what to do without knowing more information or having looked at the van myself. If the sliding door cables were frayed it’s likely that is the issue and you can just go ahead and cut the cables and trim them off to free your door just to get it closed. I’ve written an article on how to trim the cables here: How to Trim Broken Sliding Door Cables on 2004-2010 Toyota Sienna. With the door open it does seem likely you could get the inner door panel off. Let us all know how it turns out.
Hi John. This is easily the most helpful DIY car repair article I’ve come across. We had both side doors stop working within weeks of each other this past summer. We’re getting ready to hand our old warhorse of a Sienna off to my stepdaughter (new driver) and I really wanted to get things in proper working order. Thanks to you, I’ve fixed one door and am confident about fixing the other next week.
One minor suggestion for the instructions. It was *much* easier to feed the new unit through the door panel after removing the lower exterior window gasket. It is quite easy to remove, so wanted to provide my experience.
Again, you nailed it (and saved me at least $3,000) in the process. Beer’s on me if you are ever in central NJ.
Thanks for the feedback Robert. Can you please give some tips on how that lower exterior window gasket comes off and what it takes to reinstall it?
Thank you so much for your excellent instructions! The cables on both rear doors of my 2004 Sienna recently both snapped within a couple of weeks of each other. I didn’t want to replace the cables, but one of the motors was jammed up so badly that the door would only open about 2 inches and the other about 18″, so I needed to get inside the doors – especially on the one that really wouldn’t open at all. The door that would only open a couple of inches was more difficult to work with – especially to get at the screw on the lower rear corner of the door panel – but it was doable. Luckily it wasn’t screwed in very tightly and I was able to get at it with a small offset screwdriver. I removed the motor and loose cable from both doors and closed everything back up. The first door took me a few hours – mostly figuring out how to get that screw that I could barely reach. The second door took me about a half hour. These instructions walked me through everything I needed to know. The pictures were so helpful!
Hi Donna,
These Plastic tabs are easy to replace. You may reclaim it from your old wires that broke, usually plastic clips are intact after wire breaks off. Worst case you may pick it from a local junk yard possibly (?). good luck !
Hi Peter, I am having a problem with the cable on my 2004 Sienna IMS/Braun Rampvan. I couldn’t find the pictures and instructions for what you did. If they are available, I believe they may help me to fix my problem. We tried replacing the cable, but the cable coating sheared off.
WOW. Thanks.
A few weeks ago the right door cable snapped on my 2010 Sienna. The left door hadn’t worked since we bought the van second-hand 4 years ago. I did a little research and found your site. I bought a set of right and left cable replacements on eBay. (I know you don’t recommend cheap, but I hardly believed that I would get the job done and I didn’t want to sink too much into it.) Anyhow, I tackled the recently broken one first. I simply kept my phone right next to me for to reference this article. It took me 3 hours, and darkness fell, but it worked. I got the door working. It was my first time attempting a repair like this. Yesterday, I went to do the left door. I didn’t even need to look at your article one time. I was able to complete the repair in much less time, and I felt confident in doing it.
You have done a great service to the public with this article and I can’t thank you enough.
That’s great to hear. Good work on fixing your van. Thanks for the nice feedback.
Will removing the cable and spool and stop the door from operating like a normal manual door until the replacement parts can be purchased? On my wife’s van, this door is rarely used but we had to move the third child to the seat next to it, and thats when the cable broke. Since we’re not selling anytime soon we’d be happy to convert to manual.
I would disconnect the wiring harness from the motor. This task is described in Step 4. You could then just leave the inner door panel off and operate it that way, or put the door panel back on. Just be careful to retain the electrical connector for the power window if you leave the panel off so it doesn’t get caught on something. The door will still be connected to the cables, which will make it difficult to open and close the door. I have written an article on trimming off those cables, see the link at the bottom of “The Back Story” section at the top of this article.
After even more reading it looks like these hinges commonly start to sag over time, with some people saying their cables started to go bad after the sagging became more pronounced. So if anyone is also experiencing it, here are the part numbers for the center hinge: Left side: 68390-08031; right side: 68380-08031. Here is a link to an instructional video someone made on how to install them. https://youtu.be/MhWoaAI4Bt8
Thanks for sharing Shami. I’m glad you are figuring it out. I’ll have to take a peek at our hinges. What likely happens is that the sagging hinges cause more resistance to the doors opening and closing and that extra tension on the cables causes them to wear faster and more prone to fail. For us it was the winter and ice on the door, but the result is the same.
After some more research I think I’ve got a worn out center hinge. There are some good videos on YouTube, and luckily the repair is pretty straight forward. The door is slightly sagging causing it to hit early on closing.
Glad you are figuring it out and what a relief that the issue isn’t with your sliding door cable repair!!
Just used your tutorial and fixed our 05 sienna. Thanks for the write up! However, now when I shut the door it sort of “hits” something right before latching closed. Any idea of this might be? It’s almost like the door itself isn’t quite aligned right. The auto door works fine opening and closing, but right before it latches closes you hear and can feel it hit something.
Thanks for sharing Shami, I haven’t heard of this one before. I would check the tracks that the metal wheels roll in to make sure there isn’t an obstruction. Finally, I would look at the door latch on the rear edge of the doo (on the door gram side). Is it possibly in the closed position when it should be open? Normal car hinges doors can have this happen. That’s all I can think of off hand. I’d encourage anyone else on this string to jump in and share if you have any insight.
please can i change the manual sliding doors of my 2007 toyota sienna into an automatic power sliding door?
I cannot see how it would be worth the time, effort, or money to try to do that.
Hi John….really great stuff. I replaced a passenger side slider motor assembly (the entire $400 assembly is all Toyota sells now) on my friend’s 2006 Sienna LE. Studying the steps and tips before doing anything made the job go well (approx 4 hrs without rushing). The only mistake I made was not ordering the cable clips. One of mine was broken but I was able to cheat it with cable ties.
One question….the rear door window frame moulding sub-assembly had some adhesive that appeared to be functional for keeping rain water out of the inner door. Has anyone run into problems by just re-installing without some new foam tape or adhesive?
Thanks again for your great info.
Charles
Thanks for leaving a note Charles. I didn’t put any new adhesive on either of my doors when I did my initial repairs. The first one I did, I damaged the panel so it wouldn’t hang on the clip correctly and eventually replaced the panel within the past year. The new panel comes with an adhesive strip which you pull the backing off of it after you install it. I didn’t have any water problems on this door or the other one though so I wouldn’t worry about it.
Thank you so much for the detailed process! I had to reset my computer. When I reconnected the battery cable, the car wouldn’t start. I required a boost to get it going. I guess my battery is getting old and it didn’t like the radio on for a few hours.
Hi, I’m studing your excellent article before I get started repairing my car. One thing, I can’t play any of YouTube video clips linked on this article. One possibility I suppose is that I’m accessing this site from outside of the United States. Can you check YouTube link or do somehow so that I can watch video clips?
Park from Seoul
Thanks John, I followed the steps and fixed my driver’s side door in about four hours.
Good work Matt, thanks for sharing!
Dear John,
My husband and I just repaired the power door on our 2009 Sienna. Thank you so very much for this detailed and thorough tutorial. We have never done any work of this type before, but your help and encouragement, and the encouragement and shared experiences in the comments, gave us the needed confidence.
It took us two about 4 hours. In addition to reading your instructions, we also watched a few tutorials on YouTube that show this repair (for some reason we were not able to play the video clips on this site). The most dreaded part for me was lifting out the window, but it was surprisingly easy. We used blue painters tape to attach the upper weather stripping to the roof to keep it from falling down, and stuck all our screws, bolts and nuts on strips of the same tape and labeled each strip with the location/part name. That made it easier to keep track of all these small parts.
We would like thank you again so very much for having this tutorial available, and encourage all those who consider this repair to give it a shot! You can do it!! :-))
PS. We did not use any special trim removal tools. We did, however, use your trick with the electrical tape and recommend that to all. We found that a paint can opener did a nice job removing clips from their holes. Good luck to everyone!
That was a great comment Maja, thank you. Good work on fixing your van!
Hi Nathaniel,
I have done this repair twice and can confirm that the part numbers given by John are correct. I can also confirm that, unfortunately, some Toyota Dealers have incorrect information regarding this part. The part number listed by John does not come with a new motor (which you probably don’t need anyway) but it does come with the cable.
Hi,
Thank you for sharing this thorough repair job!! My question is on the parts. My driver’s side sliding door cable broke. You have listed part number #69641-08031 as the replacement part. You said one should not need the motor assembly because they motor is good, it’s just the cable that’s broke. I called a local dealership seeing if they had the part (069641-08031) and they said that part is just like some bracket and I need the whole motor assembly, which is $540. He said the part, 69641-08031 does not include the cable, to get the cable I have to buy the whole motor assembly. So I’m confused. Can you help square things up for me?? What part do I need to order to replace the broken siding door cable on my 2010 Toyota Sienna?? Thank you so much for your help!!
-Nathaniel
Nathaniel, you are welcome. 69641-08031 is the correct part for the driver’s side. I’ve consistently found that dealers can’t look up these parts correctly. The Toyota Owners Parts website lists the part correctly under that part number (link here) and shows it correctly on the parts diagram:
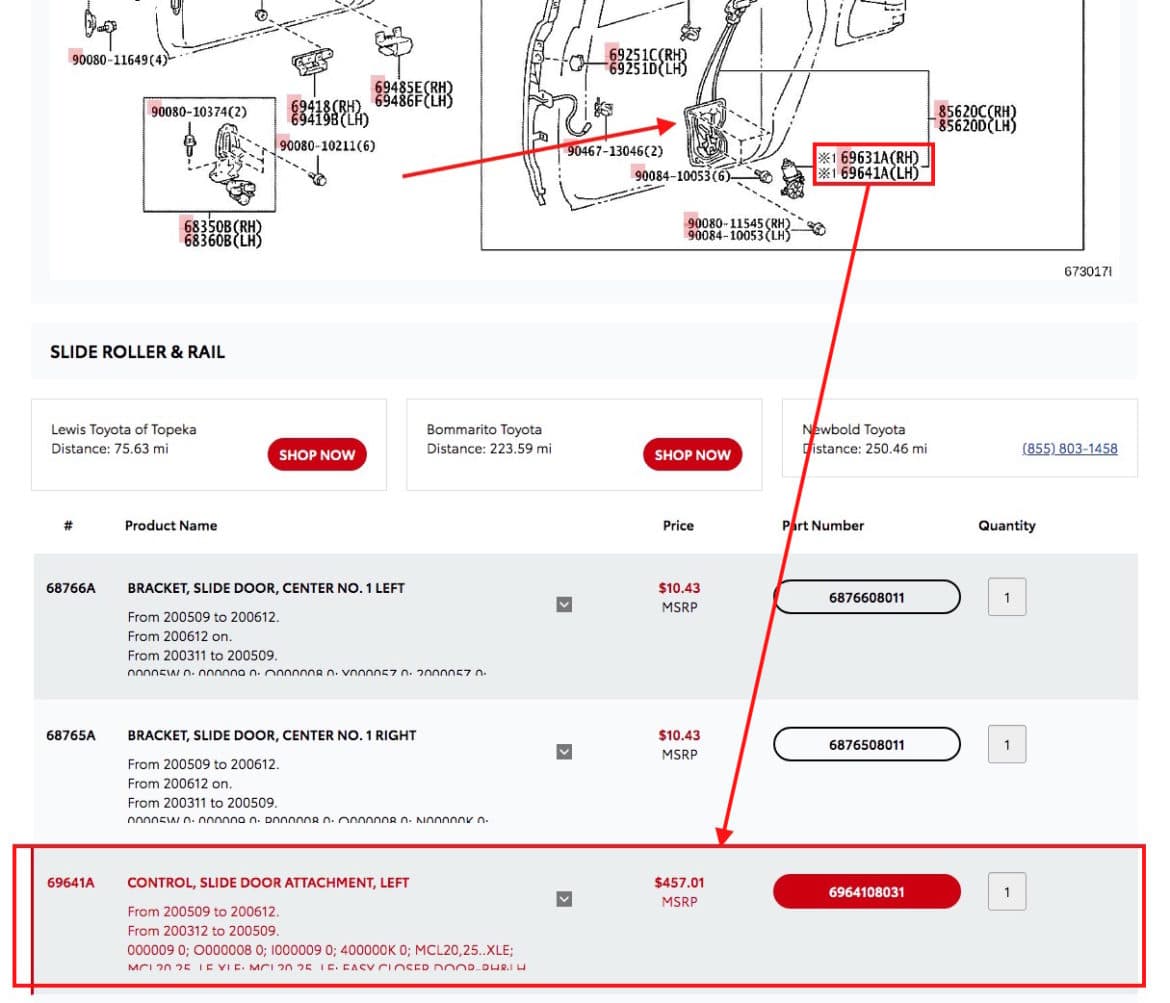
Excellent instructions,very detailed, accurate, and helpful. As a manufacturing engineer for an aerospace firm, I had to write assembly instruction. This was on par with what my peers and I created. What I found most helpful were the partnumbers and those “hidden” screws that were necessary to remove. If I did not have all the steps, I probably would have tried to route the cable without taking the window out, plus some of the mouldings. One note: My cable failed from a rusted, frozen pulley (Thanks New York winters!). So I sprayed some silicone on the opposite side cable to prolong its life.
Thanks for the feedback David and good work on fixing your van.
Hi, I am attempting to fix my broken cable on my 2004 Sienna after 15 years. I had to try twice and finally quit for the day after realizing the black cable was too short. I then found this page and what a life saver this is. I was able to figure it out but somehow both the tensioners broke. Is there a place I can get just the black and white tensioners from? Maybe a link. I thought that would be an easy thing to find since they are plastic and pretty cheesy but just can’t find them. I am seriously hoping I can pull this off and get the van fixed. I think I am doing it in my sleep now I have watched so many videos and read so much. Yours was by far the most informative and helpful!!! Thanks so much. Hoping the other door will go easier when I need to do it!
Hi John, This information is so interactive that I have replaced Power Sliding Door Cable of my Toyota sienna 2006 car by myself , simply following this article.The steps are so accurate and in sequence , anyone whosoever will follow, can do this job easily.I was given a 1000$ estimation from Toyota dealership and somewhere 800$ from a local mechanic.
But I did it myself. There were some tricky steps too, But you have explained in such a nice way that Even I as a non technical guy was able to accomplish this project successfully.
Thanks a lot.
Anuj Tyagi
Anuj, thank you very much for the feedback–I enjoyed it so much I read it to my wife. Great job on fixing your van and saving your family a bunch of money!
I had done this repair 2 years ago using your guide and everything has been working great since. However, when I reinstalled the lower trim piece that covers the rear tensioner (step 35), I must not have secured it properly and it recently fell off and was lost.
I’ve spent a long time trying to find the part number for replacement of this piece on the parts sites but haven’t had any luck identifying it. Any help is greatly appreciated!
Here you go, for my 2004, the part is called “MOULDING, SLIDE RAIL END” and the part numbers with Toyota Part links are:
MOULDING, SLIDE RAIL END, LEFT Part #: 6837408011 (superseded by 6837408010)
MOULDING, SLIDE RAIL END, RIGHT, part #: 6837308020
Thank you for posting the directions and photos. The back cable broke on my 2004 Sienna and I cut the front cable per your directions to get the door open, I am still looking for the cable assembly but since it costs so much I plan on tearing it apart to see what the damage is before I order anything.
Why does the window need to be removed?
Normally I disconnect the the negative side of the battery to prevent shorting the battery out against something with the wrench. Disconnecting either battery post will break the circuit but there is less chance of generating sparks if you work with the grounded side.
Thank you for the great post.
Rob
Rob, if you look at Step 22 you will notice that when you remove the old cable assembly, it passes through the area where the window resides. The power door cables were not designed to be easily removed and there’s no way to do it without removing the window. But, if you read the feedback I’ve quoted at the top you can see that people of all ages and abilities can complete this repair, save a lot of money, and feel really good about fixing their van. About disconnecting the battery… I don’t know that it is essential to disconnect it for this repair as you will not be dealing with any bare “hot” wires, but if it makes you feel more comfortable, by all means disconnect it. Let me know if you have any other questions.
I finally finished my repair. These instructions prepared me for everything. The most challenging was Step 22, pulling the assembly through the window. It took me about ten minutes to finally get it through. My only suggestion is don’t give up, it’ll go through eventually. Once everything was reassembled, i disconnected the battery. However, when I clicked the open door button on my remote, nothing happened: not only was the door locked but the automatic doors were disabled. Make sure these are all set correctly before freaking out. Now all I need is to sell the part I order by mistake. Thanks so much for the guidance!
Thanks for the great feedback Tony–I love hearing back about your successful repair jobs. Good work on persevering and fixing your van!
John – I have a 2008 Toyota Sienna van. Both sliding doors have stopped working. I need to replace the cables on both the right and left side. I am not sure if these are the correct parts because this is what the web site says –
This part does not fit the vehicle you selected:
2008 Toyota Sienna United States Of America
View Similar Parts That Fit
Toyota Part No.: 69631-08031
CONTROL, SLIDE DR AT
Part Description CONTROL, SLIDE DR AT
Manufacturer Toyota. This genuine Toyota part is guaranteed by Toyota’s factory warranty.
what do you think?
I’ve noticed that with all the part number changes for this part there has been a lag in dealer systems being updated. When I formerly had an inside connection at a Toyota dealership I would get the newest part numbers and pass them on to you all and then other dealerships would tell you guys that they were the wrong parts. I don’t have that connection anymore so all I can do is recommend that you guys call around to a couple dealerships, and talk to their parts managers to get to the bottom of it. Make sure to give them your VIN. Sorry I can’t be more help than that.
I had an issue with the window garnish not going all the way on. Found that the aftermarket part from Rockauto was configured slightly different right at the window channel on both the door panel and garnish. Trimmed back the window sweep with tin snips to fit around new part on door panel, also removed rubber sweep from garnish and trimmed plastic back to fit it properly. With your excellent and very detailed tutorial, I still found the repair fairly easy.
Good job on working through the quirks of your repair Larry–often, overcoming some unknown obstacle is the difference between a successful repair and a half-done repair. What happened to your old window garnish? I haven’t heard of anyone needing to replace it.
Wow! What an incredible tutorial! I did this job in about 3 hours. I only had two issues: 1. When putting the rear window channel back on, I cross-threaded one of the bolts. Luckily, they’re pretty long so I cut it off and it worked. 2. When testing, the door would only open but not close. I realized I had forgotten to reconnect a wire harness near the top of the door. Once I did that, perfecto!
Thanks for the feedback Rob. Good work on your repair! I’m glad you were finally successful.
I am in the middle of performing this job. JMUELLER makes it so easy to do. However, I got ridiculously confused about which part to buy. So I bought the wrong one. However, that means I have a part for sale:
(I bought this(69641-08031) for $325.00 and I am selling it for $275.00 THIS PART IS FOR THE DRIVERS SIDE)
https://www.ebay.com/itm/303145791616
Again, this is for the drivers side. Once I receive the correct part, I will post the details of my experience performing this fix.
Thanks, JMUELLER!!!!
I have the same problem as Jesse. I replaced both for cables last year. The full function was short lived. Now the left door only closes and opens by pulling the handle. I have purchased the door lock motor and will follow your instructions once the weather and my motivation have improved. My right door however has a different problem. It tries to close (by handle or button) but when it gets about a foot from being closed, or it opeitself back up. I have to overpower it and force or it shut while it’s still moving on the correct direction. Any thoughts on what’s wrong?
Thanks for the question Christine. I would verify that there is not some obstruction to the door closing. If you had not just replaced the cables I would guess that you have a fraying cable that was providing resistance to the door. I would verify that there is not something in the track that the door rolls down. The top track is above the door opening, the other track is below the back window, as highlighted here:
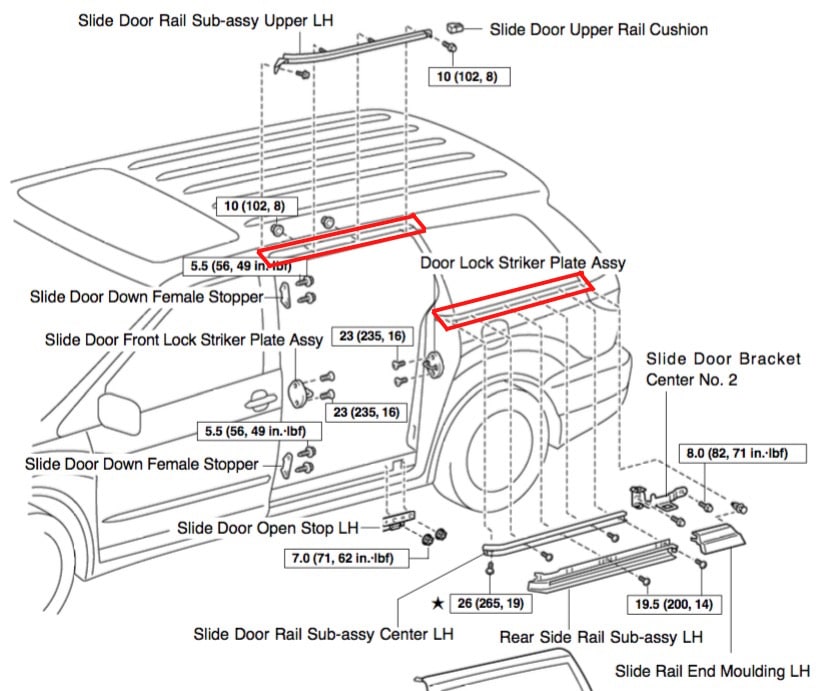
If there is something that causes resistance to those metal wheels rolling in that track, the door will reverse direction. That would be the first thing I’d check if I were you. Let me know if that helps.
Thank you done the repair and it worked. Only problem I ran into is that both doors does not open or closed when using any of the button. The motor engage and try to close the door or open but it freezes like the lock mechanism did not engage. Only way to open and close is by manually opening or closing using the door handle. The inside buttons and keypad does not allow the door to open or close. It seem to be stuck when fully open and closed after the lock set in. Any idea?
Jesse, that sounds like your door lock release motor is bad. I have written an entire repair article on that and since you have already replaced your sliding door cables, this one will be easy since many of the steps are the same: How to Fix 2004-2010 Toyota Sienna Sliding Door Will Not Open or Close With The Remote-How to Replace the Slide Door Lock Release Motor Assy
Hi John, I just wanted to post and thank you for this website. I followed the directions listed and the repair went smoothly beyond my expectations. I did my homework and reviewed the steps a few times before doing the repairs.. The left door on our 2010 Sienna van broke a few months back and I took it to the dealer and spent $1500.. when the right door broke I decided to do the repair myself.. and I am glad that I did.. Thank you for your postings.
Hi again John,
I got my door opening and closing in powered mode. Hooray! It turns out I could bend a couple of the tabs that hold the cable ends to the mechanism. This essentially shortens the length of the cable slightly to make it work. So now it’s almost ok, except I can’t lock the door with the remote. The motor under the red circle you drew makes a feeble attempt to push the lock arm. I have not been able to find a part number for that motor. Maybe you can help identify it. The other issue is sometimes the door doesn’t completely close. I’ve lubed the hinges a couple times and it seemed to help but not completely.
Thanks again.
Hi John! Well, chalk up another success using your sliding door repair tutorial. Replaced the right (passenger) sliding door cable today and it went much smoother than than last time. (I was surprised when I read the quote from me in there… thanks!) We’ve got 228,000 miles on our 2004 Sienna, and it’s still going strong. One minor issue with my repair – sliding window is too tight (goes down easy but not up without help), so I must have not installed the window piece correctly. I’ll dig into it tomorrow and see what I can come up with, if you have any ideas please let me know.
One other question – have you ever worked on HVAC Blend Door servo motors? I believe there are three of them, left, right and a main one in the center. I’ve got at least one going out, and of course it’s the hardest to get to. Trying to keep this sienna going as long as our 16 year old is in high school… Thanks again for the great documentation! Tim
I had a window issue like that on the first door I did. For me it was that the rubber channel that the window slides in was folded over or somehow messed up–I can’t remember exactly how it was messed up but I had to backtrack somewhat and rearrange the rubber channel and then the window would go up and down like normal.
As for your HVAC problems– do you hear clicking behind the glovebox when your AC tries switching from outdoor air to indoor air–mine is doing that too! I haven’t done the repair and am unsure of exactly how to do it. I have priced out some parts and because of budgeting have just been putting it off. Let me know if you tackle that problem. I haven’t found anyone online to really tell you how to do it.
Thanks for the blog excellent instructions, tried to see any shortcuts but found none. Just follow it step by step. Did the right side and a couple of days later the left went
Thanks for the feedback and good work on repairing your Sienna. The second time it is even easier to do!
Hi John,
I replaced the door latch motor but it hasn’t resolved my issues. The outside handle doesn’t work anything. If I pull on the lever that has the blue cable with green end and the black cable with white end, then the mechanism releases and I can move the door, either manually or with the remote or the button on the side of the van. There is no indication of a problem with the cables that your instructions cover in this article. It seem whatever motor activates the lever with the green and black cable is not pulling it far enough forward to release the latches. Can you help with this issue? The inside and outside handles don’t open the door either.
James, you are going to need to trace the run of each of those cables from one end to the other to determine where the problem is. At the handle there is a cable that runs to the central “hub,” which I’ve circled in the picture below. If when you pull the handle, if it doesn’t actuate the hub, then the plastic piece where the handle’s cable attaches is probably broken off. Try the different methods of opening the door, with the inner panel off and work your way through the system to determine where the problem is.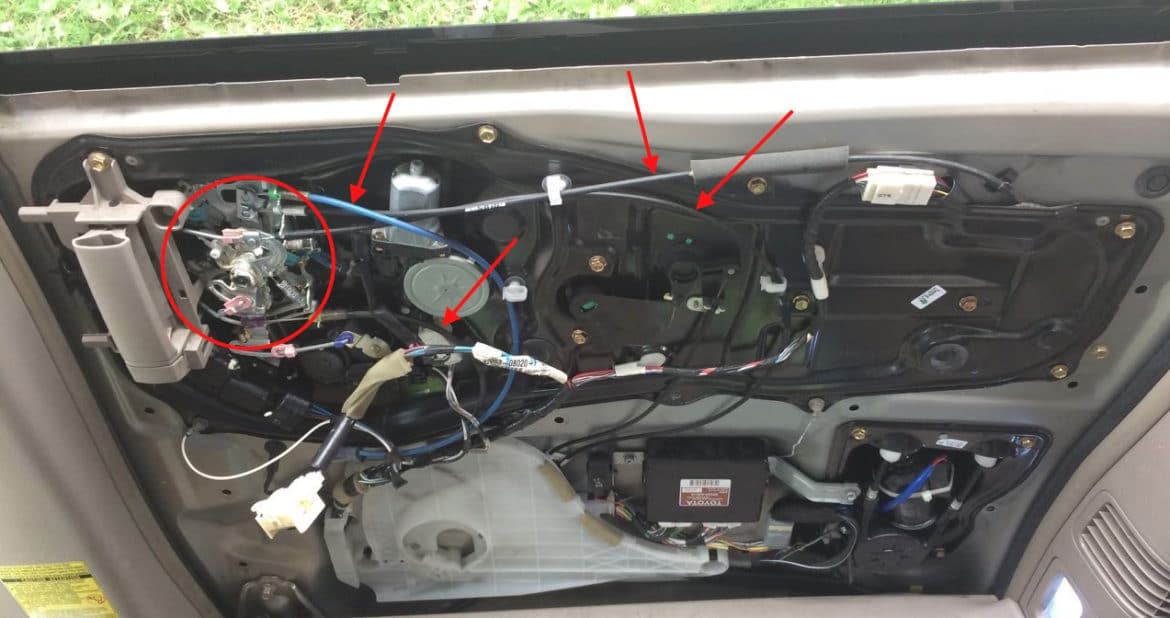
OK, I’m back again. It has been a while! I did finally get the door closed. But then I was back to the original door won’t open no way no how. I finally got back to working on it today. I had thought about this a lot, but finally acted on it. What I did was pretty drastic. After pulling the door panel off, I used an angle grinder to cut an opening in the inner steel panel so I could get at the front latch to see if I could see what was going on. I found the rod that should have opened the door, but didn’t. I could see the black and blue cables the entered the latch mechanism but I couldn’t find anything wrong. I finally took the three screws that attach the latch to the door and tried to remove it. I couldn’t fit it through the hole I made so I wiggled it around again and put the screws back in. Then a big surprise happened! The door opened! So now I’m back to ground zero with it stuck open and afraid to try closing it again. My plan is to go ahead and replace the latch motor and see what happens. I would really appreciate any ideas.
Hi Peter, I’m just reposting because I may have accidentally posted a new comment instead of replying to your comment. I’m definitely interested in seeing how you made the door open the extra 3″ for the ramp as I’m looking to make this repair myself.
I would be interested to see what you did for the ramp van conversion. I have a 2005 Sienna ramp van and the cable just busted on it.
John,
I revisited the repair. My daughter took one end of the cable and I took the other, and we pulled back and forth repeatedly. After we did this, I found that I had the perfect amount of slack. Problem solved.
I find it hard to believe that doing that back and forth with my daughter freed up some slack, but I can’t explain why I couldn’t get the cable to reach the rear tensioner mount last week.
Bottom line: We have a working auto-slide door.
Thanks so much.
Oh good, I’m glad you worked it out. I’m going to add a tip in the article to try that if you come up short on one end. Thanks for sharing Stuart and thanks for persisting and overcoming on your repair. I’ve had stuff like that happen many times and I often think back (after all the sweat and stress), “Why couldn’t it just have worked out on the first try and save me all this stress??” DIY doesn’t always work that way.
I definitely performed steps 24 and 25 correctly. I am going to get a partner to help me and we’ll pull the cable back and forth a few times. Maybe something is snagged in the pulley and doing this will unstick it.
Hi John, Thanks to your tutorial and associated comments, I successfully completed the repair of the right sliding door on my 2008 Toyota Sienna Braun Rampvan. Ironically I found this site from a web address noted in the comments of one of the cheap cable only repair kit suppliers that you recommend against.
I ordered SDK-08042 from Amazon Prime/CNS EngineParts. The product arrived the same day and was as described. The description referenced included installation instructions along with an invitation to contact them if the instructions were not supplied. There was a one page barely legible 2 sided sheet with some pictures and difficult to understand comments included.
Had I purchased the Toyota part that you recommend, the resulting installation would not have worked. To accommodate the ramp, Braun modified the cable spool and replaced the rear tensioner with their own. I will provide pictures and instructions for what I did to make the door open the extra 3 or so inches for the wheelchair ramp. This initial comment is mainly to offer hope for others with the Braun conversion. I suppose it also serves to warn others that taking it to the dealer might result in the installation of the unmodified spool with the door not opening far enough, and the loss of the original modified spool. You will understand once I send the pictures that I took.
A few weeks ago I followed the instructions here and replaced the cables of my passenger-side sliding door. Took some time, but it worked beautifully. Thanks!!
My driver side door was broken as well, so I reasoned if one repair went well, I’d try the other.
So I ordered the part for the driver side (69641-08031) as indicated on this site. The repair was going great. I anchored the end of the cable with the black anchor to the inside of the door, I then attempted to anchor the white anchor to where it is under the rear window and I discovered that there was not enough slack. It was too short by about 4″-6″
It was getting dark and I have no garage, so I had to stop the repair until next weekend when I can look at it again. But how can this be?
I thought maybe I might have twisted the cables as I passed them up through the door, but if I had done that I would not have been able to screw down that part near the door hinge (it wouldn’t have reached).
Could Toyota have machined the cable length incorrectly?
Could the cable be tangled or crossed inside the pulley?
Could the cable have been wound around the pulley one too many time from the factory?
I left that white retainer clip on the pulley right up until the point I mounted it on the motor.
Should I take the pulley/cable mechanism out of the door, gently take the pulley out and inspect it. I am afraid to do this because if I becomes unraveled I might not be able to figure out how to rewind it.
Any suggestions or advice would be greatly appreciated.
Stuart, since it is short, I would verify you did Step 24 and Step 25 correctly, and if you did, I would contact the people you purchased the part from. If it was too long then I might think a loop of cable from one side came off the spool, but since it is too short, I don’t know how that would happen. I purchased one of my cables off of ebay and it arrived with the cables coming off the spool. So I had to re-wind them myself. It was really tricky and I was quite nervous about getting it right, but I was able to pull it off. So it is possible to rewind those cables but I would not recommend it. Let us all know what you end up doing to resolve your issue.
John Mueller, Thank you sir for all the info available on this page including the hard to find part number, even the dealer won’t tell you about.
I ordered the OEM part that has the spool ready for the right door ( 69631-08031 Control Slide Dr AT $297.87) from McGeorge of Richmond Virginia.
https://toyotaparts.mcgeorgetoyota.com/
The installation was faster than installing Dorman part that required reusing the old spool.
It took me less than 2 hours since I already have a history of installing an after market part (Dorman) and removing it 2 weeks later after it broke.
so i am missing the left rear cable tensioner bracket. it’s just not there 🙁 do you happen to have a part number for it? thank you so much
you have made an amazing set of instructions to change these cables,I am by no means a mechanic but I was able to follow the step by step instructions with photos fairly easily,I would not have felt confident enough to do this repair without your site ,I would have had to bring my van to the dealership ,the same dealership whose part dept told me the part is only available with the motor attached for $1500 Canadian and the part number you gave does not exist,I got the part with the pre spooled cables and pan for $400 Canadian at toyota parts direct in Ontario and they did recognise you part number, thank you very much for making and posting your instructions
Hey thanks. I think opening up the assembly is not a big deal if you could get through the locktite applied screw which fixes it.
My problem is that the outside sliding door doesn’t work very well and the remote key and the inside sliding door button functions very well. That actuator motor still works fine on mine, but I am really tempted to do a prophylactic replacment of motors. On the other hand, the actuator on the rear part of the sliding door, which seems to be attached to the outside handle, makes that clicking sound, which I think means a dead motor inside, but I can’t figure out a way to access that assembly yet.
Thank you for these great instructions! The cable snapped out our 2010 Sienna and I thought for sure it was headed for the dealer. After finding your post I ordered the part and in a little over 3 hours this weekend got the door back up and running. I never would have have been able to do this without your step by step instructions. Thank you!!
Thanks Sam, I’m glad you were able to fix your van–good work.
Hi John,
So I’ve took out the trim and checked again, and looks like my Sienna has a dead motor inside the power slide door lock assembly. I could hear that clicking sound very similar to the video you posted on the actuator repair page, but the sound is from the rear side of the door. Also, from the inside, the cable from the outside door handle to the rear side of the door was well attached, and functioning. That’s how I come to this conclusion.
I could find the part number to be 6933008020, and it probably has a similar sized motor in it, so if I could take it out, maybe I could just replace the motor in the plastic housing. The problem of taking out the slide door lock assembly seems to be a much tougher task though.
Have you tried such repair yet?
Thanks.
JP
I’ve done the repair and it is written up here: How To Fix 2004-2010 Toyota Sienna Sliding Door Will Not Open Or Close With The Remote-How To Replace The Slide Door Lock Release Motor Assy
I have not performed this repair by just replacing the motor. I have heard of people doing that though. Here’s how to disassemble the part: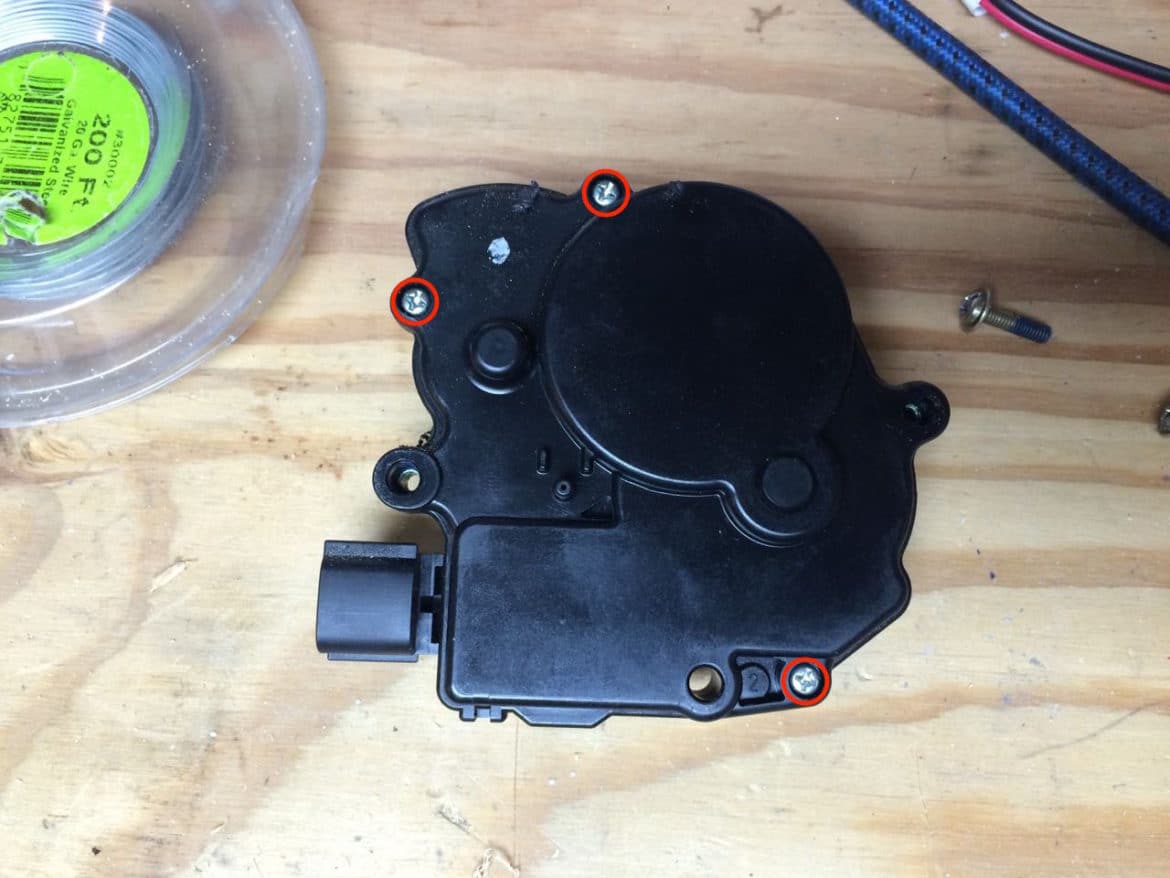
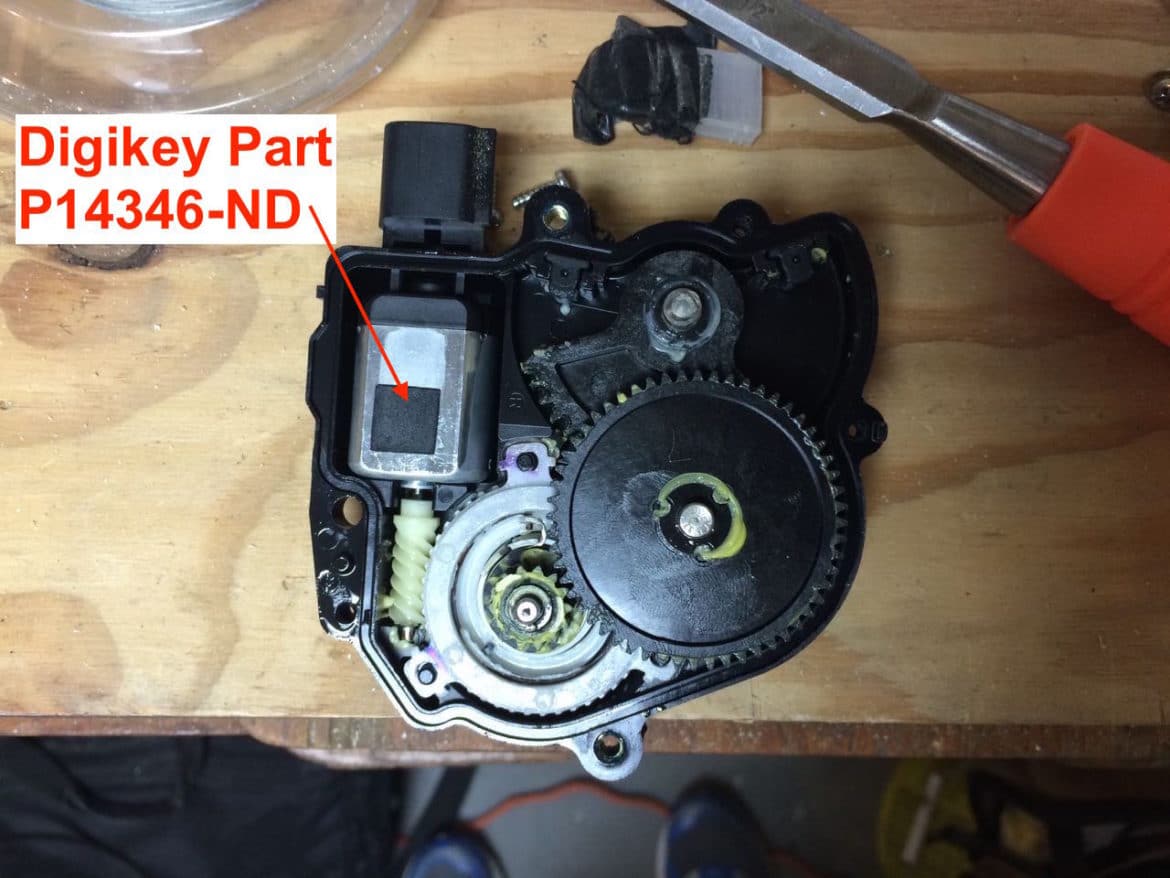
John, thank you so much for taking the time to make such thorough and reliable directions for so daunting a task. I had battery issues making the repair more complicated, and then had the right rear wing window break out of the hinge joint before I was done putting the sliding door together–if your process hadn’t been so clear, I would have pulled all my hair out and removed the wing window with a hammer. The savings you have given my family are huge. The sliding door is fixed. Wow.
John, what a nice bit of feedback–thank you for taking the time to drop a note. Good work on persisting and conquering this difficult repair. Every time you press that button and the door opens on its own you will feel a lot of pride that you did the repair yourself.
Thank you for hosting this website and having the instructions and photos. After waiting a month for the part (was on back order) and After 3+ hours of installation, I was able to replace my rear passenger cable assembly (69631-08031). I purchased it from the link below. I had my wife helping me hold some assemblies and helping me put the assembly thru the door.. Funny thing the bolt for the window didn’t fall in the door, but the socket fell after screwing the window in the socket hit the door after i installed the nut. Luckily I had a magnetic wand to help me get it out.
https://toyotaparts.mcgeorgetoyota.com/
Thanks again for helping me save tons of money.
All of the info on this page was very helpful. I did a right side 2010 door. Got the part 69631-08031 Control Slide Dr AT for $297.87 from the site below.
https://toyotaparts.mcgeorgetoyota.com/
It took me about 4.5 hours to do the job. Hardest part for me was sneaking the pulley system through the window opening. It is a puzzle.
Thanks again for helping me save tons of money.
You are so welcome Robert, thanks for taking the time to share. Good job on repairing your Sienna!
I used your steps for my left driver side sliding door a few months back with great success (and posted to that effect) – thanks again. Now, on my 2007 Sienna the right passenger sliding door is starting to act funny. Wondering your suggestions – do I now have to replace the motor assembly for it as well?
Symptoms:
1) Weezing noises / struggles to open
2) Doesn’t open or close using remote button (but tries to, it kind of kicks a little but doesn’t have the strength)
3) Will slide open or closed in automatic mode if I pull on the handle
4) Seems to struggle most when in the fully closed or fully open position; i.e. buttons will work if door has not gone to closed position
Especially after seeing a recent post that the part may be difficult to find, I’m wondering if there may be alternative options I could try since the door still (sort of) works.
Thanks,
Pete
What you are describing, the door not opening when you try opening it remotely (by keychain fob or the electric buttons), is a different issue, which I’ve written a repair article on as well: How To Fix 2004-2010 Toyota Sienna Sliding Door Will Not Open Or Close With The Remote-How To Replace The Slide Door Lock Release Motor Assy. The motor is bad that unlatches the door before it opens or closes. If you can fix your sliding door cables then this repair will be easy as it follows some of the same steps. Only my passenger door slide door lock release motor has failed, not the driver’s side.
Dear David,
My name is Tae Hoon KIm and have that part you are trying to buy. Last September, i tried to fix both sides of door cable of Sienna 2009. I bought both parts from http://www.kalamazootoyota.com and tried to fix from passenger side. Unfortunately, i failed and ruined my part. From that time i never tried to fix driver side and have kept that part. Although I originally paid $489.77 for driver side part(69641-08031), Now i hope to sell that part lower than that price if you are interested in.
If you are interested in my offer, please give me an email letter to tkim109@syr.edu.
Have a good day!
Sincerely,
Tae Hoon Kim
Dear David,
My name is Tae Hoon KIm and have that part you are trying to buy. Last September, i tried to fix both sides of door cable of Sienna 2009. I bought both parts from http://www.kalamazootoyota.com and tried to fix from passenger side. Unfortunately, i failed and ruined my part. From that time i never tried to fix driver side and have kept that part. Although I originally paid $489.77 for driver side part(69641-08031), Now i hope to sell that part lower than that price if you are interested in.
If you are interested in my offer, please give me an email letter to tkim10@syr.edu.
Have a good day!
Sincerely,
Tae Hoon Kim
Dear Martin,
My name is Tae Hoon Kim and I have that same part you want (69641-08031).
Last September I tried to fix both sides of my Sienna door. Thus I bought both parts and I started from passenger side.
Unfortunately, I failed to fix passenger side and ruined that part. From that time I have so depressed and just kept my driver side party intact. Originally I bought driver side with $489.77.
If you want, i can sell that part with much lower price than i bought.
And only if you are interested in my offer, just give me a email letter to peace71k@naver.com.
Have a good day!
Sincerely,
Daniel(Tae Hoon Kim)
Just as a FYI, I ordered on 7/23/18 the Driver side OEM part (69641-08031), and I got an e-mail from the vendor saying “69641-08031 IS ON BACK ORDER FROM TOYOTA USA. AT THIS TIME THERE IS NO STOCK IN THE USA. CURRENT ETA IS 9/4”, I purchased it from McGeorge Toyota Online Parts ($297.87-$14.30 shipping)
Well shoot, that’s disappointing. Thanks for sharing. If anyone else finds a spot to buy the parts let us all know in the comments.
I am also searching for this part. I found one but they are asking $450 and I have to drive 3 hours to get it.
I have been told it is on back order with no date for fulfillment.
Thanks for the update. Seems like there’s a country-wide shortage for some reason. I’d never heard of that for this particular part before.
try rock auto parts. They Have it for $207.00.
Rock Auto does not sell the part we have been discussing and I do not recommend buying the aftermarket (partial) part. Rock Auto’s part requires you to reuse your old spool and wrap the new cables they provide on the old spool. IF you are going to go to all the work to do this repair I recommend buying the Toyota part.
When I follow the link to order part number 69631-08031, it doesn’t show a picture of the part. I just wanted to confirm that the part includes the spool and cover with the cable preinstalled around the spool? Thank you
All the OEM sliding door cable parts come with the cable installed on a new spool.
When I use the link to purchase the part without the motor 69631-08031, the site doesn’t show a picture. I just wanted to double check that the part came with the cable preinstalled on a new spool?
All the OEM sliding door cable parts come with the cable installed on a new spool.
Dorman after market cable broke in 15 days. I knew it was not reliable since the cable length was not accurate. Such a waste of time, 4 hours to install, then broke in 2 weeks. I wasted another 2 hours removing it, to put it back in the box to get a refund. I received my refund from Rock Auto. Now the door is manual since I disconnected the motor and the little tiny motor near the door handle.
I always liked Dorman Products, but this one was a big disappointment.
I have a concern for my door. I remove the cables and the spool from my door so I can use the door without the wires hanging out or messing the motor up until I order the part.. I found that when the motor is still connected I can only activate the motor when the door opens.. when I close the door, the motor does not activate.. What do you think .. is this normal because the cable/spool is not attached or is something wrong with the motor?
Thanks
The power door system has a position control so it knows where it is in the process–that system is probably confused since there are no cables. I do not think you have a bad motor. Once you replace the cables per these instructions it should work fine.
My problem is after the cable broken I could not open the power slide door again, even I push down the slide door off button.
I’ve run into that problem too. The issue is that the frayed cables don’t easily slide through the tubing and to transition the door to open they must. What I do to get the door open is that I sit down in the middle seat and put one foot on the rear/back end of the side door and the other foot on the front end of the door and used my hand to push the inner door latch while I pushed out with both feet simultaneously. You don’t want to push with all your might but just on the front and back simultaneously just after the latch has been pulled. You can accomplish the same thing easier with the help of a second person to unlatch the door (they can do it from the outside while you push, from the inside, on the leading and lagging ends of the door.
My experience was that it took patience to get the components out (I.e.into the door) and threaded back in (I.e. out the top of the door). I left the protective white cover on because I was paranoid about damaging the part during this step. I agree that this was frustrating and there were not specific instructions on what angle to turn the parts, but just keep trying and you’ll get it.
What a great DYI write up. Helped me immensely! Thank you
Thanks for your feedback, glad to hear you got the help you needed.
I have it off just needed to pull it really. How do i get the old cables through the holes the white plastic thing seems to block that. It’s not in the instructions as far as i can tell
I have had over 275 people follow these instructions and successfully repair their Sienna so I’m pretty confident that every step is covered. Did you buy the OEM Toyota part? Let me know which step you are on and then I should be able to advise. Thanks, John.
Hello John, I finished replacing my cables today for the passenger side, thanks to your blog and some YouTube videos that some referred me to this page.
I posted a comment about and after market part SOLD (not made) by DORMAN, I was not happy with cable length, the rear one came half inch short. By the time I discover that, as you know, I was almost done. I took a break then I tried multiple scenarios and nothing worked. I released the front cable to give a chance for the rear then I couldn’t attach the front.
Finally I released one loop from the front cable in the spool, which made it loose,
I decided to keep the part after I found a solution which saved me from doing the whole work again. I removed the the cap at the bottom of the black front tensioner and pulled the cable and made a knot . I loosened the two screws that holds the black tensioner base and passed the access cable around the base between the two screws then I tightened the screws hoping it’s gonna help support the knot. Of course I lost the spring mechanism and now it can’t be called a tesioner any more.
if it happened and broke again, i’m going OEM.
On the other hand, I did not need to remove the attachment panel, there was enough room to pass the cables and the clutch. I don’t know why people all over the internet insist on removing that 8-screw part.
I’ll keep you posted,
how can I send a picture for my modification?
Send me your email via the Contact Me page and I’ll respond and then you can send me the email as an attachment and I can post it. Thanks. Yes, your experience is why I recommend going with the OEM part. If you are going to go through all this work why not be done with it for the remaining life of the van versus what you have experienced. I bet you wished you were done and would gladly pay the difference for the prices now to be done with it and now you must buy the part all over again. Thanks for sharing and let us know how it goes with you.
I did some research on part needed to do this repair. There is a coupon discount code you can use mentioned at the end of my comment.
There are three options available now in June 2018 for the cable set without the motor (assuming you motor still work):
1. The lowest price is a cheap generic brand sold under different names (one is called ADPTY) for around $200.
2. The second option is a better well known aftermarket US brand called DORMAN (not necessary made in the US but comes with US warranty) Right side part # 924550- Left side part#924578. Each sold in the range of $250.
Before I tell you about the third option which costs more, you need to check your door first to see if the spool is still in good shape, because option 1 and option 2 do NOT come with new spool. If your spool is damaged or if you don’t want to deal with winding the cables yourself around the spool, you have no choice but to order the new part offered by TOYOTA dealers that comes with new spool and cable already winded around the spool as shown on this web site.
3. The third option is to order an OEM part from Toyota that come with the spool ready to install. All you need is to swap the motor to the new pan and attach the spool to it which will save you 15 -30 min of labor and guessing work. Right side part #69631-08030 Left side part# 69641-08030. it’s the highest price, around $480.
My personal choice since my spool and motor are both in good shape, and after some research, I chose to buy DORMAN from a web site called ROCK AUTO. It is hard to find the part but if you click on your car make and model , scroll down to +INTERIOR then click +POWER SLIDING DOOR CABLE and voila!! it’s there DORMAN for $190 each side. Right side part # 924550- Left side part#924578 .
Rock Auto always charge for shipping but you can knock it off if you use this coupon if you cut and paste the code into the box HOW DID YOU HEAR BOUT US during check out. code is 8332957656735880 gives you 5% discount but it Expires on 7/15/2018.
I ordered the Right side for $187.29 right to my door step.( NO sales tax in my state and price after applying the code and shipping charge).
Thanks for all the work you put into sharing the part information Hamad. I would say one thing, the part you list in #3 is the old expensive part which now has been replaced by a much less expensive part, ending in -31. Dealers WILL sell you the old part and overcharge you so please everyone, do not order the -30 part or you will be overpaying for what is exactly the same part, which can be purchased cheaper.
Thanks John, Auto Zone did not have the bolts. Ace hardware had one slightly longer, so I paired that with a washer and voila! Both doors completely fixed! All that’s left is cleaning the black marks from the leather seats. It took me about twice as long as was suggested (12 hours for 2 doors). For me the 2nd door (right) didn’t go faster. The right seemed more awkward to reach things. I have some back issues and am not very flexible. Perhaps it was more awkward because I’m right handed or because I followed the recommendation to remove the 2nd row seat, which for me did not work so well.
I was able to tame my strength and didn’t break anything on the 2nd. Actually, my husband told me to hold the head of the wrench instead of the handle to reduce torque. He also said, “Wow, I never knew auto repair made you so horny.” You see, he was working in the garage while I was working on the doors and apparently I said the F-word a lot.
Finally, I’m not sure this subject is allowed, but if I want to make a donation to shareyourrepair, would any of that get to you?
Christie, that probably is the funniest thing anyone has commented on my website–too funny! Auto repairs can be frustrating but I’m glad you made it through BOTH doors!?!?! It sure feels good when you successfully completed them though! You can give a donation, thank you. To donate via your phone, scroll ALL the way to the bottom of the article (for this one it takes forever because of the hundreds of comments–maybe pick a different article and it will be much faster) and tap on the donate icon and you can donate through paypal. If you are on a laptop, the link is in the right column and you don’t need to do all that scrolling. Thanks again!
Hi John, you are my Toyota Angel! With your awesome instructions, I fixed my left door and am about to begin the right today. Elizabeth’s price of $312 was the best I’ve found. I didn’t use that dealership because I had already purchased my parts from my local dealership. I paid $326 ($350 after tax with no shipping by picking up at local dealership).
My experience with car repairs is extremely limited. I’ve only attempted interior repairs such as radio replacement, headlight assemblies, window motor, and now power sliding door!
My question may be dumb, but where can i find bolts and screws that I lost or broke? I need:
1. a couple of the gold ones that are used to hold the window and the panels to the door.
2. I over tightened and broke the one that holds the back trim onto the door’s window.
3. And most importantly, I over tightened and broke one that holds the rear cable bracket under the vent. That one I need my husband to drill the broken one out.
I’ll be more careful not to over tighten with this door I’m starting on today!
Christie, thank you for the feedback and good job at tackling this repair! Now we need to tone down your muscles on that wrench so you don’t over-tighten your bolts. I may go back and add some caution to some of those steps to warn future repairers to be careful. As for where to get the missing bolts, if your door is still opened up I’d take a different bolt out (They nearly are all the same) and take it into a auto parts store and get a replacement there. Otherwise you’d need to go into a Toyota dealer and have them pull up the parts explosion on their computers and they can look them up there. I’m shopping for a new dealer connection so I can’t be more help than that. Again–great job on tackling this job Christie!
John, your reply about this issue received. So, apparently there was a change and the dealer doesn’t have upgraded parts diagrams and descriptions. He did check service bulletins, but he only found the 2010 issue with the coated cables. This repair has dropped a couple of places on my life priority list, ti will probably be a few weeks before I get to it. If there is a problem, I’ll be sure to let you know. I will also post in the case of eventual success.
Thanks for your very prompt attention and replies.
Well Steve, I sure don’t want to mislead anyone and that’s why I spent so much time double-checking. Thanks for giving us the feedback about the dealer not having the updated information. Keep us posted on how things turn out if you choose to do the repair.
So, John I went to the site in your updated link and it loaded a page with the title, “Control Slide Dr AT – Toyota (69631-08031)”. Sounded close, price looked close to what others had posted. I took it into myy local dealer and he ran it through his system and it is the part # for the drive motor, it was clear on his display.
I have a functional door without the repair, so, I’m not in a hurry. It appears from the posts here, some have had success using the Doorman aftermarked part. If a part as you describe is no longer available, I feel good enough about your instructions to tackle the repair with the aftermarket cable assembly.
Steve
Steve, I understand your concern–I always want to double-check that I’m getting exactly what I want. When I updated the parts links I did not edit the text descriptions, which included the parts numbers, so I assure you that part number is correct. I also went back and looked up the emails I received that alerted me of this new lower-priced part and they match the part numbers there. To further verify, I just searched on Google and I found Toyota Technical Bulletin T-SBM-0Ra0er8cv5h21-0392 (click link to download pdf), which calls out this exact part number as well and mentions specifically “A new service part has been developed so that the replacement of the entire motor/cable assembly is not required.” This is the part numbers that dozens of people purchased and successfully installed since I updated it back in September, 2017. One thing I’ll mention is that this part is new and may not be correctly updated in the dealership’s database you consulted. I will contact Olathe Toyota to further verify these part numbers and will comment back on this to update you all.
Very nice tutorial John. I want to replace the cable on my 2004, right hand door. I took your part number to my dealer, and his system lists that # for the motor only, ~$400. The cable assy, w/motor is available, just shy of $1k. He did some searches, didn’t turn up anything. I have dealt with this dealer and this parts man before and believe he is quite knowledgeable and proficient. I do see on ebay the cable assy for $195, but, of course, you have to wind it on yourself. On the basis of your tutorial and my previous experience replacing the latch motor, I’m willing to take this on with this part, but I much prefer your suggested part. Has there been a change since you posted that part #?
Steve
Thanks for the note Steve. My original Toyota parts connection closed their website. I have not found a new connection yet but I don’t want to keep you all from getting your van’s repaired so I have updated all my links to the local Toyota dealer’s parts so you can get back on track with your repairs. I have not done business with them yet but I’m reaching out to them as we speak. Check out the links again and let me know if any of them do not work.
My 2006 Sienna Limited AWD drivers side cable broke last week. Glad to have found this site. Don’t need to spend more than I have to on this 12 year old car with 139,000+ on it. I was hoping I could get new links for the parts. The ones above don’t seem to work, I’m getting a not found message. Debating if we should replace both while we are at it. I’m sure the other side isn’t in much better shape.
Mary Beth, check the links out again. The Toyota Parts connection I had with the former links closed their online business without informing me. I have updated the parts links to another Toyota dealer. Let me know if you have any problems with the links.
This just happened on our 2014 Sienna (I am so frustrated) – could your tutorial be used successfully on this year model? Thank you!
Molly, sorry to hear about that. I am under the understanding that they have changed the design of the sliding door cable mechanism somewhat, to make the replacement part less expensive. I have not worked on the new model and I cannot recall anyone reporting back on how similar the repair is to the one I describe in this article. Sorry I couldn’t be more help.
Hi, I want to understand how the suction function still work in my door despite the cable is broken and I use the door manually? I’m not sure what is the right term to explain it, when I shut the door manually (cable broken) with full force it shuts like any manual non motorized door, but when I shut it with less force and the door reaches the column, I notice that the rear part of the door get sucked into the body and seals it flush with the body with a sound similar to the one I hear when shutting the rear gate? My Question is : is that a separate motor that pops the door out and in? (2007 LE)
Hamad, the mechanism that pulls in the tail edge of the sliding door is completely separate from the sliding door cable system that opens and shuts the door. The sliding door cables are inside the door and the part you are referring to is technically called the “Power Slide Door Lock Assembly” and is located on the rear frame of the door. I have highlighted the two systems (one set on each side) in the diagram below.

Big thanks to John and everyone else who has pitched in tips over the years! Our first ’08 door went out about three years ago and the second broke last year. I’ve been following this blog since the first one broke. We used John’s instructions to make them manual but I started to worry about the weight of the doors and them slamming shut on our kids. The doors wouldn’t always lock themselves in the open position, and they slam shut on even the smallest incline.
So, we bit the bullet, ordered the part and did the repair on the driver side. It took my husband and I about a day and we had no problems. And, after 10 years, we discovered that the “vent” button on the driver’s console opens the far back windows! I grew up with vans and it was always a manual open and when we first got the van we couldn’t figure it out. It wasn’t a top priority so we never bothered with them. Funny to learn it after 10 years though!
We’re going to do the other side now since I’m concerned about the motor and having the automatic turned back on but that side still disabled. Now, if anyone has a tip on how to fix our FOB that just stopped working (battery change didn’t help), that would be great!
BTW, I found the part at this site for even cheaper: https://parts.erniepalmertoyota.com. Stumbled upon it while looking for a seat belt replacement. Best price on both.
Love my van and love this blog! Thanks John!
In the past I’ve bought parts from Cool Spring Toyota in Tennessee if you want a new link. Great pricing when compared.
Your links are now struck out but weren’t a couple days ago. Part prices don’t pop up. Can you check links?
Thanks for the note Neil. The parts dealership I have linked to for the past 3 1/2 years shut down their website a couple days ago, giving me no notice. I am working on finding a new connection but haven’t found one yet. The part numbers are still good so if you need the part I’d google it to find somewhere else to get it. Sorry about that.
Big thanks to John and everyone else who has pitched in tips over the years! Our first ’08 door went out about three years ago and the second broke last year. I’ve been following this blog since the first one broke. We used John’s instructions to make them manual but I started to worry about the weight of the doors and them slamming shut on our kids. The doors wouldn’t always lock themselves in the open position, and they slam shut on even the smallest incline.
So, we bit the bullet, ordered the part and did the repair on the driver side. It took my husband and I about a day and we had no problems. And, after 10 years, we discovered that the “vent” button on the driver’s console opens the far back windows! I grew up with vans and it was always a manual open and when we first got the van we couldn’t figure it out. It wasn’t a top priority so we never bothered with them. Funny to learn it after 10 years though!
We’re going to do the other side now since I’m concerned about the motor and having the automatic turned back on but that side still disabled. Now, if anyone has a tip on how to fix our FOB that just stopped working (battery change didn’t help), that would be great! Oh, and we have to replace the third row, driver side seat belt thanks to our dog. Otherwise, rock on Sienna!
Love my van and love this blog! Thanks John!
I got the kit without the wound spool. Yippee! My real problem so far though, is that on the drivers side the previous owner just threw out the wheel, cover, bearings, and everything, and at some point the cover on the passenger side broke and the bearing fell out of it as well. Where can I find the right bearing for between the pulley housing and the pulley? Is it just a roller blade bearing?
Logan, I am not aware of anyone selling those parts individually for a Sienna. I would recommend following my suggested steps in this article for the door where the previous owner threw the parts away.
Hi John great site. I have a 2008 Sienna and was using manual mode for a year when one day the door won’t shut at all. It doesn’t seem to want to latch or pull itself shut. When I removed the door panel the cable housing was broken and cables looked like rats nest. Since my door won’t work in manual mode does it mean I need to buy more parts? Also I went to Toyota dealer they said part 85620-08053 would cost $930 what parts do you reccomnend I get? Thanks
John, I have yet to hear that anyone needed to replace the motor and cables. I disagree with the dealer you talked to–your motor is most certainly ok and all you need to do is replace the cable assemblies of which I list out the part numbers above. See if your pictures look like what I show of the “rats nest” I found in my van–you are describing what I expect and all you need to do is what I prescribe in this article. Let me know if you have any other questions.
Thanks for the great detail in this page. Had a mechanically inclined friend follow step by step. Paid $350 for the part and paid him some for his work – quite a savings over the $1800 quoted by my mechanic! Thanks again.
In step 9a, how do you get the black pan off the vehicle once the screws are out, It looks like it is riveted at the top middle,
Bryan, thanks for the question. There are no rivets holding parts together in this repair. What I think you are seeing is a peg that sticks out the back of that part, which inserts into a hole, to line up the assembly and from which the entire part will “hang” once you put it in place. The larger black panel has two of these, one on each side on the top, and I mention them in step 28. One thing I do want to mention though is that both black pressed-metal parts on this repair have rubber gaskets on the back outer edge of them (essentially a drizzle of hot glue) that will stick to the door once you have removed all the bolts. You’ll need to take a flat-head screw driver and pry them off as they will likely stick in place even with all the bolts removed. Let me know if you have any other questions.
John,
I did have an issue with a set of cables. The grey cable came out during shipping. I tried to put back, and I though I did, but it broke very quickly after installation. I contacted Metro Toyota and they did send me another (under warranty) which worked well. Paul and James at Metro Toyota were a big help. Hopefully, that’s it for the cable repair. I’ll keep an eye out for the other side. Thanks-Steve
Sorry you had that problem, they really should be secured better for shipping so the cable cannot come out. I’m glad you were taken care of and were able to fix your van.
Thank you so much. You saved a royal migraine, and a bucket of cash.
Saving buckets of cash and avoiding migraines is what it’s all about at Share Your Repair!! Reed, thanks for taking the time to share and good work on your repair!
My driver side cable failed this winter on 2005 Sienna and I was using in manual mode for a month which was annoying after it worked perfectly for 13 years, so had to fix it and I wanted to do it in the cheapest way. Cable and spool cover was broken. Wanted to make the cable myself, you can get a spool from amazon but could not find anybody sell the spool cover only. The cheapest thing I found was the cable and spool cover for $150 on ebay which is ridiculous but then for $198 got the entire assembly on ebay. The installation was a breeze thanks to your instruction. I installed the assembly without the spool, then attached the two tensioners and then at the end wound the cables over the spool. If one inserts the spool in the correct way there is only one way the cables can be wound. Only problem I had was the last pully on the assembly was scrapping the channel when moving the door. I fixed that with inserting a washer under assembly while putting the two bolts on step 25. Thanks again.
RHS went again. Only lasted a little over 4 years. Part from Toyota was defective as the cable protruded out. I put in as best I could but destroyed on test. Back it goes. Very disappointed in Toyota products right now. Have to waste more time and wait for a replacement part. By now, I think Toyota would come up with a part that can last.
Steve
Amazing write up! I have very little automotive experience but your post gave me the confidence to try this repair myself and am so glad I did. Dealer quoted $2000 USD for the repair of left sliding door. I did it myself using this writeup saving sooooo much money and it is working great now. Did finish with 2 spare parts though — oops. They are two small silver sleeves that probably were supposed to be under screws somewhere. I did the repair over a period of a few weeks in small chunks of time so I don’t remember where these were supposed to go. For reference, please tell me. Honestly, it seems to be working fine without them so I may not bother reopening everything to put them in.
Thanks for the feedback Peter. The silver sleeves, I believe, are the bolt collars shown in the first picture of Step 11. They keep the bolts from compressing the plastic cover and breaking off the tabs. It would be pretty easy to go back and look to see if you were missing them as all you’d need to do is pop off the inner door panel. They also could have come with the new part (I cannot remember anymore) and you just reused the originals. I’m glad you were able to fix you van–good work!
John’s article saved my family well over $1,000 dollars! The dealer told me the cable motor needed to be replaced, but the motor was fine. This was by far the most challenging repair I’ve ever done, but I was jumping with excitement when I successfully fixed our sliding door in Nov 2017. Still works great! Thank you so much!
That’s great to hear Daniel–thank you for sharing and great job on fixing your Sienna!
John, Looks like it’s been a little over 3 years since I had to replace the LH slide cable assembly. In 2012 or 2013 I had the dealer (warranty) replace the RH side. Well, in 2018 it broke again. Just ordered the new part (cheaper) part and will replace when it comes in. So far, I’ve done the LH cable assembly and both door actuator motors. I guess
Toyota really wants me to do the RH side cable assembly too. I’ll review your procedure again before I start to refresh my memory. Hopefully, it will take less than 4 hrs to complete. I’ll let you know what happens.
I’ve noticed that the replacement cables sold by some sites are only $50 cheaper than the entire assembly you have on your site. Doesn’t pay to wind the spool to save $50. Thanks for that leg-work.
Steve
It seems like those cables just will not last that long. I’m glad you were able to repair your Sienna’s doors–at least the powertrain on these vans lasts a long time!! We can handle the doors ourself 🙂 Thanks for the feedback on the part. I had to wind the spool on the first one I did and I paid for the OEM part (I bought it on ebay and it had come apart in the mail). It is not worth the stress let me tell you. With all the work it takes to put it in I recommend just buying the real thing and then being done with it. Thanks again for sharing about your repairs!
I just used your directions for something else and came across this. My ’06 Sienna has door issues, one side won’t start to open with the clicker or button you have to yank to get it started (to open or close) but then once it starts it opens and closes fine. The other side starts opening and closing fine with the button, but as it tries to close it bounces back and won’t close all the way unless you manually push it really hard. Will this fix those issues, or do you think those are different issues? Thanks so much!
Thanks for the question Michelle. Here’s my thoughts and some questions:
Issue 1: Must pull handle to get door to open/close.
If the door operates fine when you pull the inside or outside handles then I believe this is indicative of the door latch motor being bad. I have written an article on how to repair that: How to Fix 2004-2010 Toyota Sienna Sliding Door Will Not Open or Close With the Remote-How to Replace the Slide Door Lock Release Motor Assy
Issue 2: Door bounces back and opens when closing.
I would inspect as much as you can see of the sliding door cables. When the door is closed, look in the channel under the rear window. There should be a plastic coated cable. If you see the strands of the cable or any fraying, that is likely the issue. When the door is open you can try to look in that channel as well (but the door is in the way) as the rest of the cable is exposed at this time (but is normally rolled up inside the door when it is closed). Also, there is a rubber tube that runs along the leading edge of the door which senses if something is being shut in the door. If this is hitting on something or is damaged, it could cause it to open. The door, if it senses resistance to closing will open back up–this could be caused by fraying cables, something in the channel that the wheels at the top or bottom of the door roll down (check for toys, food, gravel…).
Check out those things and let me know if it helps or if you have more questions.
Hi, John! Thank you for your thorough instructions. You saved me at least $700, since one mechanic shop was asking 1,600 and the other one 1,000. I paid 320 (including shipping) for right side cable assembly. This was my first time doing any car related job and it took me 5-6 hours roughly. I’d like to share a couple minor modifications I had to make during the process. which might be helpful for other users.
1. Step 9-10. After i’ve inserted the drive motor into new cable assembly I wasn’t able to seat the actuator cover onto the motor shaft. They appeared not completely aligned with each other.
Solution: release the drive motor, seat actuator cover over it, then bolt drive motor down to new assembly.
2. Step 15. Removing of the rear sliding door window frame moulding sub-assembly. Couldn’t do it with just my fingers.
Tried long flat-head screwdriver covered with towel to avoid damage to exterior paint. Also, i was using claw part of the hammer for two purposes: 1) to apply more force, while pushing this part up; 2) to hit on the flat-head screwdriver, inserted between part and door frame to remove frame moulding sub-assembly.
Thank you so much John! With the help of your excellent tutorial, my fourteen year old son (with a little help from Mom) was able to fix the sliding door on our 2004 Sienna.
Now we can enjoy the use of that passenger side door that has been out of commission for a few years, and a growing young man has developed some confidence in his abilities to master a seemingly daunting repair.
Your instructions and encouragement have been a blessing.
Great to hear, thanks for sharing, and tell your son that I am very impressed with his repair skills!!
My drivers side sliding door (2008 Sienna) wire snapped. Unfortunately my husband is the opposite of handy & decided to slam the door shut. It is now stuck closed. Any thoughts on the best way to get it open again so I can cut the wires to continue to use it manually? Any help would be much appreciated!
What I believe is happening is that the frayed cables are stuck and don’t want to slide inside the tubing. What I would do is have one person push out on the front and back ends of the sliding door carefully timed with someone pulling the handle to open the door (pulling the handle just immediately before you push out). If they are pulling the outside handle MAKE SURE they are not attempting to help you open the door with their handle pulling as that handle will break. Alternatively, when I didn’t have a second person around to help, while sitting down inside the van I’ve pushed with my feet on the front and rear of the door while using my hand to actuate the handle on the inside and was able to get my stuck door open. The trick is that you must pull the handle BEFORE pushing the door out, as the latch must be unlatched when you try to push it open. Check back in and let us know if you are able to get the door open and you can visit my article here on how to trim the cables: How to Trim Broken Sliding Door Cables on 2004-2010 Toyota Sienna
Hi John. Thank you so much for the very easy-to-follow instructions! With me reading the instructions and my husband doing the work, we were able to finish in 2.5 hours! Well worth the savings gained!! Fingers crossed that the other door doesn’t break soon, but we know what to do if it does. Thanks again!! Debbie
Awesome–good work guys–you made a good team! It’s helpful and encouraging to have a teammate! Thanks for sharing about your successful repair.
FINALLY!!! I finally got my wife’s van doors fixed! Thank you sir!!!
Ok…now my mistakes. I bought an aftermarket part from Autozone from Doorman. It didn’t come with the spool, so I had to spool the cable around the old spool. Also, the spool cover that came with it didn’t come with the bearing. So I dug the bearing out of the old, broken spool cover. Oh, then it only lasted for 24 hours before it broke. The cable was all twisted up and the spool cover broken.
So…I returned the broken part back to Autozone and drove to the local Toyota dealer, who said they’d matched the price listed on this website. Oh it was great. It went in so nicely.
IF YOU HAVE ANY DOUBTS ABOUT OEM PARTS…SPEND THE MONEY!!! You’ll be thankful you did.
Note though, I also replaced the center hinge on the doors because the driver’s side door was rubbing on the back side of the door jam. The passenger side didn’t rub, but I changed them both anyway.
Thanks John! very good instructions with details. I have finished replacing the broken cable of my passenger sliding door for the sienna 06 xle by:
– Following your blog
– View this video, https://www.youtube.com/watch?v=FlJA7p4n0mI
– Ordered this part, Dorman 924-550 Sliding Door Cable Repair Kit, from https://www.amazon.com/gp/product/B00TEFLAN8/ref=as_li_ss_tl?ie=UTF8&psc=1&linkCode=ll1&tag=shareyourrepair-20&linkId=064dd7926676e988077f1feba62509ff
The door finally works as normal as before. For me, what I found challenged are:
– take out the glass
– re-route the cables into the pulley
– slide the kit through the door.
Anyway, I feel lucky to see your blog.
I’m glad to hear you were able to repair your Sienna. Thanks for sharing.
I missed that but see it now! Thanks again for the excellent directions! I would not have attempted this repair without your help.
John,
I inadvertently posted this in your other Sienna door post. It was meant for this sliding door repair…..
Fantastic write-up! I used your directions to fix the driver’s side and will soon be tackling the passenger side.
I have one thing to add. While removing the old sliding door assembly from the door I broke one of the little black clips that holds the two plastic rods on the sliding door assembly.
The part number for the clip is 90467-13046. It’s about $2.
Also, another person mentioned they stripped the middle bolt that holds the window bracket in place. I did the same so be careful when reinstalling this bolt. A quick trip to Ace hardware and I was able to piece together a solution.
Thanks again for the excellent write-up!
The clip I mentioned can be seen in Step 21.
John,
One other comment that may help others.
When I was all done and had it put back together I noticed that the door wasn’t opening all the way. It would stop a few inches short and fail to lock into place.
A quick search online revealed that the doors won’t open all the way or lock into place if the windows are down on the sliding door. I have to admit I had never noticed this before but confirmed it on the other door as well.
I initially thought I had done something wrong on the install and just want to save someone else the time if they notice they same thing. Roll the windows up and they will work fine.
I ran into this same issue and after studying the cables and what happens when you roll the window down, I came to the same conclusion and I mention that in Step 36.
Hi John,
It’s actually on the other end of that piece…the end with the foam dust seal on it. Is there any way I can post a photo? Thanks!
Only I can post images in the comments. I think I know what piece you are talking about now, is it this piece:
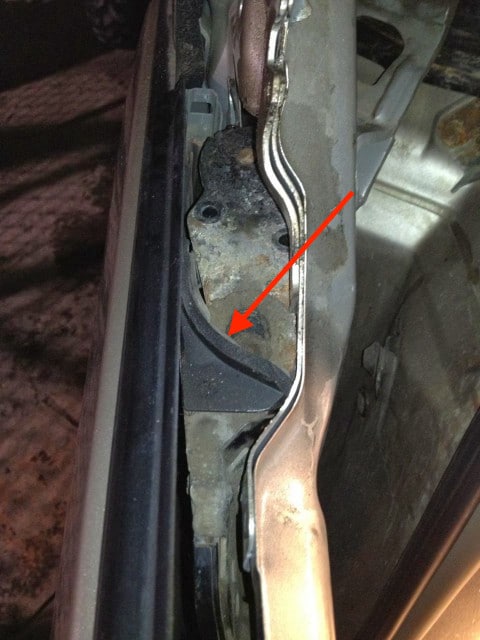
George–send me your email address via the Contact Me page, I’ll email you back, and you can send me the picture if you want.
George, I received the picture, thank you, and below it is posted for everyone following this article to see. I have also included it in the main tutorial in Step 24:
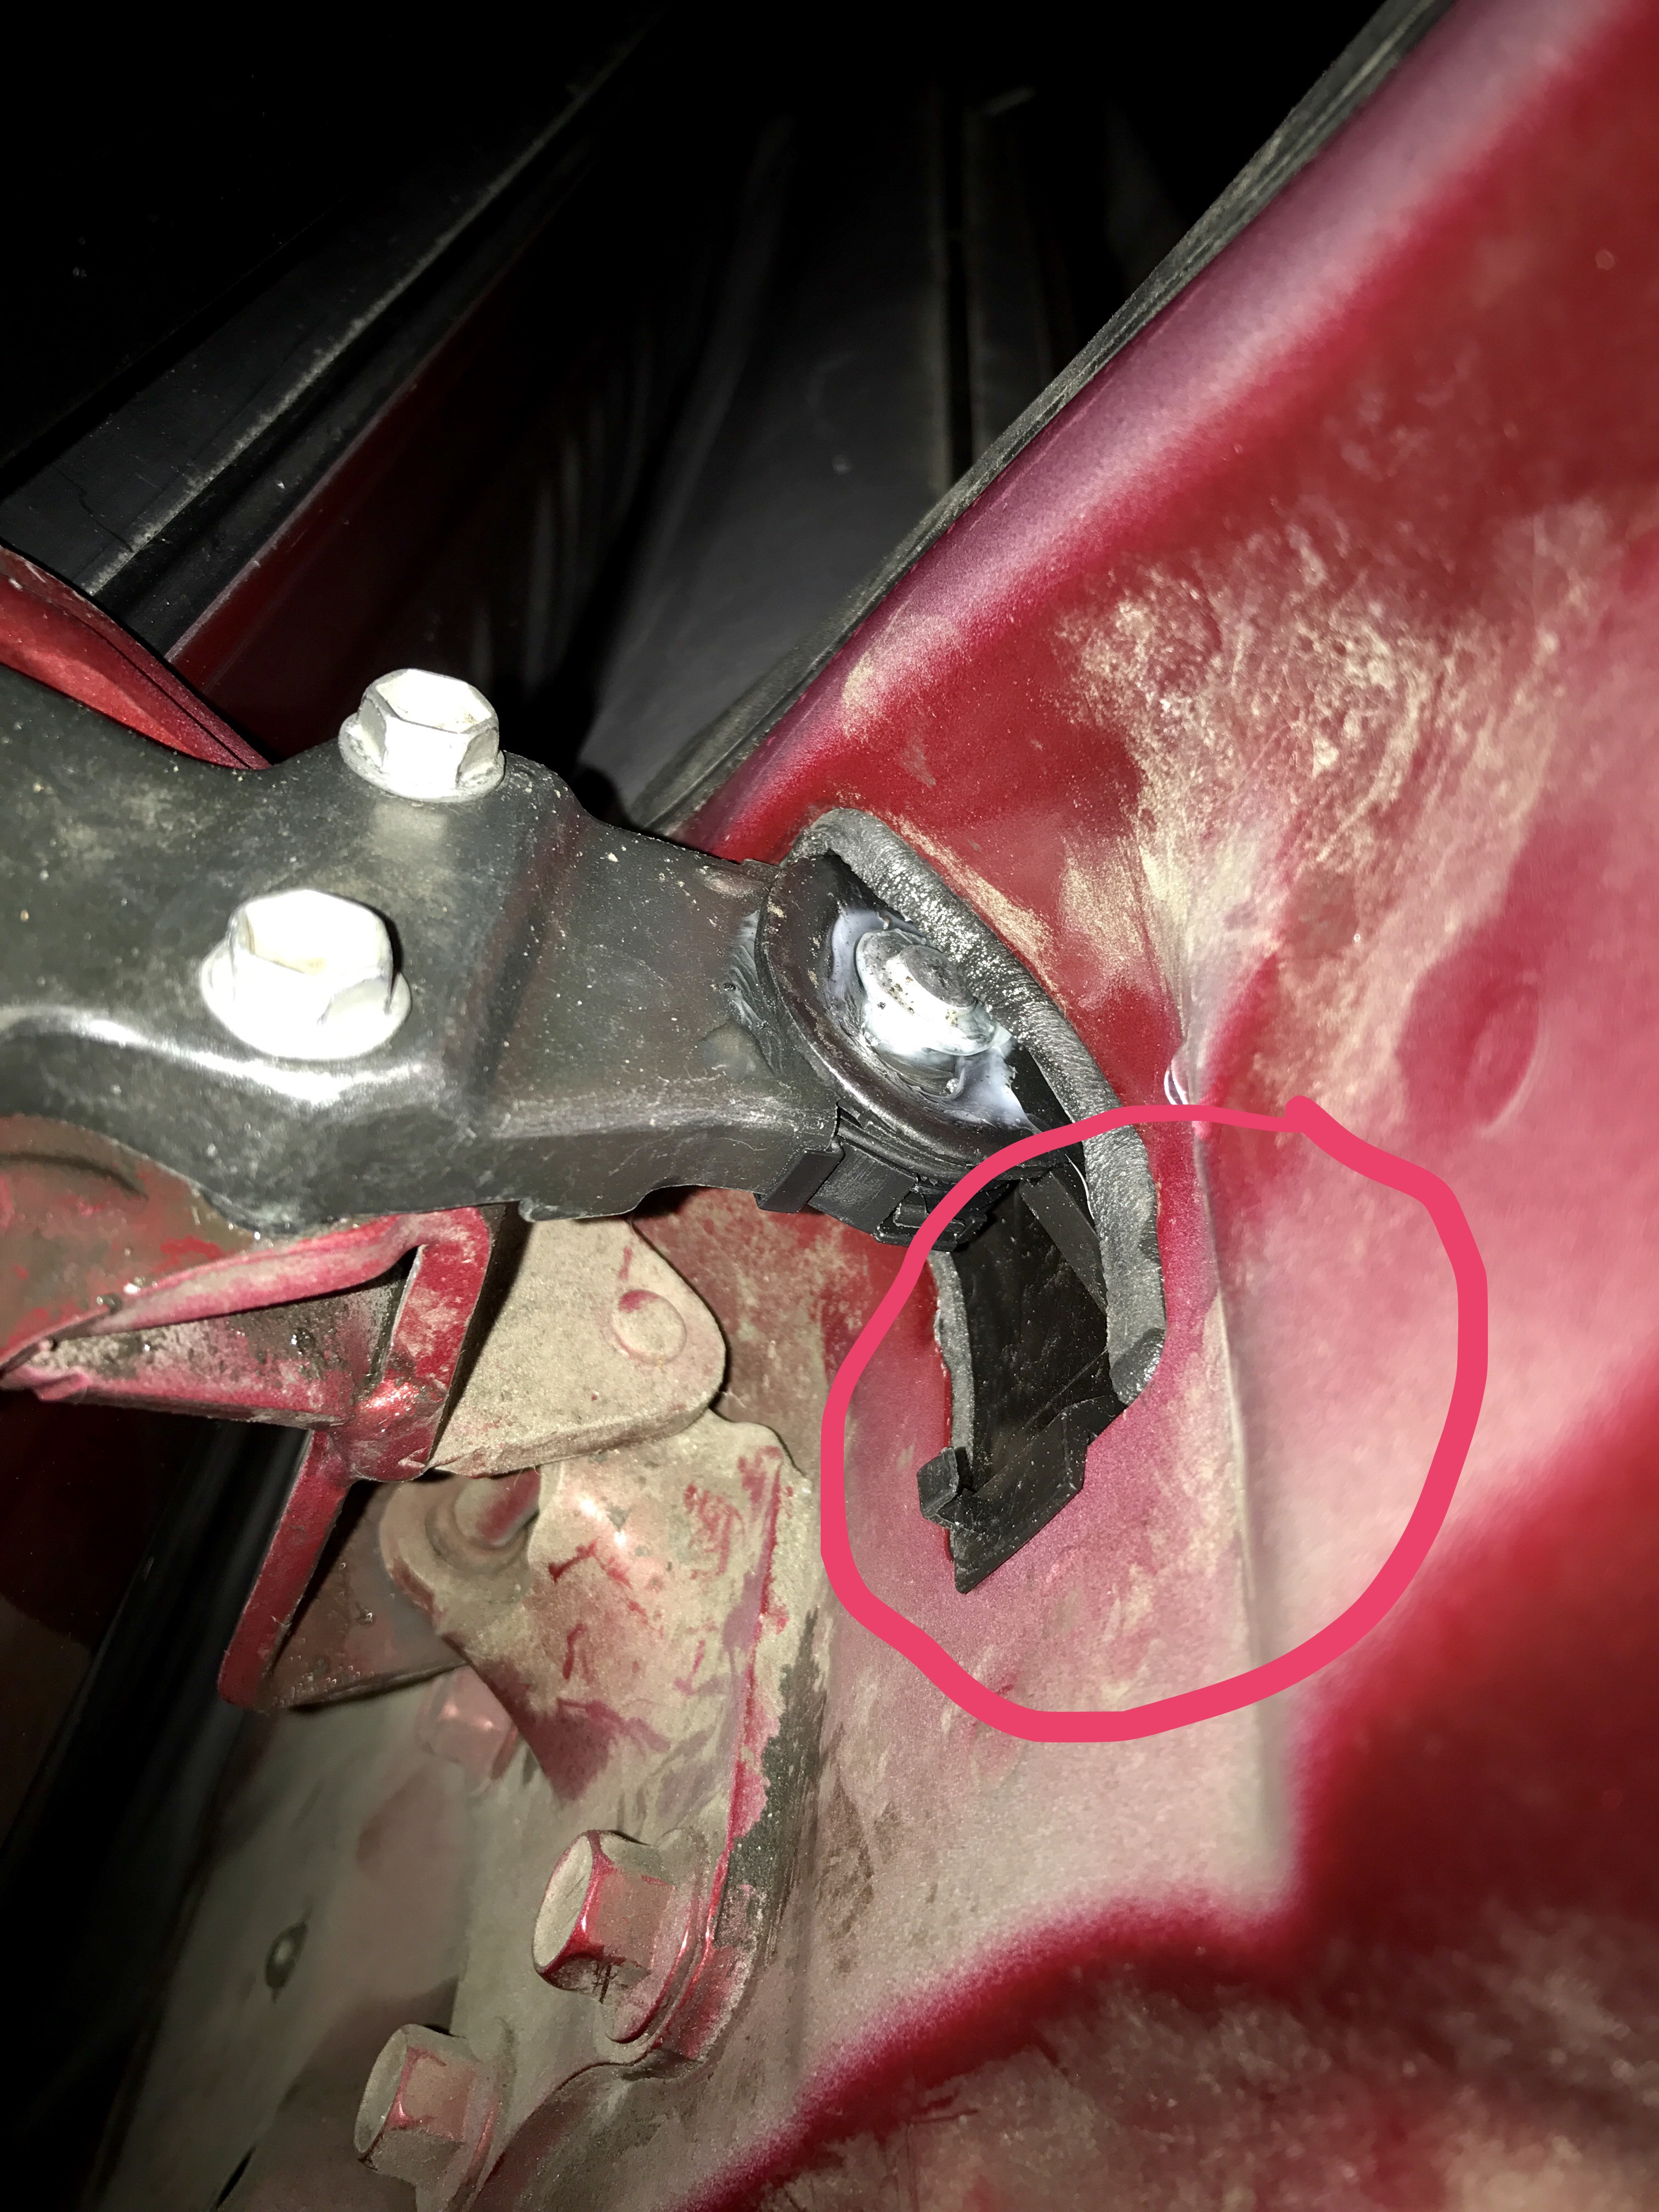
Hi John,
Sorry for the delay in getting back to you. Regarding your #2 question, I re-read your instructions and found under step 24 this quote:
“be sure you close the door enough so the top of the hinge is clearly visible and you can see how the pulley fits into the hinge. I had the door open too far, and I didn’t see the tab at the top of the pulley wasn’t thru the hole in the hinge. It was still a challenge to line up the holes, but pulling the door shut more made it easier.”
This is probably what happened to me because the “tab at the top of the pulley” in that quote is what the problem was for me. I didn’t have the tab all the way through and it wasn’t hooked over the edge of the hole in the door. I’m not sure how to attach a photo, but I have one with the tab circled if it would help.
Regarding your question #3, I’m sure that’s exactly what happened, as I did have the window halfway down and didn’t roll it up when I was initially testing. I was trying to think of why on earth they designed it that way and then looked at your note in step 36. Now I understand! At least it helped me double-check my work and find the aforementioned tab that was out of place.
A couple other things I forgot to mention: 1.) My new pulley assembly had the cable slightly off the spool as you noted in step 9b, so thank you very much for the heads up on that. 2.) I decided just to replace the “Slide Door Bracket” in step 33a. Mine wasn’t broken, but it did have a groove wearing in it from the cable. The part was cheap in the grand scheme of things and I imagine the plastic may have been getting brittle after 10 years.
Thanks again for saving me a heap of money!
George
This must be the tab you are referring to, correct?
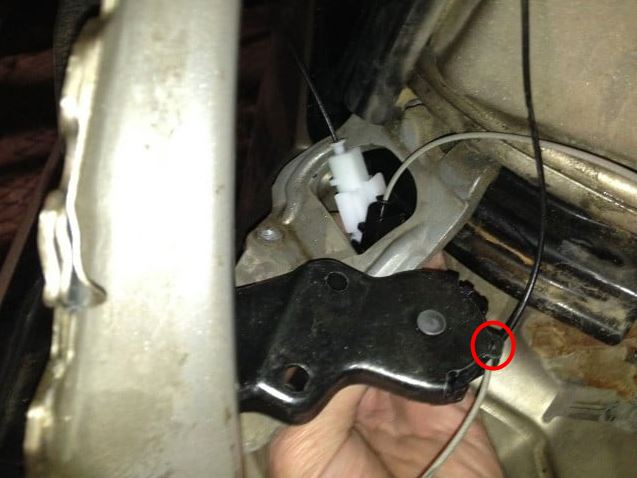
good catch this looks like it then right https://www.lowes.com/pd/Hillman-6-Count-6mm-to-1-x-25mm-Pan-Head-Zinc-Plated-Metric-Machine-Screws/999994856
Looks like this to me? https://www.lowes.com/pd/Hillman-6-Count-6mm-to-1-x-10mm-Pan-Head-Zinc-Plated-Metric-Machine-Screws/999994848
I think that bolt is less than a half inch long, only 10mm, right?
Step 19
Ok Mike, sorry for taking so long to get back to you with an answer but I was managing a big project at work over Thanksgiving. I took one of the top bolts out of my van and checked it with my metric die set. The bolts are 10mm headed, 1″ long, and the threads are M6x1.0 (metric 6mm x 1mm). I’m guessing this is a common bolt for Toyota and you could pick it up at a dealership. I’ve requested a link to the bolt on the http://www.toyotaparts.metro-toyota.com website and I’ll follow up with the link when I get it. Thanks!
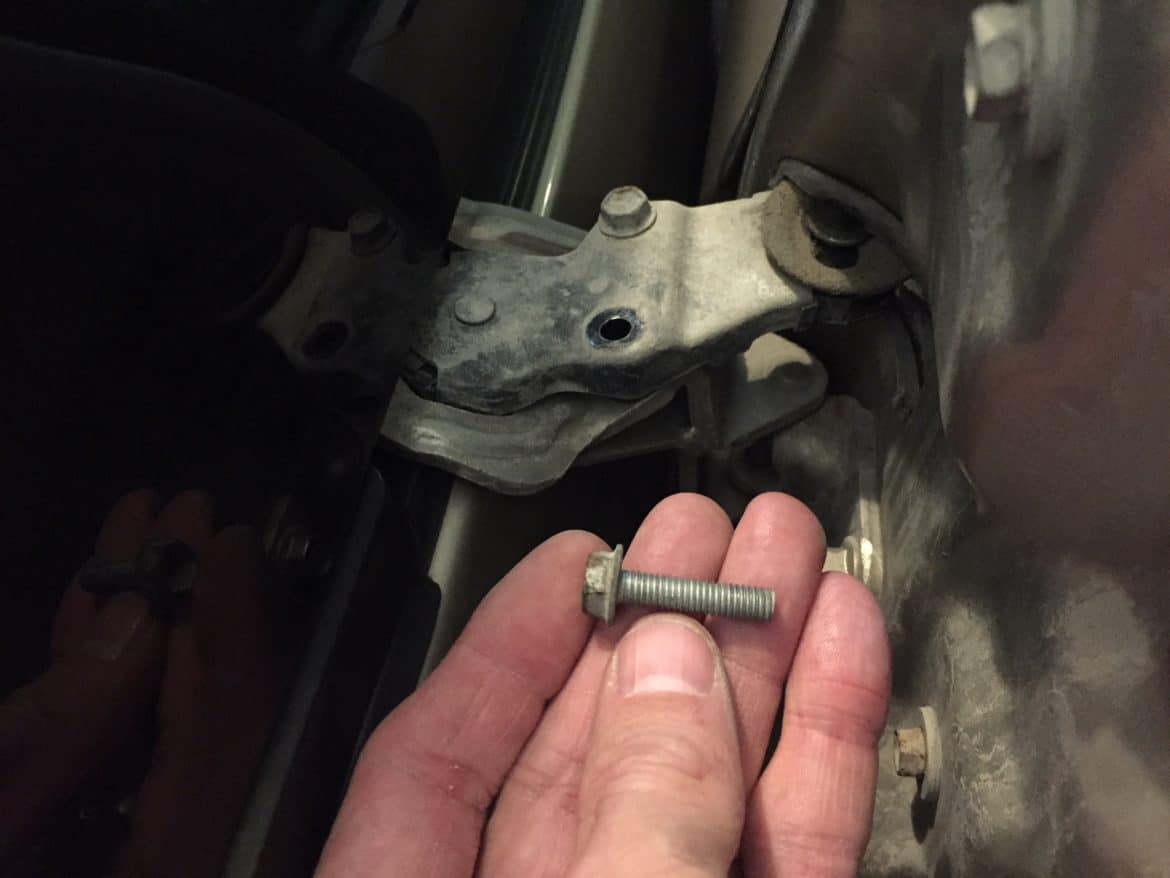
Mike, here’s a link to the exact OEM bolt you need. If you go with the pan-head bolts you linked, I’d install a washer as well, if I was you, as these OEM bolts are “flange bolts” and therefore the bolt’s head makes a lot of contact.
I have lost one of the three pulley bolts, anyone happens to know what size it is? Or what part number
I’m not sure which bolts you are referring to–can you refer to the step in this article in which they are removed or installed? Please be as specific as possible.
These were excellent instructions and I was able to successfully replace my broken cable in around 6 hours with several breaks. Thank you so much for taking the time to publish these! A couple of notes from my repair:
1.) The two torx bolts that hold the rear tensioner bracket also had 10mm heads on them. I have a 2006 Limited, so maybe they’re unique to that year?
2.) When I threaded the pulley assembly through the hole in the top of the door, I didn’t realize the tab wasn’t hooked on the edge of the hole. I didn’t discover it until I finished and was troubleshooting why the door wouldn’t open all the way, which ended up being a different issue. Anyway, I was able to remove the three bolts holding it in and then wiggled it so the tab came through the hole and was positioned correctly.
3.) When I finished, the door wasn’t opening all the way. It was like it was hitting something in the lower track. It ended up being a springed tab on the mechanism on the bottom of the door that was in the wrong position (the one with two cables going to it) I puzzled over this for quite a while, as it seemed like a totally mechanical issue, but in the process of disconnecting the battery, opening and closing door, etc., the tab went to the correct position and has stayed there. I think another reader had the same issue and found it was fixed by disconnecting and reconnecting the battery. At any rate, it appears to be all good.
My last comment is that I think it’s highway robbery for the dealer to charge so much for this repair. If a rookie like me can get it done in 6 hours with $350 in parts, I’m sure an experienced mechanic could get through this in a couple hours.
Thanks again John! I really appreciate the great article!
-George
George, thanks for the feedback and the tips–I try to make the article better with each person’s feedback. Good job on completing the repair! I’ll reply to each of your notes by number:
1. I added a note on Step 14, mentioning that some vans may have a 10mm bolt instead of the torx.
2. I’m not sure what tab you are referring to. Will you please clarify exactly which step you are referring to (is it Step 25?).
3. I’m guessing the root cause of your door not opening all they was was that you had your window rolled down. When the window is down, a metal arm comes out at the bottom of the door, down by the latch, and keeps the door from locking in the fully-open position. I added a note about this in Step 36.
Thanks for sharing your repair George!
I live in Hawaii and shipping here is always expensive so I looked into where would be closest to get the part, 69631-08031. First I went to the local Toyota dealer to ask if they have it and they checked on their computer and said that part # does not appear as a part for a 2004 Sienna LE. Obviously I was a bit concerned and so I Googled 69631-08031 and found several places that sell it on-line (including the place in your link). One of those sites has a verification step in which I entered my car’s VIN to make sure the part is the correct one for that year and model. The web site reported it cannot confirm it will work in my car either! So now I am totally confused. Two different sources are saying it may not be the correct one, yet it seems to have worked for you and several readers here. Can you help resolve this? Thanks.
I have interacted with the parts manager for the Toyota Parts links I have in this article and I can assure you those are the correct parts for a 2004 Toyota Sienna. If you want to send me a message via the contact me page with your VIN I will personally double check with them and then email you back. The part is rather new so I’m guessing it has not fully propagated through all the Toyota parts dealership computers.
Not to mention it saved me $1,500 bucks under what the toyota dealer quoted me.
These instructions were fantastic. I was able to complete the repair with no issues in about 3 hours. I’m not an expert by any means and have never done a repair this complex, but the instructions were great!
Thank you for the feedback Michael–that is great to hear. Not everyone now-a-days can follow instructions 🙂 Good work on fixing your van–it feels so good to have fixed your own stuff and it gives you confidence to tackle the next repair.
I can’t even begin to tell you how much your tutorial helped me on this. I consider myself pretty savvy and was ready to tackle this but this gave me a lot more confidence to even feel like I could do this. Spending almost $2K was not even an option, and quite frankly absurd. More importantly, the wife is happy and that is what really matters! Thanks for doing this!
Thanks so much for the encouraging feedback Nick, you are so welcome. Good job on repairing your Sienna!
This guide is awesome! It took me approx 3.5 to 4 hours to complete the repair. Thanks for creating such a detailed set of instructions. They are very impressive.
Thanks for the feedback Justin and good job on your repair!
John thank you so much for looking at this stuff daily you have saved me thousands and I owe you. So neither the handles or electric buttons work to close the door under power. Both system work to open it but the only way to close it is manually at this point. Do you still think it’s still that issue?
Thanks again so much
Brian
That’s a puzzler Brian. The step I would probably take next if it was my van would be to take the inner door panel off and then observe what is happening inside. When you push a remote button (on the van or keychain remote), does the motor attempt to unlatch the door first? When you pull the handle, is the cable pulling the latch? That’s my best guess–I would have to feel my way through the troubleshooting. Taking the inner door panel off would probably be what I’d do next. Sorry I can’t be more help.
John I’m not sure how much you monitor this anymore but I have followed your directions to the T twice and both sides went perfect so thanks for that BUT not I’m hoping you have an idea of what’s happening, my drivers side slider will open but will not close. Motor works fine when opening but when you hit either button to close there is no response at all, no clicking etc. I have removed and replaced batter cables to reset but gotten no where. Any ideas? Thanks for your time
Brian
Brian, thanks for your question and yes, I monitor all these articles, daily 🙂 I have some questions to help me diagnose your issue. Will your door close if you do the following:
If it will open via the inner or outer door handles but not the remote buttons, that points to the door latch motor being bad. I’ve written an article on how to fix that and if you’ve replaced your sliding door cables you know almost all the steps to replace the door latch motor. That article is here: How to Replace 2004-2010 Toyota Sienna Slide Door Lock Release Motor Assembly
Thank you very much!
Hi John, I see you are still replying to comments many years after writing this awesome procedure. I was wondering if you have any updated information on replacing the “cables and spool only” as you mentioned in your above reply. I have a 2013 Sienna. It would be wonderful if the procedure is in fact a lot simpler for the 2013!
Thanks for the comment Cindy. It may be a while before I have an article for the new model of Sienna as I don’t even own one, and most, if not all, of my repairs, are by necessity only–I repair it because I own it and it’s broken!? So, unless you all want to pool together and buy me a newer van so I can repair it and write about it, I’m going to keep the one I have going until it’s time for an upgrade-LOL! I expect to get another 100,000 miles out of it (300K total)! I’m guessing the newer van will be similar but there’s no telling until you tear into it.
Hi John, Thank you for these instructions. They are awesome. I am sure the cables on the passenger side of my wife’s 2005 sienna LE are bad. She only has one sliding door on passenger side. We experienced the “crunching noise” that’s reported on your site, a few weeks ago. I cut off the pieces of wire that had snapped and the sliding door worked without noise for a few weeks before it completely failed yesterday. Visible wire is still attached but the door only closes 1/2 way. After reading your instructions I am planning to make the repair myself with Genuine Toyota parts from your link, even though Dorman parts are under $200.
I have another question for you. Before the cable failed we had another problem for a couple of years that we just put up with and I am wondering if you are aware of it or know a fix. Both buttons inside the van opened and closed the sliding door flawlessly without any problems. However, when we used the outside or inside door handles, we couldn’t just engage the handles and have the door engage and open. We had to pull/engage the handles, and then move/nudge the door by about an inch in the direction we wanted it to go before the door would engage to open or close.
Thank you
Hi ,, i have a 2005 Sienna , the sliding motor is working fine can i just replace the cable without going through all those steps ?
Hello Mike, thanks for the question. I’ve heard of people doing that but do not know how long it lasted or even how the repair went. I feel that type of repair will be short-lived and you’ll be back where you started in a year or so. The OEM cables are threaded through the plastic tubing with metal grommets tightly fused to the end of the cables (and that grommet seats down into the pulley on which the cables reel up on), so it is not easy to only replace the cables (as you would need some special tool to fuse a grommet tightly on the end). The process described in this article involves replacing the cable housing, pulley, and the tubing in which the cables run. I do know that hundreds of people have successfully followed this guide to repair their Sienna and now the part is less expensive than it ever has been.
Yes, that was my comment from back in July: http://www.shareyourrepair.com/2014/01/how-to-replace-the-power-sliding-door-cables-2004-207-toyota-sienna-xle.html#comment-10289
Hi John,
Thanks for putting together such a great instruction and keeping it updated. I was able to replace the driver’s side door cable assembly without too much difficulty. One comment regarding use of T30 torx for removing the rear cable tensioner bracket is that for whatever reason T30 bit was somewhat loose fitting (I tried 2 different brand T30) and I ended up stripping it even after a liberal application of penetrating fluid. However, upon careful inspection, I noticed that the screw head was not round but 6-sided. I tried 10mm socket on it and it came off very easily. The passenger side will be next!
Thanks again!
That’s the first I’ve heard of that one John. It sounds like there was a different kind of bolt on your tensioner bracket. Good job on the repair.
I wanted to send a message out to all you who have a Toyota Sienna with a sliding door you haven’t repaired because of the price of the part. I have some good news–Toyota has released a new part number for the sliding door cable assembly (same identical part though) and it is more than $150 USD lower than the old price. So now it is even more affordable to fix your van with my guide. I have links to everything (as always) at the beginning of this article. Please reply to this comment if you have any questions.
It turns out a piece of the old shattered housing was gumming up the works. After a few troubleshooting efforts the piece became dislodged and now the door works perfectly!
Great job troubleshooting Lauren! That is a relief to find the source of the popping noise. Thanks for checking back in and great job in fixing your van!
Hello! 37 y/o female did the repair today. Amazing instructions! All is well except that when I open the door there is a very loud POP as the door releases. The same pop is head on the other side when I open that door but not nearly as loud. It’s really loud lol. Door works fine but I’m nervous something is wrong and might be doing damage. Any advice would be greatly appreciated! –Lauren
Lauren, thanks for the feedback. Your door should not make a popping sound. Are the cables extremely tight? It seems like something went wrong in your installation but it’s difficult to diagnose from afar. I would inspect your install and compare the path of the cables to the pictures in this article to verify that they have been thread through the correct route. Had someone worked on your doors in the past? Since there door is popping too, could someone have done something incorrect to both doors?
Hi.
First of all, THANK YOU for sharing this, I really do thank you for this. These instructions are a BIG money saver! Me and a friend did this repair and even he mentioned that the instruction were well written, this coming from a guy that’s been 40 some year in the automotive business.
My rear door one day started making this crunching sound and upon detail inspection I found that the cable had striped (not entirely). So, doing a little bit of research I came across different way of making the repair, one of them included buying the cheap part. But when I came across your website and instructions and the many comments about other folks doing exactly that, they had to do the whole repair thing again because that cheap part did not work as expected.
Anyways I bought the genuine Toyota part and upon inspecting it very carefully I found the same issue you describe in “Step 9b: VERY IMPORTANT Cautionary Checkpoint”. I followed your steps and the wire was placed inside the assembly perfectly!
While doing the whole repair, I found 2 things that I would like your input.
1. Found another problem on my vehicle, while doing “Step 15: Remove the rear sliding door window frame molding sub-assembly” the trim was not coming off that easily which was weird, then all of a sudden it made this crack sound and I thought “oh no I broke the trim or the clips or the tabs or something”, well it turns out that this trim piece was GLUEDED to the metal pillar! There were no claw clips and the tabs on the trim are partially destroyed. So, I am now deciding whether to fabricate both tabs for the back of the trim (I kind of already made one) and glue them there so I can put them back on the metal frame or just buying a new trim. I found one on this website but it doesn’t say if the trim has the claw clips on them. Would you know?
Toyota Window Molding Part Number 75765-08012
2. When opening the door, with the remote or the head console buttons, sometimes it doesn’t open, you can hear the motor trying to open it but it just doesn’t open, almost like something is making it stuck, and you can almost guess that the motor is trying really hard to overcome some force to try and open it, but it doesn’t open. What I do to “fix” it is I use the door handle and open it and pull the door outwards a little bit and then the door opens itself all the way thru. And if you close it with either the remote, head controls, door button or door latch it closes ok. This has happened a few times now, any idea what it is?
My opinion is that if you are going to put this much work into replacing a part, buy the good part and be done with it for another 10 years. I haven’t had any problems with my OEM sliding door cables.
I ended up breaking that vertical plastic panel when I first removed it, as I didn’t know I needed to slide it off to disconnect it. All I did was buy double-stick foam tape and put that along the edge and it has held for years now–that is what I’d suggest. The new part has adhesive along the leading edge of it. Technically, when removing that part you should slide something along the leading edge (something that won’t scratch your paint) to break that adhesive’s seal.
As for your door opening issues, if the door struggles to open when using any remote button but opens fine when you pull the physical inside or outside handles, that points to the door latch motor failing. I replaced the passenger side door latch motor and have written up that repair. If you can do the sliding door cables that repair will be easy and shares many of the same steps: How to Replace the Slide Door Lock Release Motor Assy
Let me know if this helps.
When is it right to replace the rear shocks?
Carlos, thanks for the question. There isn’t a set timespan as to when you should replace your shocks. I do know that if you let them go bad you will ruin your tires and it is dangerous as your tires do not make consistent contact with the road and when braking you will not be able to stop like you could if your shocks were in good condition. You can notice someone with very bad shocks driving down the road as their wheel will just bounce up and down, even as they drive down a smooth surface. In my experience, around 75,000 is about all you should expect to get out of your rear shocks or front struts. I just changed my rear shocks and it had been about 75,000 miles from when I did them last. When I purchased my van it had bad shocks and the rather new tires had been ruined by the bad shocks, which is a waste of money. I paid good money for my tires and I want to get my money’s worth so I change them. One thing I’d add is to make sure you inspect your springs. I’ve had a broken spring on both the front AND now the back of my Sienna. That is disappointing but what do you do but get them replaced and if you replace one side you should do both (and the rear springs come in sets). Hopefully this answers your question.
I might add that if you can see visible signs of oil leaking down the shock, that is a definite sign the seal is leaking and the shock needs replacing. I’ve not experienced that even when my shocks were bad though.
I might add that if you can see visible signs of oil leaking down the shock, that is a definite sign the seal is leaking and the shock needs replacing. I’ve not experienced that even when my shocks were bad though.
After another day of using the door with the broken pulley, I think I need to replace the entire cable now, as the motor now grinds with the sound of stretching/breaking cable. Guess I’ll be buying the parts and giving it a try!
Thanks again, John, for your awesome tutorial. I fixed my passenger side door with it last July, and wouldn’t you know it but this past January the driver side door went pop. I finally got around to fixing it today, and it was definitely so much easier the 2nd time around. I shaved my time from 4.5 down to 3 hours. I just hope I never have to do it again.
I followed the instructions above for replacing the left sliding door on my 2009 Toyota Sienna . . . twice, once in 2015 and once in 2017. Both times the instructions worked well.
In 2015, I had no problems with testing the automatic sliding door opening and closing after installing the new cable assembly . . . it worked like a charm and I was impressed with how easy the instructions were, especially when my son helped me with the disassembly and re-assembly of the door.
In 2017, my son and I “attacked” the cable assembly replacement, and we referenced the same website . . . it was saved as a “favorite” from our 2015 experience. In 2017, we did have a challenge with the door recognizing its position and opening and closing. The door was not opening all the way, but was stopping at the door stop while it was opening . . . the little arm trigger was not being cleared away from the door stop.
After examining its mechanism and how it should work, we finally decided to disconnect the positive cable from the battery, wait a minute, and re-connect the battery cable. The problem was not fixed, until we also turned on the vehicle’s engine. I’m not sure why that needed to occur . . . but it was the only additional step we did over and above was described above. Maybe turning on the engine only helps “re-boot” the computer.
Thank you for the instructions . . . they are fabulous, and, my son and I enjoyed the “Meccano Playtime” on the Sienna door. 🙂
Leonard Borgdorff
Barrie, Ontario, Canada
Thanks for the feedback Leonard, I’m glad you were able to fix your van, twice!! It’s always good to get your kids involved when you can (and safely). My 4-year-old hung out with me this weekend while I finished replacing the rear shocks on my Sienna.
Hey John, thanks again for this info – you have literally saved people thousands and thousands of $$$, not to mention our sanity! I was successful replacing my driver’s side system, and ready for the passenger side if/when it decides to break. I have noticed recently, the doors seems to struggle to fully open (when you hear that ‘click’ when the door is completely opened), as well as closing. Without a little manual assistance, when the door tries to close it doesn’t quite seem to have enough ‘power’ and it suddenly reverses course and opens back up. Anybody else report this type of problem? Think it’s the motors failing?
Thanks!
Bryan
I’ve never heard a verified case of the motor failing even once in the years I’ve maintained this website. I would check that the track where the door’s upper and lower wheels run are clear of debris, I’d verify that the cables are in good shape and not unraveling (and that the plastic coating is intact). If the door latch motor is going bad, this possibly could have the symptoms you are describing. Does it do the same type thing regardless of whether you initiate the door opening/closing physically with the door handle or remotely with the keychain remote, door button on the front door post, or remote button above the rear-view mirror? If it only does it when you use a remote button, then it’s almost certain the door latch motor. If you can repair your sliding door cables then that repair will be easy and it shares a lot of the same steps. My article on replacing the door latch motor is here: How to Fix 2004-2010 Toyota Sienna Sliding Door Will Not Open or Close With the Remove-How to Replace the Slide Door Lock Release Motor Assy
I just replaced my door hinge on my 2006, because it was sagging and the door was having a hard time closing. The new hinge fixed the issue. However, during the process of replacing it, I broke a small piece of the top pulley, where the cable exits and goes through the hinge. It may have been a guide to ensure the cable fed into the proper groove on the pulley? Anyway, after a 1/2 day of using it with the new hinge, the cable appears to have come off the pulley because I cannot move the cable in either direction, and there is a bunch of slack in it. The part you linked to seems to include it, but is there a way of replacing only that top pulley? Or does the cable routing require it to come as a “unit” with the rest? That part is $489!
I’m going to contact my dealer connection to get you a part number. I’ll get back to you.
I think I now understand what you are referring to. Tell me if this is the pulley you damaged:
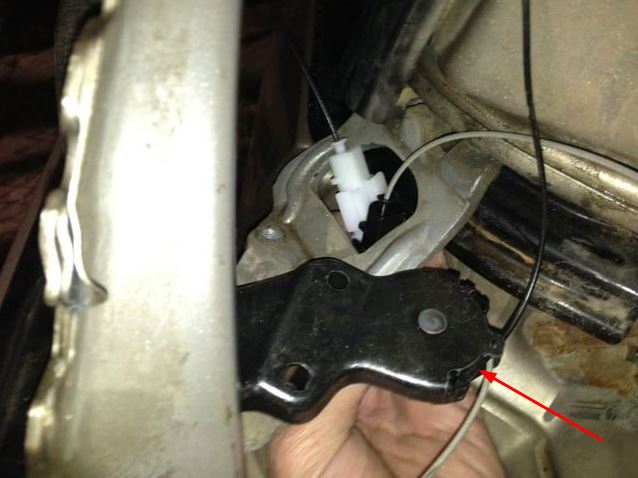
If that is the pulley you damaged I’m virtually certain it is not sold separately. Now if it was mine I’d probably attempt to repair it with some JB Weld or something similar before I’d throw in the towel on that expensive part. You’d want to make sure to prep the surface very carefully before doing the repair and then give it time to set before you try it.
John, thank you for this tutorial! I successfully replaced the sliding door cables on my 2010 Sienna yesterday. The repair itself probably took me about 5-6 hours. I made a couple of minor mistakes which slowed me down (such as removing more than just the 9 bolts in step 20, letting the battery die and needing a jump, etc.) Your instructions were amazing and made it possible for an amateur like me to complete the job! Thank you for saving me so much money in labor costs!! My wife and 4 boys, 3 of whom are 2 and under, thank you for helping us get our sliding door up and running again! 🙂
Hi John,
Your tutorial is amazing for a visual learner like myself, and I look forward to trying this myself. I have a 2012 Sienna that seems to have had this happen. Not much online about this in any Siennas past 2010. I had a local repair shop look quickly, $238 for the part, $1300 in labor.
What I see is a rusted, frayed cable sticking out from under the 3rd row “pop out” window. The door suddenly stopped opening, and obviously now only works manually. Does this sound the same?
Do you know if the repair is the same for 2012? Are you able to look up a part number? 2012 LE, driver’s side sliding door. I can email you a VIN, and a picture of the sticking out cable, if you need them.
Many thanks!
Gretchen
Gretchen, thanks for the feedback. I have never repaired a 2012 model. Toyota redesigned the sliding door cable system in that you can replace the cables and spool only and the part is much less expensive. I do not know how similar the repair is since I’ve never had my hands on a newer model so I can’t give you any insight on whether the two repairs are familiar. I can get you a link for the part for your van though if you give me a VIN. Use my Contact Me page if you don’t wish to post it here.
Thank you for your detailed instructions which saved me thousands of dollars. I especially appreciated your “what could go wrong” comments which actually happened to me. Fortunately, I was able to tighten the new cable on the spool based on your instructions before installing it and it worked like a charm!
Thanks for sharing Laura and good job on the repair!
Thanks, very detailed write-up. I repaired the passenger side a couple of years ago with help from your write-up. The door is working great so far . I used cable and parts from MCmaster-carr. I used stainless steel wire rope and wire rope stoppers costing $40 in total parts cost. Now the Driver side is gone. I will share more details and parts numbers from Mcmaster-carr after the repair. My pulley housing was broken as well, but I fixed it with super glue and there were some chunks missing as well, there is not much stress on this part until the wire breaks and jumps and pushes the walls out. So I do not think there is a need to replace the housing. I will see how this repair goes.
That’s great, thanks for sharing and please do come back and share more information to help other readers.
Great write up. Both doors with broken cables after 7 years. Fixed passenger side in about 4 hours. Will now do driver side and should be much quicker.
– Used clamps to hold doors open.
– Paid 480 (Canadian) for the part from dealer
– All went pretty much as planned and as you wrote.
– Dealer quoted $1300 per door.
Thanks!
Good job on your van–I bet you felt real good when that door was working again! Oh, and the second door, it will be 50% easier than the first one now that you’ve done it once. Thanks for sharing about those 820 Canadian dollars you’ve already saved and the $820 more than you’ll save when you do the other door!
Thanks John. I tried saving about $40 from the link you provided. What a mistake!!!
Oh did I happen to mention stay away from EB Toyota Parts???
It was 69631-08030 for the right side door. He sent me a window regulator! Stay away from EB Toyota Parts because I just got off the phone to them and they said it wouldn’t fit my Sienna.
Thanks for the update. The links in this article have been time-proven by now what are surely over 100 repairers like you so please use the resources I’ve linked here. If you go elsewhere you will be rolling the dice!
John –
First time for any sort of major car repair and your instructions/photos were pure gold – many thanks!
I too ended up with some of the cable exposed from under the spool when in arrived but used your tips to secure it back on the spool. Great tips!
That said, in manual mode with all cables attached, all now working normally and smoothly for the right door (no apparent binding in feel or operation). Also, I can initiate the auto mode when I use the outside or inside side door handle from either the open or closed position. Again, it works normally and no indication of binding anywhere.
However, although I can close the door from the open position with either the upper console or side post button, I Cannot OPEN the door just using the side or upper controller button. I the motor appears to start operation, but then hits a cutoff when it reaches a physical resistance limit. Has that ever been an issue you or others have come across?
Also, compared to the working left door (in all modes), it appears the door latch receives the first signal to unlock and then the motor kicks in to draw the door back. I’m trying to listen intently, but maybe the right door latch is not receiving the signal or not unlatching fully for the motor to draw the door open. Again, door takes over automatically just fine after I’ve initiated the handle (unlatching the locking mechanism). Thoughts?
I’ll try to disconnect the battery to reset the cycle, but since it operates in other auto modes, I’m not sure that’s the issue…
Appreciate any words you may have – thanks!
Thanks for your feedback and questions Henry. Have you looked at my article: How To Fix 2004-2010 Toyota Sienna Sliding Door Will Not Open Or Close With The Remote-How To Replace The Slide Door Lock Release Motor Assy. It sounds like the motor that releases the latch so the door can open or close is bad. Take a look at that article and the videos I’ve embedded in it and let me know if that matches your symptoms. You can do the latch motor repair easily now that you’ve done the sliding door cables.
John,
Thank you for the excellent tutorial. I bought the full-price part and did the repair, which was not wholly unfamiliar after having repaired the unlatching actuator last year using this useful video that I found,
https://www.youtube.com/watch?v=TtH91s0B-Rs
When I tried to use the repaired door, it just moves a few inches in one direction and then stops moving. There was no slack in the cables during the installation. How long do you detach the + battery terminal in order to reset the computer?
I read up to 20-30 minutes on some posts. If that doesn’t fix it, do you have any suggestions?
Many thanks,
CJ
Thanks for the question CJ. You should only need to disconnect the battery for seconds and the computers should reset. I have even found this step unnecessary. If you do disconnect the battery you should have the door in a fully closed position when you disconnect it and then you’ll need to actuate the door to allow it to find the limits. In the two times I’ve done this repair I haven’t had any problems with the system recovering. You should make sure the door will open and close manually without any excess resistance to ensure you don’t have a cable running through the wrong path first, before attempting to move forward. Step 24 and the path of those cables (and that they are not twisted or incorrectly routed) is critical. If your door is encountering resistance the motor will either completely stop or reverse direction so make sure the track that the rollers of the door run down are clear as well. Let me know what happens when you attempt these troubleshooting steps.
Hi John. It seems that the part ending in 08031 is significantly cheaper than the part ending in 08030. Are they in fact the same part? I have a 2010 Sienna. Thanks!
They are not the same part. Recent Siennas have a less expensive replacement part, I believe that is what you are looking at. Give me your VIN number, tell me exactly which side (driver’s/passenger’s) you are looking for and I will verify the part number for your van. You can use the contact me page if you don’t want to post it here.
I now stand corrected Benjamin. The -1 part is a newly released lower-priced part. Please refer to the “parts list” for the correct parts and I address the less-expensive part there. I apologize for the confusion.
John thank you so much for all this info. I ordered the new cable assembly but the gentleman I talked to said that with the vin number I supplied that was the wrong part. I have a 2008 Sienna LE. Any thoughts? I was driving so I couldn’t jot the new part number down.
Which part number did you give him? I’ve not had anyone in the hundreds of repairers say I had the wrong part on this article yet. I do get a lot of mistakes pointed out though but you’ll have to give me the part you are talking about and I’ll get it double checked.
John, add me to the list of very grateful DIYers. One of the smoothest repairs I’ve ever done on my 2010 thanks to studying your whole guide in the days leading up to it. I especially appreciate your tips on covering sockets with electrical tape. I’ve dropped many a bolt into a hard or impossible to reach spot in my day, and that’s a distraction you don’t want when you need to get things done.
Just two things I wanted to note in my case. In step 31, the middle bolt would not grab the threads on the window channel, so while trying to tighten it the channel just pops up 3 threads or so (meaning the bolt wont tighten and is just held there by some friction). I am usually careful not to cross -thread bolts, and won’t rule out that I did so but I wonder if anyone else had this issue.
Also, one major tip I would offer in regard to step 9B. Mine arrived exactly as in the picture, with the cable protruding slightly. While following your step to get it back in, it felt a little like diffusing a bomb, since one false move, or too much force would cause disaster. I ended up finally hearing a satisfying pop and getting mine in after a lot of tricking around, but I think doing this step would be MUCH quicker, easier and foolproof with two people: one to gently pull the cables, while the other one puts force down on the exposed cable to guide it into the case.
Thanks for the feedback Joseph! I haven’t had anyone report stripping out the bolt in step 31, until now. As for your feedback on recovering from the unraveling part, I’ll edit the details in that section to share your feedback on the two-person suggestion. Thanks for sharing your repair and good work on fixing your van!
the right slide rail molding piece is part # 6837308011 and the left is 6837408011
John your instructions were excellent! Thank you so much for saving us over $1,000. I appreciated the heads up that it would take a while, I think it took us about 6 hours but everything is put back together and working great.
Just a side note: Near the top of the post under Hardware needed on the right passenger side, it says “For the left motor AND cable attachment, part 85620-08042 click here)” I think you meant to say “right” side. The link looks to be correct.
Hopefully our Sienna will not have anything break in the near future, but if it does I’ll be sure to look for your blog posts on how to fix it.
Thanks for the feedback Eric and thanks for pointing out that I had the wrong side on that one part description–I’ve corrected that. One thing you can probably expect to go bad is the motor that unlatches the doors before the power doors open/close them. But if you can replace the power sliding door cables you can fix that too, and it will be easy since many of the steps are the same: How to Fix 2004-2010 Toyota Sienna Sliding Door Will Not Open or Close With The Remote-How to Replace the Slide Door Lock Release Motor Assy
The bracket part number for the left door is 68766-08011. The black wire guide piece is not made of rubber, it’s made of hard plastic. After inspecting the bracket I replaced, it appears the top of mine broke off.
Just obtained the part. Confirmed is the correct piece. The plastic guide could have been torn off at some point in time. It turned out to be a very costly omission.
Rolan, is there a right and left side piece, each with a different part number? I will add a note in my instructions to verify that the black plastic piece is in fact in place when the reader goes to connect the new cables. Thanks again for taking the time to share your repair.
The techs at my local Toyota dealership searched around and think this is the part (#68765-08011). I will be going there today to pick one up. Will let you know if it is the correct piece.
http://omnistep.com/share/68765-08011-Bracket-Slide-Door-1c.jpg
Here’s a link to the part: Bracket, Slide Door
A word of warning to those that perform this repair: I bought the OEM part, replaced it according to the above instructions and had the door working fine for 5 tries, and then the black “door close” tensioner popped off the chassis resulting in a slacked cable, and ultimately the shattered pulley housing problem. Upon closer inspection, I noticed the black plastic guide on the tensioner bracket was missing (it appears to keep the cable from slipping out of alignment). Without that, the wire slipped out of place. I’m searching online for this part but not finding a part number. I may have to call around the to salvage yards. Here is an image of it, for your reference. Also I indicated the part on the Toyota manual diagram as well.
http://omnistep.com/share/missing_bracket.png
http://omnistep.com/share/close_tensioner_bracket.png
Rolan, I’m sorry you had this problem–this is the first time I’ve heard of this happening to someone. I’ll work on getting the part number for you and then will check back in.
John,
Great blog advice! Although it took me way longer than I thought it would (as with everything) having your step-by-step proved invaluable. My problem was as you described – a “bird’s nest” of cable that had broken the reel housing. 2009 Sienna LE. I ordered the complete assembly according to your link (passenger side). I tried to find other vendors – nope, your’s was the best option. On install, I DID have a little cable protruding from the reel – no problem, though. Your advice steered me clear of those rocks! Door works great now.
1 tidbit: In step 16 regarding the issue with the window channel and weatherstripping getting in the way…I bungeed the thing out of the way until I removed the window. Then i just tucked it into its original position. Much less hassle with opening and closing the door to keep working on the repair that way.
Keep up the great blog posts!
Ron Parker
Ron, thank you for the feedback and for sharing about your successful repair–good job. I will add your advice to Step 16 as to help future repairers.
The cable on driver side sliding door of my 2010 Sienna snapped this week. To my astonishment the dealer told me it would cost $1,700 (Canadian) plus tax for the repair. He said that I would require parts 69641-08031 at a cost of $1,043.99 (Cad) and 69604-08041 for $209.99. Labour is 4.5 hrs. He indicated the part included the spool, cable and motor. They did not take the door apart and the motor appears to function.
I noticed that the part you reference in your repairs is the spool and cable, part # 69641-08030. Do you know what the difference is between parts 69641-08030 and 69641-08031? I can’t seem to find any information regarding part “08031”
Regards
Kevin
Thanks for your question Kevin. Like I share in this article, I have never heard of anyone legitimately needing to replace the motor. If you did need to replace the motor, and the cable just broke, I have no idea how you would determine that without opening the door up–and typically, the running motor is what breaks the cable by no fault of the motor–it’s a frayed cable getting stuck. I’m pretty confident that all you need to do is replace the cable assembly as I describe in this article. I will do some research and get back to you on the answer about the part numbers. It is my guess that the other part numbers are the motors. I’ll get back to you.
Kevin, I have an answer for you. Toyota is now using a new part number for the exact same parts. The part ending in -31 is the replacement part number for the -30 part. So, the dealer is giving you the correct parts with the new part numbers. I will update my article to include this information. Let me know if there’s anything else I can do to help.
IS it possible to make the automatic door on my 2006 Sienna a manual door – to save money?
Is it easy?
Yes Todd, you can, and I’ve written an article on it: How to Trim Broken Sliding Door Cables on 2004-2010 Toyota Sienna. You can also simply turn off the sliding doors (both) with the switch located by the driver’s left knee. If you want to use the good door but you don’t want to hear the motor attempt to open the bad door when the buttons are pushed, you can follow my instructions to take off the inner panel of the door and simply unplug the motor’s connector and then put the door back together. Let me know if this helps.
Hi again! I say “again” because last summer (’16) my right cable snapped on my ’09 Sienna and this website gave me all the information to fix it. Now, just this morning, my left side cable snapped. Needless to say, I’ll be using this website for instructions once again after my part arrives next week! Thanks for keeping it up on the Internet.
By the way, do you recommend any code readers for understanding “check engine” light codes?
I had both the Check Engine light and VSC light come on…only to find out I had a busted ignition coil and $425 later from the dealership, it was fixed. Just wondering if any other Toyota guys out there rely on a certain code reader for DIY repairs.
Welcome back Ludwig! You are so welcome. Your story sounds very familiar to mine as our Sienna’s passenger side sliding door cable broke first and then the driver’s. I used my own article to replace my driver’s side sliding door cables and used the exercise to take better pictures and update the instructions. The second time you do this job it is MUCH easier.
As for your question about engine codes–I always use my local repair shop to pull the code. Most auto part chains will read your codes for free. I’ve only dealt with O2 sensor issue-based engine codes so far. So, because of the few times needing to read codes, I just use the free resources through my nearest Auto Parts store to get them read. If anyone following this article has a suggestion for Ludwig, please jump in and share!
John, thank you very much for such detailed instructions with photographs and warnings about potential pitfalls. I was able to fix my 2010 LTD driver side power door by following your instructions and videos posted here. The only dumb thing I did was to remove the bolts that are in the middle of the attachment panel – as shown in Step#28 – which caused the power window mechanism to get messed up. Realizing and fixing this took about 1 hour. So overall I was able to fix the door just under 4 hours. Many thanks again.
Thanks for sharing about your repair–good job! Often these repairs are a test of whether we can recover from mistakes and I’m glad you were able. Is there a way I can make the instructions more simple? Let me know if you have any suggestions.
I’m glad I could help. The Harbor Freight multi-tool saw can reach in at the gap between the door and the body, so if you’re careful the cut will be sort of hidden when you put it back together. You could also melt the pieces back together if you trim some plastic from behind the panel to use like solder. It’s around $75 to replace it.
Thanks so much James for following this article and weighing in to help another out–this is the power of the internet. Good work team!
Hi John, you are awesome! Thanks so much for your work to put this together. I recently came upon your site as both of my 2005 Sienna doors just exploded. Both cables and door handle actuators are broken. It is so maddening. I was able to cut the cables and get the drivers side to be manually operated. But my question for you and my problem is that when the cable broke on the passenger door, there was the cable clip that came off and was flapping around. I went to close the door and the cable clip got stick between the frame of the door closing and smashed the clip down. The problem now is that I cannot open the door at all. It is completely frozen shut. I tried having someone hold the handle while I put both of my feet on the inside of the door and nothing. It doesn’t budge one millimeter. Have you heard of anything like this? I think I am going to have to take it into the dealer to get the door open, but I don’t what else they can do that I haven’t done. I am really ticked with Toyota and am tempted to scrap the van and buy an Odyssey. If you have any ideas of how I could get this door open, that would be so awesome. Thanks John!
Thanks for the feedback Travis. You may try having someone pull the exterior handle while you push from the inside on both the leading and following edges of the door. It is possible that you have a disconnected door latch cable, as you have let things go so to speak on your van. As for the Odyssey, I would caution you to check out Consumer Reports on the year of Odyssey you buy as they had some VERY bad transmissions there for a while. I’d much rather fix a Toyota sliding door than a Honda transmission. That is precisely why I didn’t buy a Honda.
If you cannot get it open and go to the dealer I would just have them get it open for you and then repair it yourself with my guide! There’s always a time for a dealer but not if you can DIY!
John, I accidentally hit return before checking on the boxes to be notified by email. For this comment I have checked the boxes. Thanks for your input!
You missed it, I already commented! But here’s what I said, again:
Thanks for the feedback Travis. You may try having someone pull the exterior handle while you push from the inside on both the leading and following edges of the door. It is possible that you have a disconnected door latch cable, as you have let things go so to speak on your van. As for the Odyssey, I would caution you to check out Consumer Reports on the year of Odyssey you buy as they had some VERY bad transmissions there for a while. I’d much rather fix a Toyota sliding door than a Honda transmission. That is precisely why I didn’t buy a Honda.
If you cannot get it open and go to the dealer I would just have them get it open for you and then repair it yourself with my guide! There’s always a time for a dealer but not if you can DIY!
Travis, If John’s method doesn’t work you might be in the situation I was in.
You can search for “Jim” in the comments to find my post 9/30/2016, but what I had to do is repeated here:
“My driver side door was stuck closed. It didn’t work with any buttons, remote or the handles. I cut the handle trim piece and used a Harbor Freight multi-tool to cut the tab at the bottom of the door. Then I could take the panel off. I was still unable to get the rear latch to release so I started thinking of drastic measures. I won’t list them here because it turns out to be very simple. When you take the screws out of the black panel, the whole assembly will drop down under the weight of the window. This will give you room to reach your arm into the door. It turns out the rear latch is attached to the body with a screw just past the trailing edge of the black panel. Follow the bracket back with your finger and you can pull the release lever and bingo it lets go!
So after I did that, the front latch was still stuck. I used pliers to pull on the second cable from the top at the lock mechanism and this one opened up as well. Ureka! The door was free on both sides.”
Mine has more severe problems than what you probably have, and I haven’t finished the repair yet.
Thanks James! I think this is exactly what I have to do. The handle is not allowing the door to release at all and I have tried everything. It doesn’t budge. I figured I would have to cut to open up the panel. Your tips are super helpful. Much appreciated.
John, My passenger door cable broke 2 years ago and 2 days ago, the driver side door cable broke. Appreciate such a detailed repair description and I’m doing to tackle both soon. My one issue is the on the door that broke the other day, the door is now completely shut and won’t even budge, as if it’s locked but it’s not. I saw a reply above that by pushing with both feet on the back and front of door and pulling handle with hand, I should be able to get it open. I just wanted to make sure it was the same type of issue. Again, when I attempt to ope from inside or out, it’s as if it’s locked. Nothing appears to feel jammed or in the way. Thanks in advance.
Jeff, thank you for your question. Yes, the scenario you have found yourself in is one I faced. What I believe is happening is that the frayed cable is stuck inside the cable conduit and must slide out for the door to open. If you have a person to help you that would be favorable but I typically find myself working on my vehicles alone. You want to pull the handle on the inside first and then immediately afterwards, from the inside of the van, press on both the leading end and trailing ends of the sliding door to get it to open. I did it on my own by sitting on the seat with a foot on each end and using my hands to pull the handle. Good luck and let me know if that doesn’t work for you.
My right side tensioner cable broke. The one pictured in under step 33a of the instructions above. How do i know if that is the only part needing replacement….or if i need to change the parts inside the door as well?
I don’t have enough information to be able to advise you. Did the cable break off or did part of the rectangular shaped piece which houses a spring and the end of the cable? You cannot purchase part of the cable and it really cannot be patched.
John- another happy driveway repair that saved many hundreds! Actually my second repair- first cable snapped on the passenger side. I ordered the cable + cover kit, pulled it apart, cleaned it up and put it back together. Took a day, but well worth it. Less than 4 months later, driver side cable snapped. Did a repeat and now they are both good to go. Took an hour or so less, but still the better part of a day. Sure glad the weather was nice.
Many thanks!
Good job JD! Thanks for sharing about your successful repair.
Great guide. Just did this repair today and it went really well. Start to finish, it probably took me about 5 hours. However, my cable assembly did not come pre-spooled (there was no pulley) and I had to spool it myself. I found a you tube video (https://www.youtube.com/watch?v=e_k6tsUWulc&t=298s) showing this and it said to wind both cables halfway onto the pulley. Seems to have worked out ok, but added about an hour to the repair as I scrambled to figure this out.
Some other tools I found helpful:
heavy duty wire cutters
needle nose pliers
a pocket knife to cut the adhesive on the outside window trim
Overall, an amazing guide. Thanks a bunch!
Thanks for sharing Matt and good job on repairing your Sienna! You must have purchased the aftermarket part that doesn’t include the pulley. The savings on purchasing that part requires you to wrap the new cables onto the old pulley and you have to get it exactly right or it destroys the new part the first time you used it. It sounds like you got it right though so good work. Thanks also for sharing the video resource for others who may choose to go that route.
thank you for your detailed explanation with precise pictures! Was very helpful and informative. Greatly appreciated! thanks
Hi,
Is it possible to just remove the cable and use the door as a manual door? Right now the door is stuck halfway open and I’m wondering if I should cut the cable. I have a 2004 sienna and don’t really want to put much money into this vehicle.
It is totally possible to use the door manually. I have written an article on how to trim off the cables. If neither door works you can simply turn off (both) doors with the button located by the driver’s left knee. If you still wish to use one then you’ll need to leave them both on. You can follow this guide and simply unplug the motor electrical connector if you don’t want to hear grinding and popping inside your door when the motor attempts to power the door open. To trim your cables, please refer to my article: How to Trim Broken Sliding Door Cables on 2004-2010 Toyota Sienna
John replaced the whole assembly, everything works well but one thing. The door will not close all the way, with an inch to go it kicks back open. If I push on the door on the last inch it will close and I can hear the rear latching activates and pulls the door shut all the way then, 2 seconds later the door latch releases. Any ideas?
Dennis, thanks for the question. There is a black rubber air-filled strip that runs along the front edge of the sliding door that is used to sense if anything is crushed in the door (hands, for example) and if that is hitting something, it will cause the door to open back up. It is difficult to diagnose without personally looking at it. That rubber strip would be the first thing I’d check. Here is where that strip is located: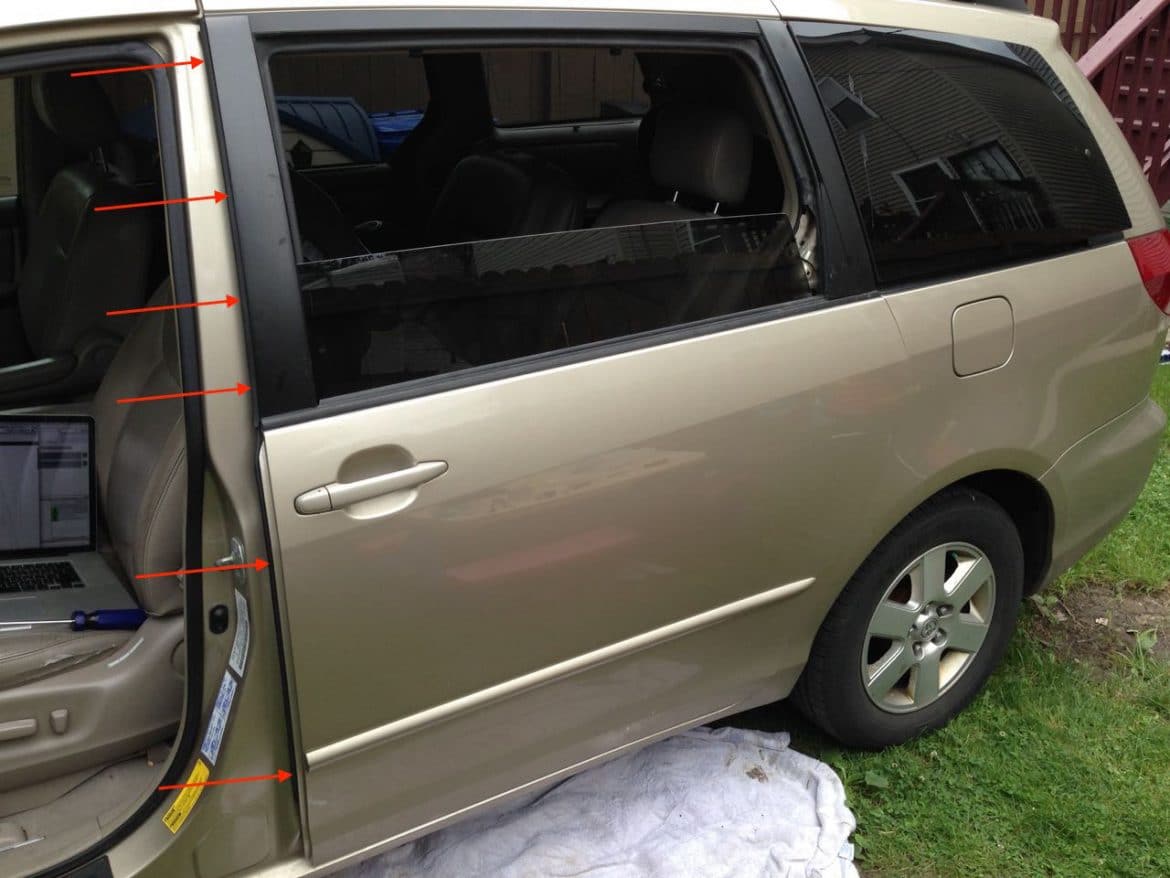
Another thing you could do is reset the sliding door multiplexer computer by doing he following:
1. Put the door in manual mode (push button by driver’s left knee).
2. Shut both sliding doors.
3. Disconnect one of the two battery cables and wait 60 seconds.
4. Reconnect the battery.
5. Put the sliding doors into power mode.
6. Try the door again and see if it opens back up when you close it.
John replaced the whole assembly, everything works well but one thing. The door will not close all the way, with an inch to go it kicks back open. I?f push on the door on the last inch it will close and I can hear the rear latching activates and pulls the door shut all the way then 2 seconds later the door latch releases. Any ideas
FYI: I responded to your other (duplicate) comment.
Hi John
My only question is that of the position of the motor spindle that attaches to the pulley. How do you know if it’s in the right mode (will spin clockwise versus counterclockwise) when activated? I fear that the pulley may unknowingly be installed in the wrong starting point so when the motor is activated it will spin in the wrong direction and break the cables.
Thanks for the question Al. From the experience I’ve had you do not need to concern yourself with the motor breaking your new cables as long as you have then installed correctly. The motor doesn’t ever know where it is in regard to the door opening but the computer in the door (pictured in Step 5 and referred to as the multiplex computer) keeps track of whether the door is open or closed. It’s not a stepper motor that has any clue where it is at–it simply runs full speed in one direction or the other. From what I understand, it actually senses the amount of resistance to the door opening and that is how it knows it has reached one extreme or the other. I mention that you might need to manually shut the door and remove a battery cable to reset that computer but I did not find that necessary. On my first door repair I inadvertently had the power door turned on when I finished connecting the power to the motor and activated it by accident with the door half open and it worked just fine. On the second door I never had any issue with the door not knowing where it was at and the official Toyota Shop manual doesn’t mention anything special other than possibly needing to cycle the van’s power with the door in the closed position to reset the multiplex computer (which I found unnecessary). I hope this gives you the information you need and let me know if you have any other questions.
Al, I wanted to go back and refresh my memory of this so I pulled up the official Toyota shop manual and this is exactly what it says, screenshot below. So, I believe, as long as you have the sliding door shut off by the switch located by the driver’s left knee, and you manually close the door before enabling and then cycling the power sliding door, you will be just fine. Let me know if you have any other questions.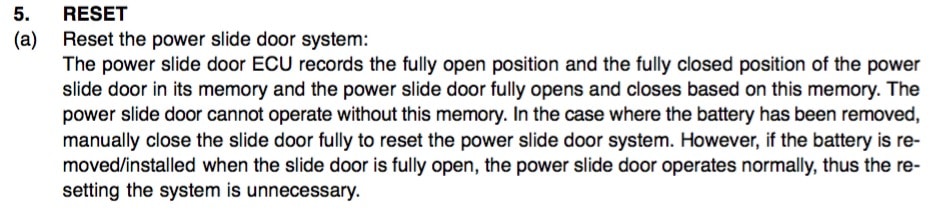
John, you rock. I just finished this repair on my 07 Sienna driver’s side door today, and everything was spot-on, almost like it was written just for me (I guess it kind of was). Thank you so much for all this work and these incredible instructions and pictures. Even down to the electrical tape on the socket to remove the window bolts. Really. Just awesome. Thank you.
I took my time (even had a few minor delays – stripped bolts, user error, snacks, etc) and completed this in about 5 hours. Still can’t believe this job is finally done!
John – seriously, I want to send you some money – do you have a donation button? I’m sure you don’t want to share your address…let me know how I can send you a check or something.
I just noticed your article on backup sump pumps. Guess what project has been on my “procrastinate” list for a few years? Now maybe I’ll tackle it in spring!
Thanks again.
Well Mike thank you. Thanks for taking the time to give some very encouraging feedback. Good job on fixing your van! You are officially the first comment (in almost 1,000 total comments, half of which are my replies though) of someone requesting to pay me for the help I’ve provided. I’ll email you directly on how you can send a gift via paypal.com. Please do come back and check out the battery-powered backup sump pump article. I have now installed two of them and it’s really not that hard. It was tricky the first time but my article makes it feel like you are doing it for the second time!
Hi John – first off, THANK YOU THANK YOU THANK YOU!!! This repair guide is excellent and I was able to replace my torn up cable in a couple hours and we’re back in power sliding door convenience!
Unfortunately, I stumbled upon these instructions after I had already purchased the after-market part but was able to assemble the cable/pulley system OK and it’s working. I did have an issue where the top pulley didn’t line up perfectly with the door opening (it’s not sitting flush), we’ll see how long it lasts but if it fails again I at least know how to properly replace it next time (with the OEM part!).
Quick question for ya, not sure if you or anybody else has experienced this but my door seems to now “struggle” a bit when opening & closing (goes a bit slow and even on manual mode it doesn’t seen to slide as easy as the other door). On my inclined driveway it needs a little ‘help’ closing or it will automatically reopen. And, when it opens it doesn’t automatically latch/lock in the fully open position. With a very slight push it will latch (or when it’s opened on my inclined driveway). It seems like it’s so close to locking but just can’t get there. Any advice on if/how this can be corrected?
Thanks Again!
BC from CO
BC, thanks for the feedback. You are so welcome, I’m glad to have been able to help you with your door. As to what is causing your van’s door to bind up, it is hard to tell from afar. I would double-check that everything is lined up correctly and that you threaded the cables through the right path. I’ve heard enough problems with the aftermarket part that I do not recommend that people use it. If you are going to all the work to repair your door you don’t want to have to tear into it again and spend more money any time soon. I haven’t had a problem with either of our siding doors after installing the OEM part. I would study the cables’ paths, the rollers on the top and bottom of the door to look for impediments. You can always take the inside panel of the door off and study the insides while it is opening and closing to see if you can figure out what’s causing your problem. Those are the steps I’d go through if it was my van. Check back in if you learn anything new and if you figure it out and fix your doors.
Hi John,
I plan on starting this repair next week on the driver’s side door in 2007 Sienna LE. I’m hoping to be the latest in the long line of happy readers!
Quick question, though. The other door – passenger side – while the power slider still works, it now gets locked in the open position. It appears that the locking mechanism that’s designed to prevent the door from closing on an incline will not disengage. The door opens fine, but will not close. If I turn power off, it manually closes fine.
Do you know of any resources that might be able to help me? Or even just a schematic of the area in question? I don’t even know the correct part name, and am afraid to just start taking stuff apart without a plan.
Thanks,
Mike
From all I can tell, the same motor that unlatches the door just before it opens (via cable D) is the same motor that unlatches it when it goes to close (via cable A). Here is the diagram: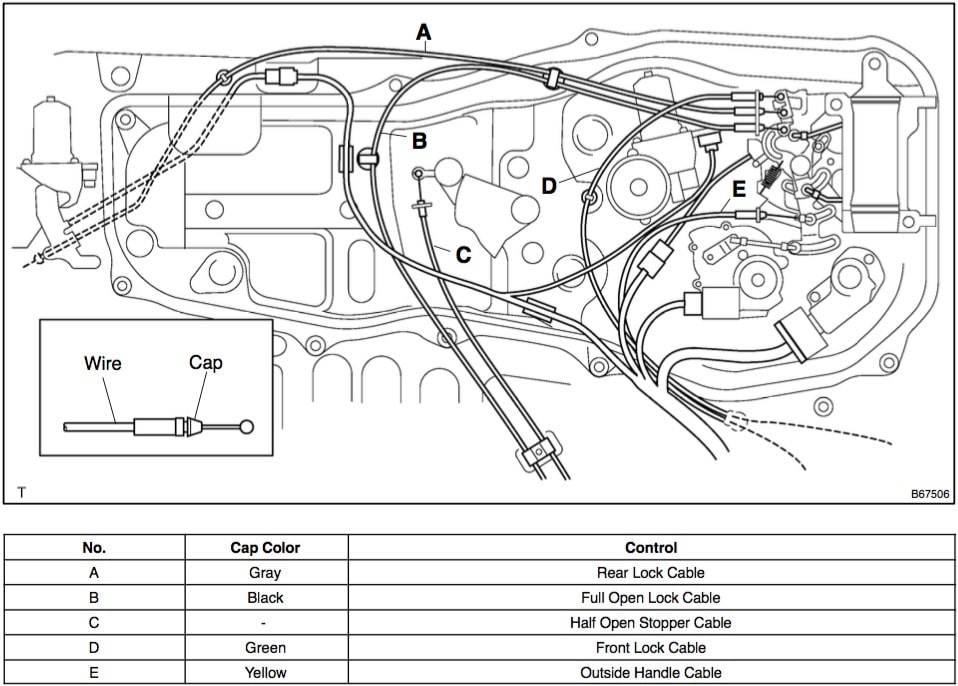 . This article covers the replacement of the motor that actuates those latches: How to Fix 2004-2010 Toyota Sienna Sliding Door Will Not Open or Close With the Remote-How to Replace the Slide Door Lock Release Motor Assy
Thanks John. I realize this is outside the scope of the original post, so I appreciate your research and answering my question.
Of course, since my original question, things seem to be getting worse. Now it seems to be breaking more and doing some strange things, all basically stemming from that lower slider area – the part where the lock is. I’m afraid I’m going to just have to take it apart and look for something that says “I’m broken”. Where do you get your schematics? Can you send me there?
Thanks-
Mike
I have a copy of the pdf version of the official Toyota Sienna manual. I cannot even remember where I got it originally so I can’t direct you to it, sorry. If you remove the inner panel of the door you will be able to see what is going on, that’s about all I can suggest at this point.
Hi John,
Last year in December our 2007 Sienna left side sliding door sped working.I found this page. Spent $229 on Amazon for the spool (without motor) I followed your instruction and the door worked perfectly for one year till now. Thank you very much!!!
My Issues now is that if I am on level ground, the power door works, If I am on any sort of incline, I will here the motor trying to slide the door but it will not work any way if the gravity is agents the close…
Does that sound like the spool snapped again? What do you think?
Zal, thanks for the question. First I would inspect the cables–when the door is closed (look in slot below rear side window) and when the door is open (you can open the sliding door window and look at the same slot, which will be hidden behind the door). They should be smooth and the black coating on them shouldn’t be damaged. Next I would put the door in manual mode by pushing the button by the driver’s left knee. Manually open and close the door and feel for resistance. If you haven’t found any cable damage I would inspect the upper and lower channels which the door rolls down to verify there’s not something impeding its smooth opening/closing. You could spray some lubricant on those metal wheels to aid in their smooth rolling. If none of those steps yield any clue as to what is going on I probably would take the inner door panel off the door and begin digging in there. Because your van worked good for some time, it points to something occurring that changed that–you just have to determine what changed. Please check back in if you have more questions, let us know what you find, and how you solved your problem.
Thanks very much for the guide. I have a 2007 limited with 150,000 miles. My drivers side door got stuck and I had to turn it off and manually open/close it (took a lot of muscle). The part from the guide was $480 all in here in Canada.
The most difficult part I found was around the window. The trim is finicky and the part I struggled most with was getting the window back in. That is not meant to deter anyone, just noting it.
I think toyota really dropped the ball on this one. There was/is no corrosion on my cable. It failed because the cover came off then got tangled up in the spool. I’m not sure what purpose the covering provides as toyota could have used stainless steel couldn’t they to avoid corrosion?
In any case, this to me is a design flaw and the part should be 50% of the current price to reflect that as should the cost to install it along with a published TSB to ensure customers aren’t getting shafted.
I’ll be replacing my toyota in the next 2 years – and will be researching other van models to see if they suffer from this same issue.
John , I have a customer of mine who sent me this link after he decided not to repair the cable issue on his 09 sienna passenger sliding door . He also sent me links on both of the options for parts : the cable & spool assembly with and with out the motor , I have taken the door panel off and inspected to find only the cable and spool assembly are needed . Upon calling my local dealer as well as 2 out of state dealers I’m hearing the same answer : part # 69631-08030 will apparently not fit my customers 09 sienna .. wondering if you or any of the people who have viewed your repair have had similar results or if they have had succes on an 09 with just purchasing the cable & spool assembly .. I do not want to order a part I cannot use and get stuck with it . I’d greatly appreciate any feed back .
The cable and spool may be the only parts needed but Toyota does not sell them separately, mostly because of the trickiness of winding the cables on the spool (if you do not get it exactly right you destroy the part on the first use). The 2009 sliding doors are identical to my vehicle and I have at least one commenter who reported specifically that they used my article on their 2009 Sienna (and you can search through all the comments to find this, which I quote below):
John. Thanks for being the web guru about Sienna doors.
Have a 2004 XLE (since new). Replaced center hinges years ago preemptively.
January 2016, driver side cable-spool finally jammed/broke as they all do.
At that time, followed your instructions, but bought the cable only repair part for around $200. I wound the spool successfully, and it’s not that hard to. I will concur it is easy to screw this up, and would not recommend anyone try winding the spool unless you’re mechanically savvy and completely understand how this thing works.
After 10 months of daily door operation, I’m sitting here today with the cable broken again.
The plastic cable coating failed, and ultimately cross tangled on the spool leading to the cable snapping. No warning, just “bang”, dead.
I believe the root cause is one of two things or both:
The replacement cable was of insufficient quality, and/or the spool was compressed or compromised during the initial failure.
Words of wisdom… If you’re going to keep your Sienna, buy the good kit with a new spool. Although this is a straightforward repair procedure, it’s still a ton of work and you don’t want to do it again (like me).
John, what are the cable assemblies you mentioned in your post from 8/22/2016? They are only $39.
Thank you,
…bill
Those parts are for a 2011 Sienna, where they changed the design of the sliding doors. Thank you for your feedback, hopefully your experience helps guide people to the best decision for how they want to repair their van. I have always opted for the safer route since so much work is involved in the installation.
Thank you John! Motor was indeed working fine, cables were a tangled mess though. The repair took hours but your instructions were excellent. Our door is sliding beautifully!
Ok, the door motor doesn’t try to run but the latch actuator still engages. Is that normal, will it break it? Or do we need to disable the latch actuator somehow as well? Thanks!
The doors are made to run in a manual mode (the switch by the left driver’s knee) and in that mode the latch does still pull the rear edge of the door shut. I would never recommend slamming the door hard as this could damage the latch mechanism. I think you will be ok.
Hi! Thank you so much for this awesome tutorial! Our passenger side door broke, just the cable and housing. We ordered the wrong part as Hari linked above but off of Amazon, it was $200 and they told me it included the spool so we thought it was also pre-wound, it was not. So we have decided to send it back and just keep a manual door for now. You provide super awesome instructions and it’s certainly doable.
My big question is: We want use the drivers side door that we just had fixed this spring in power mode. Is there a way to disconnect all power to the sliding door on the passengers side? We thought that maybe we could repair the door later and don’t want the motor getting ruined. Is there more than just the motor we took off in there, like a back one? Seems like when we had the drivers side door repaired that there was a back motor and middle one, besides the latch actuator up front. Our plan is mount the motor back in (so we don’t misplace it) without plugging the power cable in or putting cable/cable housing on. Is this all the sliding power door parts/motor? Will this break anything?
I believe you can totally disable the one door. If you simply disconnect the electrical connector in Step 4 and leave it disconnected, it will not attempt to run and the door will operate correctly on the other side. Let us all know how it goes.
Hello John,
My 2010 Toyota Sienna’s passenger side sliding door cable broke last week. Cost of this part (P/N 69631-08030) is about $479.
Rock Auto has the part for $190.79 at
http://www.rockauto.com/en/moreinfo.php?pk=6432981&jsn=235
Can you please have a look at this web link and help me understand if this is the same part? Really appreciate your help.
Thanks!
Hari, thanks for the question. That is not the same as the OEM part I have linked in this article. That Rock Auto part doesn’t come with the metal pan the OEM comes with and requires the user to re-use the pulley from your old door cable assembly and wrap the cables from the Rock Auto part onto the old cable. If you do not get the exact number of wraps of each of the ends of the cable and don’t get it all back together exactly right it will self-destruct when you use it the first time. I don’t have any experience using the after-market parts that are out there but I did have to re-wrap one of my own cables that came apart so I know it is possible. Does that answer your question?
Hello John,
Thank you for correcting me on Rock Auto part. I ordered the correct P/N 69631-08030 from my dealer and planning on replacing it in couple days. One question? How can I find out that it is the cable assembly only that is faulty and not the motor as well? I want to know it before I open the cable assembly box so that I can return it and get P/N 85620-08042 which is both motor and cable assembly (why in “hardware/parts needed” above, both driver and passenger parts say “left motor”?). Really appreciate your help.
Thanks!
If you follow Steps 1-3 of this article, which open up the door, you can attempt to open the door with the remote or with one of the push buttons (on the front post of the side door opening or on the ceiling between the front seats) and view the motor running. I have not heard of anyone needing to replace the motor so I think you’ll be ok. If you hear crunching inside your door before even beginning to follow those steps you can be sure that is the motor turning and a sign that it is working.
Hello John,
I was able to replace Toyota Sienna’s passenger side sliding door cable assembly with my friend’s help in about 6 hours. It was only possible due to your awesome step by step instructions. I work in auto industry and we make good operator instructions, your instructions taught me on how to make great work instruction. Thank You.
And Thank You for helping me save lot of money. Dealer’s estimate was $1800 (motor = $650, cable assy = $650, labor = $500). I only bought cable assy from dealer for $450 by asking him to match price from another dealer. Saved a lot! Thanks a lot!!
And the satisfaction and confidence I gained is “priceless”! Feels like I can dissemble and rebuild entire minivan (if you make instructions…just kidding!)
Thanks again!
Best Regards!
thank you went great with the repair much appreciated with the step by step
Thanks for taking the time to leave a comment. I’m glad you were able to repair your Sienna.
Hi John, this is a great guide. Thanks so much for creating and updating it.
Having done this for the left/driver’s side door of a 2005 XLE now, a couple of things to note from my experience.
1) I found the window removal a bit tight (Step 17). It helped me get a little more room to remove the lower trim before lifting out the glass. Just one screw at the back, and friction and tabs hold it in place.
2) To get more wiggle room to feed the cables up inside the door (step 23) and inside the other cables, I undid the wire-harness of the other cables.
3) I managed to drop the foam behind the window guide (step 17) into the door. Next time I’d make a point of taking it out and placing somewhere.
4) When I replaced the window and was doing up the bolts that hold the rear-guides in place (step 31), I managed to cross-thread one bolt because the holes were not lined up. The bolt threads are a little soft, so I had to get a replacement.
5) By the time I read and re-read the instructions, and fiddled with things again and again, it was between 4 & 5 hours to do all this, clean-up, and put my tools away. I didn’t see anywhere you provided any guidance on what the repair-book-time is or what it now takes you. You might want to provide a “your mileage may vary” estimate somewhere.
6) I took out both middle row seats so I’d have more room to work when inside the van.
Thanks for taking the time to leave a message Rob. The main reason I don’t always tell people how long it will take is because, for example, in the case of my radiator repair article–it took me 12 hours!?! BUT, that was me blazing the trail for everyone else, figuring out how to do it first, and taking over 750 pictures to make sure I can describe every step in detail. I’m not a mechanic either so I don’t have numbers on how many hours a specific job is paid. Even when I repaired my second sliding door I was working to improve my original article and taking more pictures, so it always takes me a lot longer than my readers who have every step laid out for them. Thanks for the feedback on the different steps, I’ll work to incorporate those warnings and tips into my article here over the next few days. Thanks for Sharing YOUR Repair Rob!
Rob, I have now incorporated your suggestions into the article. Thanks for taking the time to share your repair and the tricks and tips you came up with in the process. Thanks for making the article better for the next person!
Thanks John,
I’ll try to figure this out from the door handle operating point of view first. I’ll probably have to take the other door apart to compare. There is no visible fraying of the cables, but I don’t know what’s going on inside the door. At this point the handles move and I feel some resistance from a spring, but I don’t feel the normal extra resistance at the point where the latch would be released. I’ll be out of town for a week but I’ll check back in to see if anyone has an idea.
Also, for anyone who needs to release the rear latch as I described above, please remember to disconnect the connector at the top edge of the door first so the cable doesn’t get stressed or the door motor turn on accidentally.
Am I off base on the latch motor being the culprit if neither of the door handles do anything? Like maybe an actuator rod became disconnected?
If the latch motor is bad you will still be able to open the door using the inside or outside door handles. The child safety switch on the front edge of the door will disable the inner door handle, but only the lock will disable the outer door handle.
My driver side door was stuck closed. It didn’t work with any buttons, remote or the handles. I cut the handle trim piece and used a Harbor Freight multi-tool to cut the tab at the bottom of the door. Then I could take the panel off. I was still unable to get the rear latch to release so I started thinking of drastic measures. I won’t list them here because it turns out to be very simple. When you take the screws out of the black panel, the whole assembly will drop down under the weight of the window. This will give you room to reach your arm into the door. It turns out the rear latch is attached to the body with a screw just past the trailing edge of the black panel. Follow the bracket back with your finger and you can pull the release lever and bingo it lets go!
So after I did that, the front latch was still stuck. I used pliers to pull on the second cable from the top at the lock mechanism and this one opened up as well. Ureka! The door was free on both sides. So then I plugged the connector at the top of the panel back in, and the door proceeded to open smoothly all the way. I thought I was home free as it appears that $4 latch motor was the problem. But now, the door is stuck OPEN! Still no action using any normal way to close the door. This time I pulled again on the second cable from the top pretty hard and something went ‘pop’. I don’t know what, now the arm those cables are connected to move easily over a much larger range. The motors don’t do anything when I use the remote or other buttons to close it. Neither door handle does anything. It does respond when I push lock buttons. It makes the annoying sound as normal if I try to lock it with it open.
I disconnected and reconnected the positive battery cable after waiting a while. All the fuses are ok.
Not sure what to do next. With it open so the bolts are accessible, maybe it would be easier to take it off the van entirely to work on it. 🙁
Jim, thanks for reaching out–I’m sorry about your situation. Were your sliding door cables fraying before you ran into this? Did you hear clicking when you would shut the door?
The inside and outside handles physically pull cables that release the latches that allow the door to open. The remote and buttons actuate a motor that pulls those same cables that release the latches. It seems like there is a bad cable that runs from this central place where the latches connect to the cables. You manually released the latch at the latch point and thought that repaired it but it seems to me that you just bi-passed the problem. There is another latch that locks the door in the open position. When you pull the handles or actuate the motor via the remote or buttons, it pulls a cable that releases that latch. I think you need to look at each of those cables and their respective latches. It’s difficult to diagnose from afar and I’ve never had to repair that problem on my van.
Hello John, I believe i messed somewhere in between and now the pully on which the wire is revolves is broken an advice?
Alex, I’m sorry to hear that. If you could refer to steps and images in this article it might be easier for me to advise you. Are you saying that the pulley that you feed through the door and which the cables exit from, is broken? I need more information in order to be able to help.
Hello, I have a 2011 Sienna XLE Limited AWD with approx 67,000 miles and the drivers side sliding door cable snapped tonight… I see earlier in this thread you posted the part numbers….are those the same for my van? And would your step by step instructions still apply to the 2011? I have turned off the auto open feature so we are able to use the door manually for now (twin boys who are active in all sports, these doors get alot of use!) We have been contemplating trading it in for something else and then this happened, my hubby’s pretty darn handy and could probably tackle this on his own. Any advice is greatly appreciated.
Tricia, thank you for the question. Yes, the links in my earlier comment are correct for the 2011 model. Toyota changed the design of the sliding door mechanism for the 2011 model and going forward. The replacement part is less expensive and from what I can tell, it is much easier to replace and I don’t believe you need to remove the window anymore. I don’t own a 2011 but I’m working on assembling instructions for repairing one. If you husband is handy he can surely do this repair. Once you get the inner door panel off I think it will be rather straight forward. I’ve been working this week to get instructions put together so if you are signed up for notifications on comments on this post I’ll let you know when they are ready. But you can order the parts in advance so you’ll have them if you want.
John,
I want to say thank you for such detailed steps in this article. I have used it 3 times successfully to replace the sliding door assemblies in our Sienna 2009 doors (9 months apart) and just this weekend in the driver’s side of our neighbor’s 2008 Sienna. Your attention to detail and many photos and links to videos make it possible for us DIYers to fix the problem and save a lot of money. Many thanks!
That is great to hear Larry! Thank you for taking the time to leave a comment. Good work on helping others out as well!
John,
I just want to say thanks for this article. Today, I replaced the cable on my passenger side sliding door on our 2009 Sienna. Everything you stated worked like a charm following your detailed step by step instructions. I really appreciate your help in saving me from having to shell out a bunch of money to fix it. Now I am waiting for the driver side door to go.
Good job on the repair Mike! Thank you for taking time to leave a message. Come back again when you run into future Sienna issues–I really like this van but it will have some issues down the road: water in right headlight, stiff steering, loose muffler heat shield rattle, …and more to come…
Hi John,
Well my driver side sliding door decided to break during the holidays. I ordered the part, replaced it, and it is back in operation again. It was good that I had the passenger side go up this summer. It gave me the “practice” I needed to replace the driver side. Thanks again for the info. By the way, I followed your instructions to replace my interior lights with LEDs. Really works well!
Great to hear you were able to repair it yourself Mike–good work. These vans tend to have the same issues so come back again if you have other problems.
What part # would you recommend with a 2011 Toyota Sienna?
Paul, thanks for the question–I’m checking on that and I will have a part number and a link for you to buy that.
Here are links for the right and left cable assemblies for a 2011 Toyota Sienna. You can actually buy the cable assembly only as it seems they have improved the part as to make the wearing portion less expensive to replace. Here’s the part diagram:
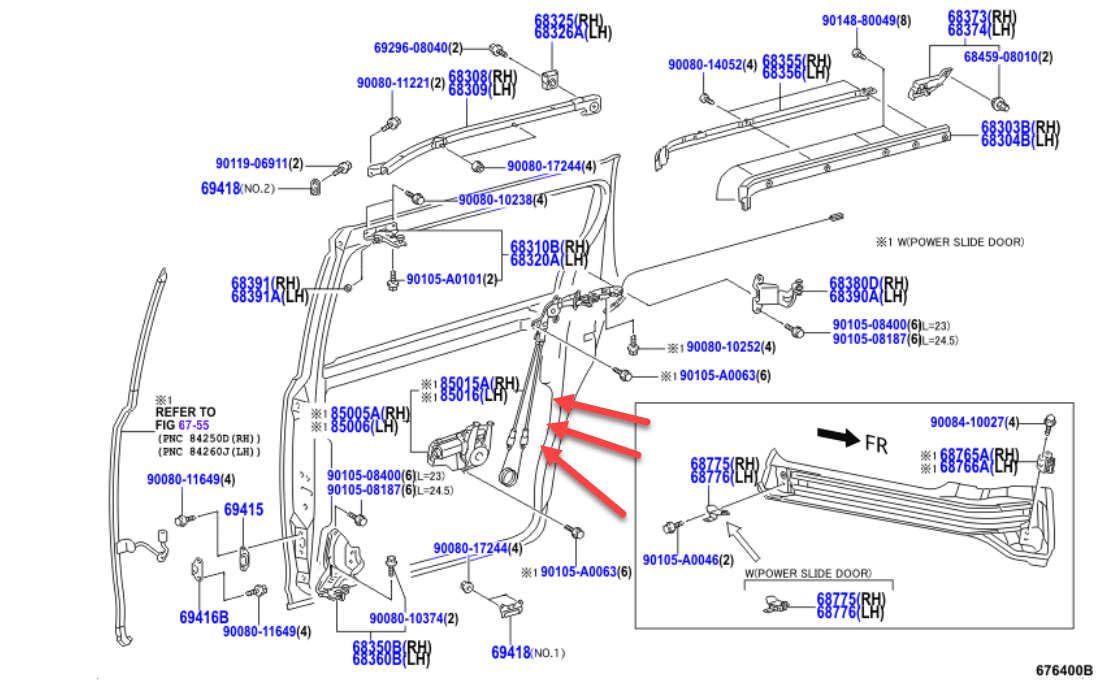
John, thanks for the reply but the only thing that I was not able to do was put the plug that connects the motor and the computer back on the metal clip that is mentioned in step 4. I got the two connected and it works just not able to secure it to the pan assembly. Either way thanks again and I really appreciate it, ordered the LED light kit and will be putting that in this week as well
John, I just want to say thank you. I bought my 2010 van last year used, with in 3 months the DS cable broke and I have been angry at the whole thing since. I found your website, took the advice of buying the OEM part from your link and even on this 90 degree day in BFLO I was able to get it done in 3 hours. The only thing I was not able to do is hook the motor cable back into the metal clip on the new assembly, did I miss a step, and is this something I should open back up and correct? Either way works great and you saved me about $650.00 and the mental aggravation of paying the dealer that. 3 hours…and I am no mechanic….
Thanks for the comment Brian. I don’t know if there are any unnecessary steps in this tutorial–which step did you skip? If you forgot to reinstall the window bolt rubber access plugs that won’t make any difference. Let me know what you forgot to do and I’ll get back with you. If you cannot reconnect the end of the cable it seems like you must backtrack. Hang in there man, I’ve had to backtrack many times.
My power slide was binding and overloading the motor which caused the door to reverse and stay open. With the sliding door switch set to manual, I could feel resistance/binding when manually closing. I inspected the cables and could not find any frayed cable wires and there were no bad noises from the door motor.
After reviewing all your detailed pictures, I considered that I might get lucky if I lubricated the cables as you suggested in another article. Lubricating the cables did free up the door and everything slides freely (no disassembly required).
I tried WD40 but, this is a light penetrating oil and results were only a slight improvement. WD40 spray went everywhere even with the spray straw. I then used tapping/drilling/cutting oil which is thicker and suddenly, everything became smooth. Instead of lubricating the length of the cable, I applied the oil at the pulley and moved the door manually as I applied the oil so that the oil got immediately pulled into the door cable housing. I was able to oil both cables. I suspect the problem cable is the one that stays exposed to the weather when the door is closed. I also oiled the other door which improved smooth open/close action.
It was difficult to see and reach the spot by the pulley where the cables just begin to enter the door. To place the oil exactly where I wanted, I used a small piece of plastic tubing that I fit over the tip of the cutting oil bottle. I suspect lithium grease in a spray can and using the spray straw may also work. For faster results, someone holding a flashlight aimed at the pulley and moving the door manually is a big help. I think the important point here is dragging the oil into the door cable housing.
As the oiled cables may only be a temporary fix based on your experience, I am putting a pair of cutters in the glove box with a print out of instructions of where to cut the cables. I have gone over the cable cutting steps with my wife should she get stuck some place with a door refusing to close properly. Our original stuck open door problem happened after dropping off at the Baltimore airport and security was NOT happy that she would not JUST drive away with the door open.
Thanks for all your repair write-ups!
Thanks for the comment Ed and good job on getting your door back up and running. I haven’t had much success at postponing the inevitable cable break but life must go on and it sounds like you are prepared for the day when it happens. I do believe that the higher the viscosity of oil/grease, the better, so it stays put. Stop back in for the best repair article on the Internet for replacing those cables when you are ready to tackle that project: How To Erplace Sliding Door Cables on 2004-2010 Toyota Sienna
Hello Again.
Actually before the third row, I have to take care of the back up sensors, since the center censors stay continuously on (without beeping) and every time I change from park to drive, or reverse or even when I turn on the engine the sonar will beep three times. All the rest of the sensors woks fine.
Any idea?
Thank you,
JJC
JJC, I have the XLE model but not the sonar so I do not have any experience with those sensors. I know they are mounted in the bumpers on the front and rear. The way I start all my repairs is that I start googling the symptoms and modify my search terms as I learn and look for hints from other people. I’d encourage you to do that and see what you can learn. Maybe my next Sienna will have more bells and whistles and I’ll be fixing sonar systems on the next one! Good luck.
Hello John.
Is hard for me to add any other comment regarding how good is this tutorial.
I cannot imagine how long it took you to make it.
Yesterday I’ve replaced the cable with total success. It took me some time but I am very happy. Now my Toyota Sienna 2006 is ready for another 10 years of kids in and out.
Thank you Very Much and I hope you get paid some how some way, since you save us several hundreds of dollars (in my case dealer quoted $650).
Congratulations for the formidable tutorial.
My next project is lubricate and check the mechanism of the power third row on the same Sienna 2006.
Well, JJC, some of the reward is intangible responses like yours, which I really appreciate. Thank you for taking the time to leave a comment and GOOD JOB on the repair!!
The dealer in Tysons Corner VA just quoted us $1600. I’d love to do the repair myself, but just don’t have the time. For $650, I’d pay the dealer to do it. Did that quote come from anywhere near Northern Virginia?
Thanks, Kevin
John,
Thanks for the fantastic write-up, I successfully got my sliding door working again after about 2 years. I did have to replace the center hinge as well, but that was easy since the cables were already cut.
I do have a popping noise near the rear latch of the sliding door when opening the door (either handle or button). It seems like the latch is staying engaged a split second too long and then the door ‘snaps’ open. I don’t think it can be good for the longevity of the cables and pulley housing. Here’s a video of the popping noise: https://www.youtube.com/watch?v=7D8GANSr3a0&feature=youtu.be
You’ll have to ignore the sound effects of my son operating the door…
Wondering if anyone has any suggestions on adjustment of fixing?
Looks like your other writeup might be what I need: http://www.shareyourrepair.com/2015/05/2004-2010-toyota-sienna-slide-door-lock-release-motor-assy-replacement.html
Thanks – Mark J.
Sorry for the duplicate post:-( It didn’t seem to work the 1st time, guess I was impatient.
No problem Mark you’re not the first person to have done that 🙂
Thank you for the comment Mark, I watched your video and I totally understand the sound effects–I have four kids, three of them are boys. It is really hard for me to diagnose it from a video only and not get my hands on it. I don’t think that it is the door latch motor. If you can use your remote or the pushbutton on the doorpost on the inside of the van and the door opens then I think the door latch motor is working fine. If I were you I would observe my door open and close with the inner plastic panel off the door. With the plastic panel off you should be able to see better what is going on. I would watch where the cables come out of the door up at the hinge (and that they go up through the opening like I picture in this tutorial} and then obviously watch any other moving part inside the door. If your door is slowing down at one point when it is opening you could have some binding of some type and hopefully with the inner door panel removed you can see what is happening. That is how I would go about trying to troubleshoot your issue. Now that I have thought more about it one thing you may want to check is to make sure there is nothing impeding the door from pulling shut. If something is pushing the door open or being pinched in the door it would put pressure on that latch and could cause it to pop when it’s released. That is one thought. Please check back in and let us all know if you figure it out and please feel free to post any other questions you might have.
So we tried to work on the ‘popping’ noise a little yesterday by moving and re-aligning the back latch receptacle (name?) on the door frame. While it helped a little, it was not 100% successful. We loosened the flat head torx screws and used a rubber mallet to see if we could align it better w/ the rear latch mechanism. It did help some, but not enough.
Also, the ‘slowing’ of the door and grunting of the motor problem. I looked at the bottom track a little more to see if there was anything inhibiting the closing and couldn’t see anything. We had chewed up that motor pretty good when we first broke the door and I’m wondering if we didn’t do some damage to it…
So, the conclusion is my door is not repaired perfectly, but is working well. I’ll keep an eye on the popping and slowing of the motor. If I need to do the repair again, I won’t be scared:-) Thanks for all the help.
Mark, thanks for the update. Your situation is beyond the scope of symptoms I’ve dealt with so that is real difficult to guess what is going on without getting my hands on it personally. I do not think your issue has anything to do with the motor itself. If you were to take the inner door panel off your sliding door and then operate your power door you may be able to gain some insight into what is going on. Just a reminder–if you roll down the window, the door does not latch in its fully-open position (so roll up the window to see the door’s normal operation).
Thanks John.
Could a bad Rear Sliding Door Latch Assembly cause the cable to fail?
The cable looked both rusted and damaged at the spot where it broke. It was so strong upstream from the break that my wire cutters wouldn’t cut it.
What is the symptom of a failed Rear Sliding Door Latch Assembly in a 2008?
Thanks!
Kevin
It is possible. If the latch motor goes bad the drive motor will try to open the door but will not be able. It will stop when the door does not open but that could put pressure on the cable. But if your cable breaks, well, it was just a matter of time before your cable broke anyway–a healthy cable should be able to handle that tension. You can watch the videos I shot of when my door latch motor failed. I had already replaced the sliding door cables: How to Replace the Slide Door Lock Release Motor Assy
John – Thanks so much for your effort in making this repair tutorial. About 2.5 years ago I had my passenger door cable repaired by the dealer. I see the part they used was the motor and clutch assembly for $1150 plus another $400 for the labor. With nearly 170k miles on my 2009 Sienna, there was no way I was going to have the dealer make money from me again for the driver side – I was ready to just go with a manual door – until I found your instructions!
I did, indeed, study the instructions a few times before purchasing the part (just the clutch assembly this time!!) It took me about 5 hours to complete the repair. The only non-tutorial difficulty I encountered was when I would pull the sliding door near shut, there was a loud single popping sound. After closely inspecting, I noticed the inside corner of the metal on the front edge of the rear side window was sticking out so that when the door arm (?- part that the pulley end of the cable assembly attaches to) when past it, it would catch that bit of metal and make the sound. The bent metal corner must have come from forcing the door to shut sometime after the cable break – maybe the pulley end was protruding. Anyway, I carefully used cloth-covered pliers to squeeze the metal corner back into place, relieved not to break the window!
One last comment, for step 35, when installing the trim piece, I was having trouble getting it to stay on, like you mentioned. I noticed it does matter how the snap is oriented. I believe the snap is either square or rectangular so a diagonal is too wide for the notch fit over – just twist it to line up and all is well.
Thanks again for you generosity!
Thank you for your work on this.
In you helpful docs section you refer to: A bulletin explaining the warranty extension on this part (warranty extension now expired) (pdf)
Why do you say expired?.
We have 2008 w/ 100K miles which is clearly still covered by the terms of the warranty extension.
However, the dealership ducked coverage claiming that for 2008 vehicles, the cable assembly is not covered, only the latch assembly (compare parts and descriptions for 2007 vehicles vs. those listed for 2008 vehicles.
I don’t know that the latch did not cause the cable to fail, but the dealer/Toyota seems to hold the cards in the dispute.
Any thoughts?
Kevin, thanks for taking the time to point out that inconsistency in my article. You are right, I incorrectly state that the warranty has expired. I read “3 years” and thought that was the extension of the warranty but that is incorrect. I have corrected my link description. As for your van, a 2008, the bulletin states:
Although the Rear Sliding Door Latch Assemblies and the Power Sliding Door Cable Assembly are covered by Toyota’s New Vehicle Limited Warranty for 3 years or 36,000 miles (whichever occurs first), Toyota is announcing a Customer Support Program (CSP) which will extend the warranty coverage for the following:
1) Rear Sliding Door Latch Assemblies – For certain 2004-2010MY Sienna vehicles equipped with a Manual or Power Sliding Door, the warranty coverage for the Rear Sliding Door Latch Assemblies will be extended to 9 years from the date-of-first-use or 120,000 miles (whichever occurs first).
2) Power Sliding Door Cable Assembly – For certain 2004-2007MY Sienna vehicles equipped with a Power Sliding Door, the warranty coverage for the Power Sliding Door Cable Assembly will be extended to 9 years from the date-of-first-use or 120,000 miles (whichever occurs first).
Your 2008 van has a bad power sliding door cable assembly and the warranty only covers to 2007. The latch assembly warranty does cover your van but it doesn’t seem that that is your issue. Sorry about that.
John – Many, many thanks for your hard work in writing all of these steps out and showing detailed pictures and linking YouTube vids to give a total and comprehensive tutorial on getting this Toyota door cable repaired properly!
I had my right door on my ’09 Sienna cable snap a few weeks ago. Dealer said, “Just to make your door a manual one, it will be around $700. But to fix the cable and get it working again, it will be around $2,200.” My wife and I almost flipped out! I was seriously considering letting them do it until I found this site and your post…and boy was I glad I did!!!
I ordered the two items you clearly linked (door cable and replacement panel clips), studied the thorough instructions a few times through (doing this really helped me…to read and re-read beforehand and to visually understand what I was going to do), charged up the iPad and headed to the garage. I dedicated a full day (kids at camp) and got to work.
It was a total success! My door works like new and I saved approximately $1,700 and gained the self-satisfaction of D.I.Y.! Total time for me was about 5 hours but that’s because I was super cautious so as not to break or damage any piece I was working with. My wife was like, “Wow! Honey, I am very impressed!”
The only “casualty” in my repair odyssey was my 10mm socket! When I was putting 1 of 2 screws back inside the door that held the window, I had put the electrical tape in the socket so well that it held onto screw for dear life. I pulled the ratchet out, the 10mm socket popped off the extender. I then grabbed a pair of long nosed pliers and tried to remove the socket. As I pulled, the socket popped out of my pilers and fell down into the door 🙁 Luckily, I had another socket laying around and grabbed it to finish the install.
I then tried finding the socket by removing the cable motor housing like you had mentioned. I grabbed a headlamp and the strongest flashlight I could find but I could not visibly see it anywhere down there. Oh well! So, I finished the job that day (since I had to resume normal life in the mini-van). It’s been 3 days and I haven’t heard it rattling around anywhere so I’ll just chalk that up small mistake to the price you pay for learning.
But again, you ROCK! I would do this repair again in a heartbeat now that I’m confident that with your instructions, IT CAN BE DONE!
Ludwig, thanks for writing one of my favorite comments I’ve received on my website! Thank you for taking the time to share–hopefully you give someone else just enough courage to tackle this project themselves and experience the great feeling you get when you DIY! When your other door cable breaks you’ll be able to do it again with no problem and it’s a lot easier the second time! Thanks again for sharing.
John, I’d like to echo all of the comments and thanks from others here. After extracting a reluctant quote of approximately $2,000-$2,500 from the dealer, I initially refused to do the repair. My wife subsequently declared that we had to buy a new van if I didn’t get the door fixed, so at $30k+ saved, I think I set the record for savings amongst your happy “customers”! After stumbling on your article, I bought the OEM part and spent a pleasant afternoon (it took me around 4.5 hours) doing this repair on my 2008 Sienna. Your instructions and pictures were amazing and I never could have tackled this without them. My only moment of panic was when I first tested the door, the door unlatched but nothing else happened. I thought I was the one guy whose motor had somehow gone bad until I realized I just hadn’t plugged the motor back in! On a whim, when I ordered the part and since I was saving so much on this repair, I splurged for new floor mats ($130) as well, which were pretty ratty after 8 years. It was the best money I’ve ever spent on a car. With the door working again and new floor mats, my wife feels like she got a new car. The new floor mats even give it that new car smell!
Ted, thank you for leaving a message–good work on the repair! Another improvement you can do on your Toyota Sienna that makes a big difference is to replace all the incandescent interior light bulbs with LEDs. Your wife will say, “Wow!” the first time she gets in the van. I’ve written an article on that too:
How to Replace Toyota Sienna Dome Lights with LEDs
I’ve written 30 other articles on the Toyota Sienna too, so check back in if something else goes wrong!
John,
Thank you so much for your article. It gave me a number of hints that I would have been figuring out hmm how would I get this thing off. I also used a 3rd party part from Dorman and wound the cable my self. The modified bits that I had to figure out were how to remove the cables out of the motor pan assembly as you reuse this part with the Dorman. There are 3 clips that have to be depressed at the same time and then the sleeve can slide over the end of the cable. Also I attached the retainer clips on the new cable much earlier to test the door was functional before I put the window back in. But I very much appreciate you writing this article.
Dave, thanks for taking the time to share. I’m glad you were able to repair your van–good work!
John,
This was an excellent tutorial on replacing my right side cable assembly. Your hints, “use tape on the 10 mm socket” or “be careful how you remove those trim pieces” were great and encouraging. I purchased the part from rockauto.com and wound the cable on the spool myself. It was < $200. I think the Toyota part comes with a pre-wound spool, but costs more.
I always pray before I start a big car repair, knowing that I will need wisdom and patience as I do something for the first time. Your article gave me both confidence and courage to do this and hopefully help others. Thank you for a careful well thought out article. Have you considered doing this as a profession?
You are so welcome Ted. Thank you for taking the time to leave a comment. I enjoy writing these articles and sharing what I’ve learned so I get a big kick out of hearing that I was able to help someone. I haven’t considered auto repair as a profession but I am an engineer at a manufacturing company so I get lots of opportunities to troubleshoot, learn about a wide variety of technologies and equipment, and I have the opportunity to write about it there too. Thanks for asking.
What are your thoughts on using por15 on the cable? I have an 04 where the cable covering has come off in a few spots and see some rust and would like to prevent as soon as possible.
That’s a good question Jordan–thanks for asking. You know, I do not believe it will work to save your cables. As I’ve written in this article: How to Prolong the Life of Your Toyota Sienna Sliding Door Cables, I tried oiling my cables whose coating had come off and they were showing signs of rust, and that failed to extend their life much at all. I don’t believe por15 paint will be very effective in extending the life of your cables. The reason I say that is because I believe that the rust is only part of the issue, and maybe just a small part. I believe the cables fail from stress failure–they have rolled up and straightened out so many times that they get stress fractures and then the individual wires in the cable break. You can give it a try and please stop back in and report how it goes if you do, but I don’t think it will add much life to your cables. That’s just my opinion though. Thanks again for taking the time to ask a question.
John,
Excellent write up, good detail that successfully took me through the entire process. I ordered a set of replacement cables & cover from eBay seller maampartsusa2012 that worked really well. The set of YouTube cable replacement videos were helpful, but after looking at the opposite door you can see the cables can really only run in one path. Took me about 4 hours to pull apart the door and rebuild the cable pulley unit, but spending $120 on the cable kit vs $1,200 at the dealer was very satisfying.
My REPAIR HINT is for keeping up with all the screws & fasteners. I take a bit of cardboard about 14-16″ long x 6-8″ wide and place a loop of duct tape on it with the adhesive side up. To this I stick each screw in the order of removal & jot notes on the cardboard on which step they came from. Easy to move around and keeps them in place.
Thanks for the step-by-step!
Thanks for taking the time to comment and for sharing the tip JD, good work!
Hi John,
I’ve followed your instructions step by step, even being super novice I was able to do it. It took about 4 hours to perform the whole procedure of replacing the cables. Once completed, the door started working flawlessly. I was given CAD 1800 estimate by Toyota dealership here in Edmonton AB. The estimate didn’t mentioned what parts exactly they’d use. But your article encouraged enough to do it myself. Your instructions are awesome, very impressive, very detailed and great pictures. Thank you!!! very much for saving me a other readers here lots of money. great job!!! Keep up the good work, please.
Thank you for taking the time to share Syed — well done on the repair!
i John,
This is a great tutorial, thanks very much for taking the time to put it together in such detail.
I suffered the same problem on my passenger side door (2007 Sienna) last year when my oversized 7-year old reefed on the outside handle to open the door. The mechanism stopped working when using any of the “remote” buttons or if the outside handle was given a quick tug: the mechanism would activate (you could hear it working), but then reverse and latch the door again without really moving it. However, if you held the outside handle in the open position for a couple of seconds, the door would slide open as usual.
So, we used it like that for months but eventually the cable snapped. Then we just used it manually (I shut the power functionality off with the dash switch). Just recently, the cable on the driver’s side door snapped. To make things worse, the passenger side door is now stuck in the closed position. I tried your recommendation of pushing on the bottom inside corners of the door while working the inside handle, but no luck. The handle does not release the door latch, so pushing from the bottom does not help. I was able to free the interior trim piece from its clips by pulling on the cupholder at the bottom of the door, and was able to undo the screw at the bottom of the trim piece (shown in your photo under step 3) by using a pry bar to flex the trim piece until I could see the head of the screw. I could just partially fit the open end of an offset spanner onto the flats of the screw, and turn it about one flat at a time. I think the screw was not installed tightly and that’s why I was able to get it to turn this way. I could not fit the box end of the spanner on the screw head, and there is not enough room to get at things with a small ratchet and a universal joint.
So now I have the trim piece mostly off the door and undamaged. It is held in place by the handle trim cover that is held in place by the two screws that can only be accessed when the door is slid open, but I have pretty good access to the door’s internals now. I am wondering what I need to manually actuate to get the door latch to release so I can slide the door open. Do I need to take the “attachment plate” off to get at the latch mechanism ? How do I get the latch to release ?
Thanks.
John, excellent article and successful repair. I ran into a hitch on step 19 when the two bolts holding the clutch assembly in place snapped as I was removing them. I was able to drill out the holes and secure with a couple of nuts but it’s a tight fit to squeeze the nuts into the underside of the bracket. I highly recommend hitting these bolts with penetrating oil a few days ahead of attempting the repair.
Graham, thanks for sharing. I’m glad you were able to get past this challenge. I had not heard of this happening from any of my readers so far but I can see how it could happen. Being able to handle the unexpected is a big key to repairing your own stuff. Those bolts are exposed to the elements so they can corrode. Good job on improvising!
Hi John,
I’m wondering if you know if these steps will work for a 2013 Sienna. It looks like quite a job, but I may be willing to try it if I know it has a chance of working with your directions.
Thanks.
James, I’m sorry to hear that your 3-year-old Sienna already has a broken cable. I hoped that Toyota would improve upon their design in future models. So your warranty is up already? I have never studied a new van so I cannot tell you whether it would work. You could definitely study your van door and see if it looks similar. I’m guessing the design has changed though. Please drop back in and let us all know what you learn.
Thank you John for your prompt answer. I had a feeling that would be your response.
I heard its a horror story getting that cable just right.
You get what you pay for….
Thank you again !
Hi John….Great information. I own a 2009 Sienna Limited. Recently the RH cable snapped. I want to try and fix this myself.Your site gives me all the information I need .Great pictures and detailed instructions. Hopefully things will go smoothly.
I just have one question. Do you recommend using only Toyota parts?
I have seen aftermarket parts that were less expensive. I hesitate to use them. I just need your input on this.
Thank you very much John!
I have only used the OEM Toyota parts. It is more difficult to use the aftermarket part because you must wrap the new cables on the old pulley and they must be exactly right or you will destroy the new part.
We’ve unfortunately had to use this twice now, once for each side, thank you for the detailed instructions!
Glad to have been able to help! Thanks for sharing.
John,
Another success! Thanks to your tutorial and all the tips in this thread. I only had one hitch – after attaching the front tensioner, I discovered I had an extra 3 inches or so in the back cable. I had missed one loop on the pulley. I used Slava’s tips and put the extra loop back on the pulley. Wanted to pass along one technique I learned on the fly: After I got the cover off the pulley, I found it helpful to have someone else put tension on the back cable. This way I could pull extra cable as needed to make the loop. The tension then kept the loops on the pulley tight while I worked the pulley back onto the motor driveshaft. (It was actually pretty easy – I did it with a 3-year old on my back ‘helping.’). Thanks again!
Hi John,
I’m not even a shade tree mechanic, but I’m feeling pretty confident thanks to your terrific tutorial. I took apart enough of the RH PSD of my 2006 Sienna XLE to remove the destroyed cable and shattered pulley housing. Motor is fine, so I ordered a replacement cable and pulley assembly from CNS on eBay. My questions, while I await the part:
1. In what step do you cover feeding the cables through the top of the motor/clutch pan? Did I miss that, or is it so easy as to need no instruction?
2. I’m worried about losing tension on the cable while I install it, and having to re-wind around the pulley (as Slava learned how to do). What’s the technique for keeping the cable tight inside the pulley container?
3. Separate topic: the LH PSD won’t open/close by any switch or button. After I pull the handle out, it will open or close on its own. Any thoughts? I think it’s one/both of the actuators at bottom front/back of the door. I found your post on replacing the slide door lock release motor assembly – is that the issue for my LH door?
Thanks very much – I’m eager for the RH pulley/cable assembly to arrive so I can tackle the repair.
1. In my instructions you do not need to thread the cables through the cover because I prescribe purchasing the OEM part that is already assembled. You have chosen a more difficult repair with the third-party part, which I have not completed or do I describe in this article, sorry.
2. It is critical to get the EXACT number of wraps of cable around the spool. If you are off by one revolution you are likely to shatter your new cover and ruin the part.
3. It sounds like the door latch motor is bad. This is because when you use the remote or buttons the motor unlatches the door but if you pull either the inside or outside handles you manually release the latch. I have written a complete article on how to do this repair as well here: How To Fix 2004-2010 Toyota Sienna Sliding Door Will Not Open Or Close With The Remote-How To Replace The Slide Door Lock Release Motor Assy
John,
Now I understand all the references to the OEM part – and I see you have answered my questions several times to other readers. I have the same situation John Komocar faced. Hopefully my part will arrive with instructions on the correct number of loops around the pulley (and how to determine the “center” – when the number of loops for each side of the cable is equal). Again, thanks – sincerely appreciate you providing this tutorial.
Hi, I can’t thank you enough for this detailed article! I consider myself a competent home mechanic, but I was a bit daunted by the prospect of this repair. Your step by step guide was absolutely invaluable, got it done in less than 3 hours with a bargain $400 CAD part from Kijiji! Thanks again!
Thank you John!
Hi John! First of all, thank you so much for this tutorial! My stepdad and I were able to complete this repair in a day, on a seasonably warm December day. So, I was initially thrilled, however the door has since started to only open about 50% of the time automatically. It will open a sliver, then kind of rock, but not open. The strange thing is…it doesn’t seem to matter whether I’m trying to open with the handle or the button/remote. If I’m correct…that makes it unlikely it’s the actuator, right? If you have any troubleshooting ideas I’d appreciate them. I’m guessing it might be something I missed during the installation. I definitely forgot to reinstall the rubber window plugs, but figured they probably weren’t too terribly important. Re-reading the tutorial (and every single comment to see if anyone was having the same problem), I see you did the same thing, but went back and installed them correctly. I’m assuming that’s not it, but if I open it back up, I will put them in! One more thing…the door slides open and closed just fine when in manual mode and if I can get the door open more than an inch with the handle…the automatic door will kick in and open just fine. Thank you in advance for any ideas you may have!
Thanks for the feedback and the questions Casandra. You are correct, the plugs do not have anything to do with the performance of the door–they are not necessary for the door to function (they are just there to give access through the steel panel and to keep dust and moisture out. It is difficult to tell what actually is causing your door to behave as you’ve described without looking at it personally. If you did not route the cables correctly in step 24, it could cause problems and I’ve heard of that before when interacting with readers. If you did mess up Step 24 it will scrape the cable coating off as the cable rubs against the door hinge. I’ll do some research and check back in with you on this.
Cassandra, if I were in your situation I would disassemble the door, following my instructions, and verify that the cable is properly wrapped around the pulley. Did the cable come unwound on you while you were reinstalling it onto the motor? If so that definitely is your issue. Otherwise I would disassemble the cable assembly and verify the path of the cables to make sure you have carefully followed all my instructions. I know that these instructions are time tested now by dozens of other people so if you follow them you should end up with a working door. That’s the best advice I can give you. I hope you are able to get your door working again. Please feel free to ask any other questions that come up for you.
Hi John! I just wanted to check in to let you know that it’s been about a year now, and the door is working perfectly! I have no idea what the problem was, but after trying a number of different things…verifying the cables were wrapped correctly…WD-40 anywhere I could think to put it, my door began working properly a few weeks after I checked in with you last. I just want to thank you again for the time and effort put into not only making this tutorial, but also in replying to everyone who has questions. Merry Christmas!
That is great to hear Casandra. Perhaps your experience will help someone else who is struggling with the same issue. Thanks for checking in and sharing your repair! Good work!!
Hello Sir John Mueller .. I liked what Mr. presented for the reform of the sliding door in the Toyota Sienna, and Love to know what the length of each cable in the drive door slider, with many thanks …
The only way to know the length would be to disassemble a new cable assembly and I wouldn’t want to destroy a perfectly good assembly just for curiosity sake, so sorry, I don’t know the cable lengths. I would not recommend trying to make them from scratch because you must have a very strong crimp on the end of the cable that fits down into the pulley. So sorry, I can’t help you with that question.
Thank you very much for your kindness and your response, anyway I could not get on the same cable here in the UAE, I do not find only the user here … thank you very much once again ..
Hi John,
Great write up, I’m really looking forward to going through it.
I would just like to request a piece of information. My mechanic, while attempting to repair the door, threw out the fasteners before giving up on the repair. I bought the DORMAN replacement part but have not the bolts. These are the 4 for the motor and pulley assembly with 10mm head (fig. B67528), the 3 for connecting to the centre door bracket (fig. B60922), and the 2 used for retaining the outer cable tensioner (the one below the glass). Could you please tell me what their lengths and diameters were so I can find replacements on RockAuto?
Thanks!
Sorry Al, I don’t have the information on the bolt sizes and my van is already assembled and since I’ve replaced both doors I don’t think I’ll be replacing them again while I own the van. If you buy the full part it will come with those bolts. You can always look at your other door. If you remove the interior panel and take the bolts out one at a time you can get the sizes.
I have a broken sliding door cable on a 2011 Sienna. Would you happen to know if there is a DIY for the 2011 model year or if the above instructions would work as well?
Sam, I checked with my Toyotaparts.com contact (and they are a Toyota dealer) and they say that the 2011 model is basically the same except the trim pieces may be slightly different and the motor is a different part number. The instructions should work for your van! Let me know if there’s anything else I can help you with.
Thanks Slava. I actually have tried both of those things (multiple times) with no avail.
I should also mention that whenever I shut the door now, neither the inside or outside door handle will open the door. When I pull the interior handle it gets firm at about 75% of the handle pulled and it never releases the door latch. So if I need to open the door I get some pliers and pull the top cable in the big handle assembly and it pops the door open.
Hi Jed,
My 5 cents, I believe I have a similar situation when I did mine and as far as I remember the reason the door did not want to open was the disconnected window switch (Step 2) and/or the door lock lever (which is right below the internal door handle) in “locked” position. I remember spending a few minutes in panic trying to make it work, hope it’s something as simple in your case. If not, back to John.
This is great Slava, thanks for joining in and sharing–TOGETHER we can fix it! Jed, let us know if this solves the issue for you and if not give me feedback on the clarifications I requested above.
Yes you’re correct. The motor that pulls the back of the door in tight isn’t doing anything and the motor attached to this newly installed cable assembly isn’t doing anything. You might want to mention that if door closes before you connect each cable end of the new assembly that they could get pinned in there.
I’ll have to double check for additional fuse locations I did check the power sliding door fuse that is in the main engine compartment panel. I’m not sure if there is another one? I’m hoping its something like that. I’m dreading the thought of buying both motors OR going back to that hellish dealership. They wanted to charge $110 to “diagnose” the broken cable. I had the whole panel off and the frayed cable looked identical to your picture. The motor would still spin (it was working). So I never even got to the point where they threw out the ridiculous price to fix it (most people I’m seeing are reporting 1500 – 2200 for this fix).
I know you probably don’t have all the answers, but thought I’d throw it out to the universe (or atleast your post) I thank you for your time in helping your fellowman.
Thank you John for this invaluable resource. I spent all day Saturday doing this repair and I have an additional issue I’m having. I never disconnected the car battery, but disabled the sliders with the button prior to the repair.When I got the new assembly installed (hadn’t connected the two cable ends (Step 33a and Step 33b) I pulled the door mostly closed to finish bolting the motor/cable assembly into place and the back door latch latched and it sucked down onto the disconnected (new) cables and trapped them. Then the door was stuck closed. Door handle wouldn’t dislodge it or anything. I couldn’t open it any way I tried, until finally I got some pliers and had to yank on the one very top cable in the handle assembly to open the door. But now the problem is the back latch won’t suck the door in and the door motor won’t do anything. I know the motor was working before, so I only purchased the part you listed. I’ve checked all the fuses, unhooked both battery terminals and reconnected. I don’t get any motor response now when I test the newly replaced assembly. I’ve read of people having to to “reprogram” the sliding door computer when the get a battery replaced, I’ve tried it once w/out luck. Problem I have now is when we drive the van the door ajar alarm sounds the whole time because the back latch doesn’t latch. It also runs my down over night. So my temporary stop-gap fix is I’ve unplugged the top plug seen in Step 26 so it doesn’t beep at us the entire time we drive the van. I’ve also bungee’d the back to the bucket seat to keep the door closed enough to keep the sensor from sounding the alarm. Any ideas from your experience? Looking back I should have just disconnected the battery and not assume the button method would be sufficient. Thanks John for this post.
Jed, thanks for your comment. Let me make sure I understand your situation correctly first–are you saying that the power sliding door motor is not functioning AND the motor that pulls in the rear edge of the sliding door BOTH are not working? It would point to a fuse if both motors were not working. I do recollect that the motor that pulls in the rear edge of the door functions even when the doors are in manual mode, that is true–maybe I should mention that in my article. I didn’t ever run into that issue. As for reprogramming the door, the only thing I’ve read is that you just have the door fully shut when you connect the battery and then it remembers that as the end point. Please get back with me and I’ll respond within a day.
Many thanks for an easy to follow tutorial . I have now repaired both sides on my 2004 van and you have saved me about $2,000.
I hope this encourages others to have a go .
Gareth .
Thanks for sharing Gareth and I love hearing how people were able to repair their Sienna with my article. It’s a tough job but with good instructions it’s very doable and I’m pleased to help.
Hi John, Very informative thank you. I have a similar problem with my 2006 Toyota Noah, where I need to replace the right side (sliding door) cable and pulleys. Can the parts for the sienna fit the Noah if not can you assist me with the part number.
Hello, thank you for your question. I know that Toyota likes to re-use identical parts across multiple different vehicles but I had not ever even heard of the Toyota Noah until you mentioned it. I couldn’t tell you whether the two vehicles use the same parts. You could take off the inner-door panel and look at the part number of your cable assembly and then compare that to the Sienna part numbers. Good luck.
John:
Thanks for all you efforts in putting together your instructions on the Sienna sliding door cable replacement. I wouldn’t have attempted it on my 2006 Sienna without your instructions.
A few things I learned while doing the repair:
1. Rear Door Window Frame Molding Sub-Assembly. On my 2006 the adhesive was still holding this piece to the door. The suggestion to use a heat gun helped to loosen the adhesive. However, I was so intent on looking at the progress of the loosening adhesive I didn’t notice that I was melting the plastic molding piece with the heat gun. I’ll need to order a replacement piece. A warning might be helpful to others.
2. Rear Door Outside Lower Window Molding. This is the molding that runs lengthwise along the lower portion of the window on the outside. It’s held in place with one screw on the rear end and a claw finger at the front end. This screw can be seen clearly in you photo labeled “Door with the exterior trim removed”. The piece comes out very easily after the above molding sub-assembly is removed. I don’t know that you mention it in your instructions. With this piece removed, removal and replacement of the window, and removal and replacement of the sliding door cable assembly are much easier because of the increased clearance that results. A useful addition to your instructions perhaps.
3. Aftermarket Cable Assembly by “Dorman”. I did not use the genuine Toyota cable assembly part as recommended in your instructions. From ebay.com for about $210 I ordered “Power Sliding Door Cable Right Dorman 924-550 fits 04-07 Toyota Sienna”. The manufacturer brand is “Dorman”. The assembly is not as complete as the Toyota assembly; it requires that one has the original spool and that one wind the new cables around it. It does come with a replacement actuator cover. I can recommend this part from this manufacturer. It comes with sufficient instructions for installation and winding the spool. Anyone that can follow your instructions can follow the ones that come with the part. The part appears to be of good quality and at half the Toyota price it’s worth thinking about. I’ve just installed it. It works fine, but I can’t speak to durability since it’s only been installed for a day.
Again, thanks for your great efforts in posting your repair instructions.
John
Thanks for your comments and helpful feedback John. Your Point #1: That’s a good word about being careful with the heat gun–you really don’t need a heat gun, a hair dryer should provide plenty of heat. Heat guns are capable of 500+ F temperatures and that is way overkill. Your Point #2: As for that outside lower window moulding that you removed–I never took that piece out on either of my doors but I do see that screw on the one end and that may be helpful for some people to have that extra room. It is not necessary though. Your Point #3: I’ve seen more people using the partial after-market part although I don’t know how long it will last and it does require you to re-use your old pulley. They sell that part on Amazon, which surely will be shipped to you faster than ebay. I avoid ebay if I can because of all the variances in shipping and ship time.
Hi John… thanks for posting these instructions! This saved me close to $2000. The dealership wanted to charge me $1378 for the part (including the motor, which wasn’t defective) and with labor the total estimate was $2276 (including tax). So, spending $433 for the part (including shipping) saved me close to $2000.
Another part of my story is just a word of advice/caution to those who have a 2009 Sienna. The dealership asked me why I wasn’t going to use them for the repair. I told them about the $400 part (without the motor) vs. the $1378 they wanted to charge me (with the motor). He asked for the P/N so he could check why the Toyota system didn’t show an option that didn’t include the motor. He called me right away and told me that the part I was going to use wouldn’t work on a 2009 as the cables were too short! He added that this part was only for 04-07 Sienna’s. I called Toyota Parts and they reassured me that this part would work for my 2009. I decided that saving close to $2000 was worth giving it a shot. It turns out the part (passenger side) you’ve listed above does indeed work on a 2009 Sienna! So, if you have a 2009 Sienna and the dealership is trying to tell you that this part and procedure will not work, they are wrong. 🙂 It does work and with John’s impeccable instructions, you can save a ton of money!
Thanks again John!!
Thanks for the nice reply Mark! I’m glad toyotapart.com and I were able to save you a lot of money! –John
John,
Need your advise.
2008 Sienna Powered passenger PSD stuck closed. I cannot get the door to open at all. No motor/actuator noise when any of the buttons are pushed. What happened was we were out to dinner and could get the door to close so we closed it manually and could have forced it closed. The manual door switch on the interior panel seems to be stuck and may be the cause of the problem, (not allowing the switch to make). Is there a way to remove this cover if we cannot access the 2 screws on the cover? May even be a fuse to the PSD fuse but the fuse was not in the location of manual. Once I get the cover off , I can troubleshoot this stupid thing. BTW, the other door works fine.
Gary, thank you for your comment. The way that door opens is that either the outer handle, the inner handle, or the door latch motor pulls a cable that releases the latch that allows the door to be opened, hopefully by the power door motor via the cables that run in two different directions so it can reel the door open or shut. I consulted my Toyota dealer connection at toyotapart.com and they said that there is only one relay that operates both doors so since one of your doors works then the other should too. You are going to need to get your door open in order to determine what is going on but, like you are aware, the screws are inaccessible when the door is shut. After studying the door myself I think the way I would get in there is to take a Dremel tool and carefully cut along the red line I show in this picture:

When you get that piece cut you should be able to pull it straight out but it will be retained by the power window wiring harness, which you can just unplug. Then you can observe the location where the inner and outer latch and the motor pull the latch to unlock the door. Here’s a video of me demonstrating the door latch opening: https://youtu.be/vsSrn1SvMyY Having cut that piece I believe I would be able to sand and epoxy it back together or you could order a replacement and I can help you find the part too. Let me know how it goes in the comments. Thanks, John.
Hi John,
Thank you for your detailed tutorial and for saving my family at least ~1000 bucks! These instructions are truly amazing.
One thing to add to your experience. On step 34 you correctly instruct to check for a loose cable before testing the door. I found myself in this unfortunate situation as I discovered significant loose cable when I tried the door in manual mode. Not sure how it happened as I tried to follow your guidance at step 9b. Looking back I think I could have prevented the whole issue by pulling the cables out AND fixing them at the exit point (after the cable assembly) with something like a duct tape (not sure if this is actually a good idea because of the glue on the duct tape that can get on the cables and jam cable channels, but something like that). I only pulled them out and wiggling at the step 23 was so extensive that it could have pushed the cables back and created a loose loop.
Fortunately I found a quick solution for this problem that I want to share. No disassembly is required and the whole process takes 10-15 minutes. I assume you are able to close the door as this process is possible with the door fully or almost closed. It is VERY important not to apply heavy force and not to engage the power mode as any such move will damage the cable and set you back $500 for the cost of a new assembly. Here are the steps:
1. Remove the middle seat in Sienna to free space so you have access to the pulley at the low right corner of the door. The rest of the job will be done while comfortably laying on the floor of your van.
2. Follow Step 6 to remove the 3 screws form the pulley cover. Once done, remove the cover completely by unfastening from the black thick cables.
3. At this point you can see the pulley and loose cable on the motor shaft. Hopefully the cable is not damaged.
4. Remove the pulley from the shaft. Be careful not to unwind the cable further.
5. Pull all the loose cable from the assembly above (I had to open the door a bit for this) and unwind the loose part of the cable while carefully keeping the part that is still on the pulley, well, on the pulley. Move the pulley down and left to create tension in the cable.
6. I believe there are two ways you can put the cable back on the pulley. You can either hold it steady and place appropriate number of loops on the pulley making sure the cable goes right in the grooves and that the cable stays under tension as you do it. Alternatively (as I did) you can maneuver the pulley in space up and simultaneously rotating it clock-wise and counter clock-wise time by time making sure the cable ends up in right grooves. I had to do 3 turns. Any way you do it you will reach the point when the whole pulley is populated with the cable and the center of the pulley is right in front of the motor shaft. I do believe mathematically there is only one way to do it right so you can’t go wrong (but I can’t promise).
7. The pulley snaps right on the shaft easily using a bit of the extra space the tensioners provide (no need to unzip or remove the tensioners). You may need to rotate the motor shaft to find the proper position. After the pulley is in place you can move the door a little bit, just an inch or so – if everything is OK you will see the pulley rotating and the cables properly winding/unwinding while staying under tension with no loose cable.
8. Put the cover back (careful with the baring in the middle of the cover) and put back the 3 screws.
9. Try your door in manual mode full open-close cycle and then back to Jonh’s manual. Again, the whole exercise including the middle seat removal took 15 minutes at maximum.
Thanks for your detailed instructions. It made the replacement easy!
As I’m a cheapskate, I used the Dorman 924-578 part instead of the Toyota OEM part. The Dorman part is just shy of $200. There were a few extra steps as it required me to wind my own pulley. Unfortunately, I did something wrong my first time through the instructions and found myself with a destroyed cable inside the pulley enclosure. I’m not sure if I wrapped the pulley incorrectly or if it could’ve happened by accidentally activating the door motor without the tensioners in place. I ordered another part (reducing the effectiveness of my frugality) and the second part worked like a charm.
Advice I wish I would’ve had (and maybe this only applies to the aftermarket part): Test proper pulley assembly while the part is out of the car (but mounted inside the black cable assembly) by pulling on one of the cables and making sure the other cable is retracted. One goes out, the other goes in.
Once everything is installed, carefully make sure the door MANUALLY slides open and shut. If there is a lot of resistance, this would indicate a problem that could possibly be fixed without ruining the replacement part.
Make sure the cables at the end of the motor/clutch assembly don’t get twisted. Looking at the photos of the OEM part, I think the Dorman part may be more susceptible to twisting.
THANKS again for the post! I’m looking forward to the other side breaking so I can fix it! There is great satisfaction in saving thousands of dollars doing a repair like this yourself!
Thanks for the comment Greg. Your story is why I discourage people from going the cheap route. I have had zero problems with either of my doors, having done this repair twice now, and I believe they will outlast my ownership of this van. For others reading these comments, I’d say that if you only want to do this repair once and be done, buy the OEM part, follow my instructions, which only coincide with the OEM part, and you can be confident I’ll guide you to success in this tutorial.
The cable snapped and my wife managed to get the door closed, but it would not budge to open. I used the foot technique and managed to open the door, but the rear end of the door came off the track. One of the rollers was destroyed in the process. The only way I could get the door back closed (to drive the van) was to remove the bracket holding the rollers and lift and press the rear of the door into the latch. I think the door is solidly closed. Do you know how difficult it will be to replace the bracket with the rollers and get the rollers back in the track?
John, thank you for your comment. I think you can easily replace that roller and get your van back in business with no problem. I haven’t done that repair, yet! If you give me your van’s VIN number I can do some research for you and find the part you need and instructions on how to install it. Which door is it, the right or left? You mentioned it was the rear roller. If you don’t want to publicize your VIN in the comments you can send it via my contact me page.
The door on my 2006 Limited got stuck a year ago in the half-open position. Took it to the dealer. They said it wasn’t covered under the extended warranty told me it was $1800 to fix. They ended up charging me $100 just to cut the cables.
I got the part off eBay, ($300-some, can’t quite remember) whole cable and pulley assembly, about 6 months ago.
Finally got around to clearing out space in the garage to work on this about 9pm. Found your website. After 4.5 hours of fairly straightforward and reasonably entertaining work the door opens and closes perfectly.
What I’m saying is, Fantastic Website! Easy to follow – I had no issues (forgot tighten the screws for the multiplex controller when putting it all back together, so needed to pop the door panel an extra time – that was all). Way better than any manual. Huge help. Thanks a lot!
– Steve
Steve, thank you for leaving a note and for the encouraging feedback. I’m glad you were able to repair your Sienna. I forgot to put the window bolt rubber plugs back in the first time I put my van back together and had to pop the door panel off a second time as well–it happens. I am looking for others to contribute to this site–would you be interested in documenting your next repair and sharing it here? If so please use my contact me page to get back with me.
Hi, John. My name is Teddy Hashee. I just wanted to tell you thank you for your great information about how to replace power sliding door cable. I fixed my Sienna’s problem with your help (I mean, your information in this website).
I recorded all procedures and made a video. I included your site information in this video.
Here is a link.
https://www.youtube.com/watch?v=FlJA7p4n0mI
Thanks again !!
You are awesome !!
Teddy
Great Job Teddy and good work on the video. That will be a great supplement to my tutorial, thanks for sharing and going to all the work to put that video together.
I just got back from a depressing trip to the dealership today. The sliding door on the passenger side of my 2008 Sienna LE will not open. This happened after we pulled into the driveway last week and heard a “pop!”. The cable had snapped and was hanging out. The door was opened and needed our assistance to close. It wouldn’t open after that. We could hear it trying but it wouldn’t budge.
After some research I found this which I think could help a lot of folks out there if they know about it: http://media.fixed-ops.com/Toy_Campaigns/csp-zts.pdf. And this: http://www.toyoheadquarters.com/threads/2004-2010-toyota-sienna-power-sliding-door-cable-warranty-extension-zts.186/. Unfortunately I have a 2008 that is not covered under this extension. I called Toyota directly but they said they couldn’t help. Maybe if more people complain, who knows.
The dealership told me today that I need a new motor clutch assembly ($1300 part) to be able to open it and use it manually. To use it automatically, I also need a new sliding door lock release motor ($250 part). With labor it brings me to $2458, which isn’t going to happen. I a bit concerned about safety with little kids and only one side opening but it doesn’t sound like there’s much hope. The dealer told us we still need the $1300 part in order to just be able to open the door again. I haven’t had a chance to read your whole article John but from the other things I’ve found on the web it sounds like most people just have a problem with the automatic aspect going out. Is there any hope for us to get back manual use of the door without throwing out $1300 for the new clutch assembly?
Elizabeth, thank you for writing and sharing those resources–hopefully they help others. I have written detailed step-by-step tutorials on how to fix both issues you mention, but I’m not positive you need the latch mechanism replaced (and btw: that part should cost you only $84.41–see the parts list in the link I share below). The sliding door cable assembly is less than $500 and the part is linked in the parts list in this article. So if you do it yourself by following my detailed instructions it would cost you less than $600 compared to 4x that amount at the dealer. I would be very surprised if both the door latch motor mechanism and the cables failed at the same time because they really are independent of each other. You can read how to repair the latch mechanism here: http://www.shareyourrepair.com/2015/05/2004-2010-toyota-sienna-slide-door-lock-release-motor-assy-replacement.html If they are both needing replaced you can do them both at once as the instructions to get to them both share a lot of the same steps. Even if you have the dealer repair it for you, buy the parts using the links in my articles, save a lot of money on the parts, and then have the dealer put them in for you–they will do that since they are OEM parts.
Thanks for the great instructions… working again for only a couple hundred bucks.
One comment… when I reinstalled the rear cable it barely fit… looping the rear bracket over the post and rotating into place I was able to make the connection but the cable is very taught. I couldn’t see any adjustment to get additional slack. When in manual mode the door requires more force and I’m wondering if anyone else has seen this or if it’s doomed to fail again because of it.
Thanks
The cable should be tight and like I share in the post, I suggest that you connect them in the order I suggest or you’ll have even more difficulty. As long as the cables are fed through correctly like I specify in step 24, you should be fine. The cables are tight. You mention “a couple hundred bucks.” Did you buy the full part off of toyotapart.com or did you use one of those cable assembly-only parts? If you did the latter, that could be an issue because getting the cables wrapped around the pulley correctly is quite difficult. Let me know what you did. Thanks, John.
Hello John,
Can you provide parts number for motor, please?
Vin: 5TDBA23C95S031064
Hi John,
Can you provide parts number for this motor, please? Vin: 5TDBA23C95S031064
https://drive.google.com/file/d/0B-q2K8IRtaULdTh4RXRoaXg4X2s/view?usp=docslist_api
Phatsakone
Hello John,
I would like to replace this motor
https://drive.google.com/file/d/0B-q2K8IRtaULdTh4RXRoaXg4X2s/view?usp=docslist_api
Can you obtain parts number, please?
Vin: 5TDBA23C95S031064
Phatsakone
Thank you for the question. I can check on that for you. But are you positive the motor is bad? In all the times I’ve talked with people about repairing their Sienna sliding doors I’ve never come across anyone who has a bad motor–all they’ve needed to do is replace the cable assembly and they could take the old motor out and put it in their new cable assembly as I describe in this article. I can see from the picture you shared that the cables must be broken and the plastic housing that holds it all together is damaged, but what makes you think the motor is bad too? I’m just trying to make sure you don’t spend money when you do not need to. Thanks, John.
Hello John,
Thank you for your information
I would like to check parts diagram first.
Can you tell me where to find parts catalog
Vin: 5TDBA23C95S031064
Regards,
Phatsakone
I emailed a Toyota dealer I’m connected with and they were the ones who told me that the motor is not sold separately. You can call Toyotapart.com at (800) 581-3033 and they will give you all the parts information you want for they are an official Toyota dealership.
John, thanks for all the info. I was able to replace just the cable & had the spool cover 3D printed. All for under $30. Hardest part was threading the cable up & loop thru the double pulleys. But once done, it reduced a lot of work…. So can I post pics of my most glorious repair ?
That's outside the scope this article. If you want to upload your CAD files to some hosting site to share with others you can come back and post a link here to share with others. Thanks for your comment.
Good morning John,
I just finished replacing the cables on the left had side of my Sienna. You Rock! Not a single hitch. Even used your electrical tape trick. Worked like magic.Thanks for saving me a grand!
A Boy Named Joe
Thanks for sharing Joe! I'm so glad you did it. Do you mind if I quote your comment in my post? It would be very encouraging for others if they are trying to decide whether they can do this repair or not. Thanks, John.
Sure. Anything that helps. Do you have a tip jar?
No tips required but thanks for offering! Thank you for allowing me to share your feedback. I appreciate the encouragement!
John, thank you so much for your well written instructions, diagrams, and reality pics. I would never have been able to make the repair without them. Especially the tip about using electrical tape on the socket wrench.
Lori, I'm so glad I was able to help–good work on the repair! Doesn't it feel so good to have done it yourself?! Thank you for sharing. –John
John – we need one more edit here – how to best cut the cables if they haven't snapped yet like yours. Our cable was causing problems, but hadn't snapped yet. Where is the best place to cut it when you start this project? Also, I wound up wrapping the ends of the cable with electrical tape so they don't inadvertently scratch any paint as we opened and closed the doors. The door works great as a manual door for now. Time to order my parts and finish the project…
Madeleine, thank you for the comment. You are not the first to request that but you're the first one to do it when I was able to run out to the van and snap some pictures and actually add the pictures to this post. Check out the section below the 7th image on this post, "Question: Can I clip off the broken cables?" I have instructions and pictures for you. Thanks and let me know if you have any other questions when you go to do the repair!
Thank you John! You saved me $1000.00! I finished this job in just over 3 hrs.
David, that's great, thanks for sharing! I just had to tear into mine today again to replace the motor that pulls the latch when you press the door open button on the remote (or any other place in the van when you are not physically pulling the inside or outside handles). You'll have to check back here if you run into more Sienna sliding door problems as I'll have another detailed repair tutorial up in a few days!
Thank you John! You saved me $1000.00! I finished this job in just over 3 hrs.
John,
Not sure if a previous post went through. Sorry for the duplicate if it did. I have a 2008 LE. I recently replaced the latch actuator motor on my right power sliding door, and everything was fine for a week. Now the door begins to move but then won't budge. I can't even open it in manual mode. The cable in your first photo in this guide is badly frayed and broken, but mine looks great, with no signs of fraying or coating damage. They're smooth, black cables. Does this sound consistent with cable assembly issues?
Chris, thanks for the question. These doors are pretty amazing mechanical machines and it can take some systematic troubleshooting to narrow down what is going on. For one, the cables can look fine in one area and then bad in another, so you still could have a frayed cable. Their is one cable that is normally inside the door and protected (the one that goes out towards the front of the van) and another that lays exposed to the environment that goes towards the back, and often is the one that goes bad. Also, when you press the remote button to open the door, an electromechanical solenoid unlatches the door so that the motor can open the doors with the cables. When you open the door by hand, from the inside or the outside, the handle pulls on a cable that physically unlocks the door and the inner and outer doors each have a separate cable (and the end of that cable fits into a plastic piece, which can break). There is also a "track" that the door slides in at the top and bottom (it has metal wheels) and that track must be free of debris. All those areas must be considered. You can determine that it is the solenoid if the door opens fine when you open it with the handle. It seems like you've already replaced that part. You may have not got everything back together correctly if it is giving you problems now, especially since that was a recent repair. Think through this list of things I mentioned and let me know if any of that helps. Thanks, John.
I'm embarrassed that I wrote "Their is one cable." I know the difference between "Their" and "There" but who knows what happens when I type. Let's try that again, "There is one cable that is normally inside…"
Thanks, John. I don't think it's the latch actuator, as I can hear the motor engage and unlatch the door when I push the remote (or pull the handle). It looks like the door is binding at the back. I have checked some of the things on your list, but you gave me some other ideas to look into. Thanks for the advice! I'll report back when I know for sure what's causing the problem. Thanks again.
Chris, my sliding door stopped working this past weekend and I troubleshot the door and figured out what was wrong and wrote all about it… check out this page to see if it helps: http://www.johnfixesstuff.com/2015/05/2004-2010-Toyota-Sienna-Slide-Door-Lock-Release-Motor-Assy-Replacement.html
John,
My side door is stuck open and will not budge. The door started by going about half way closed and then would open back up. The more we tried it the less it opened and now doesn't hardly budge. I've tried switching to "manual" mode but that does nothing. I have also tried disconnecting the battery but again nothing. Without being able to close the door I can't take the side panel off and continue with the steps. Any help would be great.
Aaron, thanks for your question. Although I cannot be completely sure about what's going on with your van without looking at it, I would guess that you can simply cut the cables where they come out of the van door and run around the single pulley where the door connects to the van (as diagramed in step 18). Cut the cables on each side of the pulley (one runs toward the front and one runs toward the back) and that should allow you to shut your van. What I believe is going on is that the cable has frayed and is clogged up inside the tubing that the cable runs inside and is keeping you from opening it or closing it. You will be able to operate the door manually once you have cut the cables. Once you cut the cables there by the pulley you can cut the cable off at the other end where it attaches to the van so you don’t have the cable hanging along the side of the van. Let me know if this helps you. Thanks again for your comment.
John, although I think I understand what you mean to do but in step 18 I don't see a picture for that or instructions. Is that the correct step I should be looking at? Thanks so much.
Step 18 was the right reference but I was just referring to that step because it has a diagram of detail I'm referring to. Your situation is unique, so I was trying to use what i have published here to help. There's a little wheel that the cable runs through at the rear edge of your door, in line with where the cable runs under the lower edge of the rear side window–that is where I'm saying you should clip the cables.
Aaron, Use my "Contact Me" page: http://www.johnfixesstuff.com/p/contact-me.html and send me your email address there I'll take some pictures and email them to you directly to better describe what I'm suggesting.
John, I cut the cable this morning and the door did move forward. Thanks so much for the fast replies and the suggestion. I will work through the rest of the steps and hopefully be able to fix it.
Aaron, that is great to hear. Let me know if you have any other questions when you go through with the repair.
Sorry for the second comment – just forgot to check the "notify" box on the first.
Jordan, I already replied if you read above and I'll just copy my response again here, so we can continue the conversation "with notifications." You're not the first person to do that very same thing!
You will definitely need to determine the cause of the original issue with your door. When you follow my steps on how to remove the interior door panel you will be able to see all the latch components of the door and see what is happening when your door doesn't unlatch correctly. I drove around for a while with that panel removed (just secure the window switch so it's not in the way) when I was waiting for my part to arrive so there's no real problem in taking it off in advance to inspect. Since the door works when manually released I'd focus on finding the solenoid that releases the door when you operate it with the pushbutton or remote. When you determine the issue you can take pictures and sent them to me. Simply use my contact form and give me your email and I'll email you back and we'll go from there: http://www.johnfixesstuff.com/p/contact-me.html
John, thanks for posting this tutorial. For several years my left side door has only operated when the actual door handle (either inside or outside) is pulled. When the buttons on the door jamb, ceiling, and key fob are pushed, the door motor would engage but the latch/actuator seemed to fail to release the door. Then, today, the cable snapped and the door now doesn't work at all. My question is this: I assume I can walk through your steps to repair the broken cable assembly. Do I also need to replace something else to fix the original latch release/actuator problem? I want to make sure that I fix everything all at once.
Thanks,
Jordan
You will definitely need to determine the cause of the original issue with your door. When you follow my steps on how to remove the interior door panel you will be able to see all the latch components of the door and see what is happening when your door doesn't unlatch correctly. I drove around for a while with that panel removed (just secure the window switch so it's not in the way) when I was waiting for my part to arrive so there's no real problem in taking it off in advance to inspect. Since the door works when manually released I'd focus on finding the solenoid that releases the door when you operate it with the pushbutton or remote. When you determine the issue you can take pictures and sent them to me. Simply use my contact form and give me your email and I'll email you back and we'll go from there: http://www.johnfixesstuff.com/p/contact-me.html
I have a 2007 Sienna, and it is having issues with both of the sliding doors. Thank you so much for this information! I will definitely use it when I fix the snapped cable on the passenger/right power sliding door.
But I am also looking for assistance with the driver/left manual sliding door. I cannot get it to open, regardless of which handle (inside or outside) I try. And unfortunately, I need to open the door to be able to remove the inside panel, to see what else is going on. I tried the suggestions to push out on the front and back of the door (from the inside) while simultaneously pulling the handle from the inside. I cannot even get a "click" like the latch is engaging. Is there any "emergency" way to get the latch to release? Any help/suggestions would be most appreciated!
Thanks,
Tim
Timothy, thank you for sharing what is going on with your Sienna. I have not heard of this issue before and my van has the 2 power sliding doors so I have a different van. I'm checking with my Toyota dealership contact and I will relay what they say when I hear back from them.
Tim, here's some questions for you… How does the lock feel? When you go lock to unlock, does it feel normal (or like there's no resistance)?
The door lock feels normal. I compared it to the other sliding door that works (power, passenger/right side), and it feels the same. Also the power lock does move the lock tab.
— Tim
And when you pull on the door handle (both inside and outside) how does it feel? Is there something to it? These door latches are operated by a bunch of cables.
Tim, the consensus is that you are going to have to do your best to pry off a portion of the interior door panel to get access to the cables/mechanism that release the door lock. I would start on the lower front corner of the door and pull till the tab that is screwed down breaks free and work your way along the bottom. Study the pictures I have on this post so you're aware of the screw locations. You must get to the door latch mechanism to get the door open. The door will be fine if you are able to get it open with only breaking off that one screw tab–it's not critical to the plastic door panel staying on the van. One thing to keep in mind is that the top of the plastic interior panel hooks down over the edge along the bottom of the window. Maybe you should repair your sliding door cables on the other door and use that to study the way the door fits together and then tackle the door that won't open.
Hi John,
To answer your previous question, the handles (both inside and outside) do not feel like it engages. There is tension on the handle — it is not like it is just moving loosely. If one side is pulled and then the other is pulled, there is a slight "click" to pulling the second handle.
And in response to your most-recent post, this was my fear — that I would just have to rip out the panel to get access. Although, your suggestion does not make it as bad as I was fearing. (I had visions of having to go at it with brute force and/or a sawzall!)
Do you know if the latch can be engaged by something like a slim-jim?
Thanks again,
Tim
I haven't studied the locking mechanism that closely because mine hasn't broken on me, yet. I would be pretty confident to say that you're not going to do anything but possibly damage your van further by fishing in there with a slim-jim—I would not recommend it. Vehicle designers have long ago made vehicles immune to the old fashioned slim-jim break-in. It really is pretty simple to get the inner panel off of the passenger's side so you could always just take that one off to study the inner-workings. The door handle latch mechanism should be pretty similar, albeit a mirror image to the driver's side. So, I am confident you won't need a sawzall! It may take a hard tug though.
Thanks, John. So, you think I can pop the panel retaining clips off the door, shattering just that one screw in the bottom left corner? Might that give it enough flex to be able to see the latch mechanism? I believe that the panel will still not fully come off until the handle & trim assembly are removed, which are held by the two screws on the edge of the door (currently hidden from access). Or will the panel slip out of the trim piece of the handle assembly?
Thanks again,
Tim
Tim, here's something to consider on your door that won't open… Instead of trying to break the one lower tab off by pulling on the inner door panel I would suggest using the other door to locate where the tab is, and then sliding a chisel in the seam at the bottom of the door and tapping on the chisel with a hammer to cut the tab off. You should be careful but you can probably knock off that tab that way and "control" the break versus pulling until the door panel breaks at the weakest point, and who knows where that will be.
John, I was thinking of removing all the power stuff in my right rear sliding door and just making it a manual opening. Any thoughts?
Well guys, I'm pro-fix-it but converting it to a manual door is a valid option too. The right way to do this would be to cut the cables off as short as you can where they come out of the door (one will be shortest when it's open and one when it's closed) and then remove the inner door panel and unplug the electrical connector from the motor. You may want to tape the loose connector to something so it doesn't rattle inside your door. Then you can put it back together and continue to operate the working door and then not hear the popping noise caused by the loose cable being turned inside the door when you operate this disabled one in manual mode.
I forgot to request that I be notified on responses, sorry! If you reply to this comment I believe that I will be notified.
Warmly,
Paul
Paul, thank you for the feedback. You can clip the cables anywhere you can get a hold of them and then once you have a loose end, cut the cable off as short as you can (trimming off the loose end). The ideal place to cut them is as close to the "pulley" on the rear edge of the door (as seen in the first diagram in step 18). Then you'll need to cut off one on the side of the van. When you open the door one end of the cable reels in and one reels out. To cut off the cables you'll need to cut one end off when the door is closed (the one that runs towards the back of the van) and then the other end when the door is open, which runs from the door forward along the plastic groove along the edge of the van. What's probably happening in your case (if you do hear the door unlatching when you pull the handle) is that the frayed cable just won't fit back into the cable "hose" that it runs into. You may need to use quite a bit of force to get it to pull the frayed cable back into the cable "hose." Hopefully this helps. One thing to note is that even in manual mode, the cable does need to slide in and out of the assembly–the motor just doesn't try to operate in manual mode.
John,
First off thanks so much for posting this incredibly helpful tutorial. You are a truly good guy for sharing your expertise, not to mention answering followup questions! I hope I will be able to pay it forward in some way.
I have a 2006 XLE and the passenger door is jammed for well over a year now. I am not able to open it at all either manually or in power mode, the motor makes a sound like it's starting but nothing happens. I have tried your suggestion of fiddling with the interior door handle and applying pressure to front and rear edges of door with my feet, in both power and manual switch mode with no luck opening so far.
As of today the driver door cable has begun to fray. I doubt it has two days left working, it's very difficult to slide as of now, and making lots of grinding/clicking noises from the cable (doesn't sound like motor noise) when doing so.
I would like to convert both to manual, as I don't have the money to purchase the replacement parts at this time. I would have preferred manual to begin with, for exactly this reason (doors, seats, and windows to be honest).
I reviewed step 18 as mentioned, and didn't see cable clipping mentioned. Did I overlook it? My question is where do I clip the cables? And should it be done with the door open or closed? Do you recommend trying to get the passenger door open prior to clipping cable, or just go ahead and clip it while it's still "jammed?" Is the "manual conversion" just clipping the cables and pushing the button to turn off the power doors? I'm assuming that I should leave power doors switched off once cables are clipped. Any advice you can share would be so greatly appreciated!
Thanks again, with warm regards and respect,
Paul
Sorry John, still not tracking. I didn't break any pieces. The trim piece survived both removals and reinstall actions. No white clip pieces were lost in the process.
John,
I got it. Step by step was HUGELY helpful. Thanks so much. Right side fixed, left side hasn't broken yet.
2 things. First, for those who haven't had one break yet, an annual wd40 application seems to keep the exposed cable sections from rusting out (seems to be working on my left side).
Second, the right side door I just fixed is 99% fixed. The last 1% is slightly problematic. The door opens on it's own all but the last 1mm needed for the rocker on the bottom door slide arm to engage the pin in the door glide. That rocker is what tells the door computer that the door is open and to stop hold it there. Without that rocker engaging the door stalls all the way open for a second and then starts closing again. My 7 year old won't be very pleased by this issue. I can engage the rocker by physically pushing the door backwards as it reaches the fully open state, but it won't engage on it's own. I can also easily move the rocker with my finger and lubed it up pretty well just in case, which didn't help.
Do you know if I can adjust the pin that the rocker engages a little forward so that the rocker will rock?
Darin, thanks so much for sharing about your successful repair and for the challenge you yet face. I'll have to take a look at my van to see if I can make any suggestions because I did not run into the issue you are having. The one issue I did have when I repaired the second door on my van was that when the window is rolled down the door will not lock in the open position. If you roll the window up, then it will. That puzzled me greatly when I was doing the repair because I only have the window down when I'm doing the repair. There is a gear that turns when the window goes down and it trips a switch that disables that latch and the door hits a bar that gets in the way of it opening all the way. I'm not sure if that gives any insight. I'll have to take a look at my van here in the next couple days and get back with you. Thanks again for sharing Darin.
I figured it out in bed last night and fixed it this morning. On step 34, if you completely remove the tensioner bracket, which I did, you need to take note of where it is on the bolts. Both bolt holes have play in them, which effects where the little bracket bumper lines up. Mine was using the post as it's starting point, but I needed to pull it towards the rear an extra mm to get the bumper in the right place. I just removed that annoying trim piece again, loosened the 2 torque bolts, held the bracket backwards as far as it would slide (about 1mm) and re-tightened the bolts. Hardest part was getting that stupid trim piece on for the 2nd time.
I might suggest the following addition to step 34 above: Install the tensioner bracket bolts and before completely tightening them, slide the bracket toward the rear of the vehicle as far as you can, then tighten the bolts completely.
I'd also suggest waiting on re-installing the trim piece until after you have tested the door for proper operation, in case further adjustments are needed.
Thanks again John! Couldn't have done it without you!
Darin, you are so welcome and thanks for sharing how you solved your problem. I will definitely add some details to step 34! I'm so glad you were able to fix your Sienna yourself–good job!!
Darin, can you please give me as many dimensions on that part that you can measure? I contacted Toyota and they say that they don't have a part number for that clip, because it comes with the plastic panel that it holds on the door. The guy was going to check for me to see if they had any laying around if he had some measurements. Thanks, John.
John,
Which part? The tensioner bracket?
No, sorry, the white plastic clip that broke. I actually used double stick foam adhesive to re-attach that plastic piece after I broke the black part of it (the clip survived in my case).
Sorry Darin, got the different commenters mixed up 🙂 I replied to the wrong person–ignore my reply. Thanks again for sharing though.
Is it necessary to go through all the steps to clip the cables as shown in Step 18. I'd be happy to have the door in manual mode because right now it won't move at all even with the switch off. However, it does close electrically at the back of the door. It's the right door that's having the problem. Thanks for your help.
Larry, you don't need to take anything apart to clip the cables. Simply clip them off as short as you can and the door will operate in manual mode. If someone hits the button to open/close the door you'll probably hear some popping and scratching inside the door but that should be pretty harmless as the motor is just spinning the lose end of the cable inside the door and hitting the shattered pulley cover, etc.
HI. Great article and pictures. I have a question. On the Rear sliding door window frame moulding sub-assembly, there two clips that holds it in place. I broke the two clips. The claw part on the moulding is fine but the clips are snapped. I can't find the clips anywhere. The clips you have linked via amazon in your article seem really big and are for the door panels. any idea where to buy the small clips for the rear window moulding? Thanks for your help
Duwayne, thank you for the feedback. That is interesting that those clips broke because they are made out of spring steel which is pretty tough. I don't think you can buy them separately for they are a part of the rear sliding door window frame moulding sub-assembly. I will check with my Toyota dealer contact and see if you can order them separately and get back to you with what I learn.
You can order those clips separately and the part number for each one is 90084-46035, so you'll need to order two (2). I added a parts diagram above in step 1 detailing the clips and how to order them. They are only $.44 each and you can get them directly here: http://www.toyotapart.com/90084-46035.html
Hi, John,
Just an update, I ordered the part above but it is the wrong part. I received a metal "s" clip but what I am looking for is the white clip you show in the photo labeled "Top clip of the exterior window trim" in the photos above under the section you talk about removing the rear window trim. The white clips that go in the little hole in the door and then the trip slides down and locks on too. I have a photo I can send you. By the way, The people at Toyotapart.com are very nice. Thanks.. D
Duwayne, I'm really sorry about that–I really thought you meant the metal s-clip. I have already contacted toyotapart.com and will get you the part number/link for that clip you need. Thanks for getting back to me.
Duwayne, can you please give me as many dimensions on that part that you can measure? I contacted Toyota and they say that they don't have a part number for that clip, because it comes with the plastic panel that it holds on the door. The guy was going to check for me to see if they had any laying around if he had some measurements. Thanks, John.
Hi John, this is a great DETAILED step by step DIY sliding door fixing tutorial.
Thank you for spending all this time and effort posting this solution
I have one question for you, for now anyway. I tried closing the powerdoor after the cable broke and now the door is jam shut. I didn't know the cable was broken at the time but now i can't open the door from outside or even push it out from the inside. Can i have access to the door motor from the inside even if i can't open the door? Can i even remove the door panel while it's shut?
Any information would be greatly appreciated.
Thank you in advance and thank you for helping us save some coinage.
Thank you for the feedback. I found myself in your exact situation on one of my doors. You cannot remove the inner door panel without opening the door because there are screws holding the inner door panel that cannot be reached when the door is closed. I think you can still get your door open. First I would caution you from pulling on the exterior door handle to try to open your stuck door–you can easily break that handle off–only push on the inside of the door (the same goes if you live in a cold climate where the doors tend to freeze shut). When I was in your situation I believe that I sat down in the middle seat and put one foot on the rear/back end of the side door and the other foot on the front end of the door and used my hand to push the inner door latch while I pushed out with both feet–you get the idea. I could have done the same thing with the help of another person but I was working on the van by myself at the time. What is happening is the frayed cable is not wanting to slide through the plastic tubing it runs through. You can get it open. Once you do then make sure to cut off any excess cable as short as you can to keep that from happening again. Let me know if this solves your problem and if you have any other questions.
Thank you John for the info. I managed to reopen the door by pushing myself against the seats and it finally opened. After it was opened i cut the wire so it would't happen again.
So that being said, how long did it take you from removing the panel to re installing it?
Thanks again for the prompt response btw.
Thanks for letting me know it worked–great to hear.
If this is your first time doing this repair I would probably allow yourself at least 3 hours to complete it and take your time and follow the steps I've outlined. I would read my entire post and get all the parts and tools together in advanced so you don't create easily avoidable delays by not being prepared when you dive in. One thing to note: You can operate the van just fine with the inner door panel off and the door motor out (and I did the first time till the part came in).
I ran into different issues each time I completed this repair, which made it take longer than necessary but if you read my post in advance you can save yourself some time and not make the same errors I did (and share in the post): tearing the rubber gasket off the lower window trim piece (Step 13), forgetting to put the plugs back in the door that cover the window bolts (step 29), getting the window channel twisted up and not having the window roll up all the way once you get it reassembled (step 29), breaking the rear sliding door window frame moulding because I didn't slide it straight up to disconnect it (Step 15).
I'd suggest working on your van in a safe, secure, well lit area where you can step away for a bit if necessary to get a part or tool or to take a break. The first time I did it I was inside a garage but the second time I pulled it into my back yard and shut the gate. Even if it takes you 3 full hours to do, you are saving yourself over $300/hour versus taking it to the dealer and your second door is probably going to go and you'll feel plenty confident to do the second one on your own once you've been successful on the first one. Let me know how it goes and please let me know if you have any other questions–even during the repair–I respond to most questions during daytime hours within the hour.
One thing to note about operating the van with the inner side door panel removed: make sure to secure the Multiplex computer in place so it doesn't scrape the side of your van when you open the door (and check for anything loose and out of place in general before closing the door).
Excellent, i need to order the part now and find the time to do it. This tutorial is a HUGE help not to mention the live support. lol
I'll keep you and the folks coming to your blog posted.
hi John,
I appreciate your effort in posting such a helpful and awesome step-by-step. I will need to follow it to have my door fixed. one thing I m not sure .. you have a picture "Shattered pulley housing", it is broken plastic part, does the part you ordered from toyotapart contain this piece, or this is something else to order? Thanks very much!
–Ran
The shattered pulley housing piece comes with the new part. Yea, don't worry about it, the new part has it on.
GREAT!! Thanks for your prompt confirmation!
Great post! Thank you for your effort!
Question: I found a cheaper cable assembly on ebay:
http://www.ebay.com/itm/Power-Sliding-Door-Cable-Assembly-w-o-Motor-04-10-Toyota-Sienna-Passenger-Side-/141087743464?pt=Motors_Car_Truck_Parts_Accessories&fits=Make%3AToyota%7CModel%3ASienna&hash=item20d97c1de8&vxp=mtr
Would you use such thing in your car?
Thanks for your comment and question. That assembly is not the entire part–by purchasing that part you linked will require you to assemble part of it yourself and very carefully wrap the wires around the pulley and then re-assemble it. They state "ready to install" but that is not true–it is ready for you to take out the current cable assembly on your van and deconstruct it and then install this portion of the part into your old part and only then install. It will be more work to install using that part and, although I am aware people are selling "part of the part" I would suggest buying the full part instead. It is a big hassle to wrap the cable correctly around the pulley and get it installed into the cover. I was forced to do it when a part I ordered off ebay had come disassembled but I don't recommend it and even the official Toyota shop manual states to discard the part if you accidentally have the pulley come out. So my opinion is that I would avoid using this part for all the extra work involved–it's not worth it in my opinion. Thanks again for commenting and please do let me know what you end up doing and how it turns out for you. Please feel free to ask any other questions you have.
John thanks for providing all this info, it really helped, I was able to replace my cable with no issues, although the door still goes very slowly right before it closes… suggestions would be appreciated. I also have a couple of suggestions for your readers:
On step 24, make sure you slide the door forward enough to see how the new pulley unit fits into place in the hinge. I had one heck of a time lining up holes until I did this.
Also, instead of tape on the screwdrivers, I bought a 5-piece plastic Auto Trim and Molding Tool Set for $7 at my local Harbor Freight. A great investment and you'll find tons of uses for these inexpensive tools designed specifically not to scratch when removing all kinds of trim. Thanks again!
You are so welcome, thank you for sharing about your success. As for your suggestion about Step 24–let me make sure I understand–are you saying that you had the door open too far to be able to see the pulley in order to guide everything into place? Your suggestion is to close the door slightly so you can better align the holes up? Let me know and I'll add clarification to that step. Thanks again for sharing!
Yes, to more easily align the holes, be sure you close the door enough so the top of the hinge is clearly visible and you can see how the pulley fits into the hinge. I had the door open too far, and I didn't see the tab at the top of the pulley wasn't thru the hole in the hinge. It was still a challenge to line up the holes, but pulling the door shut more made it easier.
Ok, great, I added your comment below the picture on step 24–hopefully this helps the next person, thanks! Each time I do this repair I find myself in new situations that require readjustment and hints like yours are very helpful. Thanks, John.
John, a quick update: Took your advice and ordered the part from Toyotaparts.com. Spent time today installing. Took about 4-5 hours with time lost looking for the window nut you said not to drop down the window (happened twice). Took a good 30-45 min to get it out the first time and about 5 min the second time. Not a difficult repair but very tedious. Thanks for your instructions and advice. I hope to never do it again.—Steve
Steve, thank you for sharing your experience–I'm so glad I was able to help you save a lot of money by doing this yourself. And it is even easier the second time you do it! Those cables only last about 10 years, depending on usage of course. If one went out the next one probably isn't that far behind (and mine both went out within about 7 months of each other). If you have friends with Siennas you can volunteer to help them do theirs now 🙂 Thanks again for sharing!
John, Great instructions. If I get the replacement part for the LH side from ebay, is it difficult to mount to the motor shaft. Looks like I have to wind around a pulley which I have to reuse(?) Is that worth it for a $175 savings?
I do not have any experience in only buying the replacement cables only, I've purchased the complete part both times. I foresee problems for people buying the cables only because you must thread the cables through the part and then you have to crimp ends on each end and those crimps are small but must be very secure, for they sit down into the pulley that sits down on the motor shaft. I would suggest buying the whole part and not messing around–you want to replace the part and not need to worry about it for another ten years.
Hi John,
So I'm trying to educate myself as much as possible, as both my doors are currently inoperable, and I'm taking it in for the required diagnosis tomorrow. Here's what I know. Both doors, I can see the black plastic sheathing is ripping off the cable, which, is why I'm assuming the doors won't work. (After the first one broke in January, we put doors on manual.) We are assuming it is NOT the motor, since today the door broke w/o the use of motor, just by me opening the door. However, in most of my research, it seems this is a big scam, by Toyota dealers saying it's always the motor. I'm wondering, is there any way the black plastic sheathing could get caught in the motor, or does it get stuck in a different part? (Where does it get stuck?) (You may have mentioned this and I didn't catch it, as I'm trying to skim since I have 3 littles running around.) Just trying to know as much as I can before I go in tomorrow so I don't get caught in their little money maker.
THANKS!!!
The sheathing can get wedged in the cable assemblies and it can have nothing to do with the motor. You can actually just cut the cables off and in will operate manually (but just slide easier than if the cables are installed). When you have the cables installed and the system in manual mode you are actually turning the motor over with the cables as you open/shut the door. If the sheathing of the cables gets caught up in the spool and/or the piping that the cables follow, then that may impede you opening and closing the door manually. It's going to be an expensive estimate at the dealer for sure. Let me know if this doesn't help or if you have other questions.
Thank-you John! Surprisingly, (I think because I went in knowing what I was talking about), the Toyota dealer I am working with is VERY accommodating and exceeding all my expectations. Since the doors broke in manual mode, they are currently replacing the cables at no cost (under the extended warranty), and will then see if the motors work or not (which they should since they were not in use when doors broke). Thank you so much for this article and your response! I was able to gain a wealth of knowledge before my "diagnostic appointment", thus lowering my chances of getting scammed 🙂
That is great to hear–thanks for sharing how things turned out. What year is your Sienna, btw? I can make a note of your story in my post to alert people to try to get it covered by warranty.
I am visiting a friend out of town and realized his dealer quoted over $1500 for this door repair. I am glad for sites like yours that can help the unaware consumer with in-expensive options to self repair or find affordable options, other than lining the pockets of the dealerships.
I'm glad it was helpful. I just wish I could have read my blog post before I had to tear into my van!??! It's so nice to be able to see what's coming up ahead. I'll need to use this post when I repair the other door when it breaks here in the next few years.
John, my 2008 just broke and they quoted me 2150 for the repair. I am considering doing the repair on my own, although I am just considering removing the cable assembly and using the door as a manual door. Can you forsee any reason why that wouldn't work? Also, do you think that i could just disconnect the power sliding motor on the broken cable side (driver's side) and have the power function still work on the passenger's side while manually using the driver's side?
You could definitely do that. You could also avoid taking your door apart and just cut the 2 cables off (right where they exit the door by the top pulley shown in step 18 and use that door manually. You'll need to slide the door manually open and closed while pulling on the cable to get it cut off as close as possible. If you were to push the button to open that door it just won't open.
John, So glad to have found your blog. My 2006 Sienna left power door cable just broke. I used it manually once. The second time I tried to open it and the door won't open. I turned off the power door and tried again and no luck. My cable has already snapped and I heard something fall near the back of the door so not sure what broke there. I noticed the part was $458 at that site. Is that the cheapest option?
Thanks John. The steps are great. It looks challenging but it can be done.
You are welcome, and please feel free to ask any questions if anything is unclear or you run into a snag.
Hi John – this is an excellent and informative article, thanks for posting. I have a 2004 LE Sienna and the door was jammed open. My plastic motor housing is not broken so I might try and replace cables only (prefab at a cable shop). Otherwise the more likely scenario is to turn it into a manual door. 🙂
I've looked at the replacement cables on ebay (for about $60) but have been hesitant to go that route. First, I don't think it will save you any time or work by replacing only the cables because I think you'll need to completely remove the cable assembly to feed the cables back through the system. Also, the cables cannot have the little piece on the end that terminates the cable and slips into the pulley because you must feed them through the cable shields first. I'm a bit concerned that they won't be on there tight enough (if they are not factory crimped) not to come off. If you go that route I'd be interested in hearing how it goes. My second door cables haven't broken yet but the plastic coating is all worn off and their days are numbered. I'd be willing to try the replacement cables if I found someone's story of it being worth it. I haven't found anyone reporting on that repair on the web anywhere. Keep me posted please.